HOME | DD
 icycatelf — Level Star Template (PSD)
Published: 2016-05-06 12:25:50 +0000 UTC; Views: 20321; Favourites: 111; Downloads: 1745
Redirect to original
Description
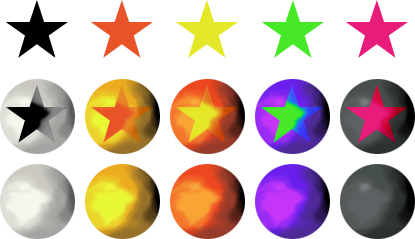
Someone requested this. Not perfect, but should work well enough for custom Level types. The template only includes the normal (middle) base—the recolors in the preview are only examples of what you could do with it.INSTRUCTIONS:
Use "Image - Adjustments - Hue/Saturation" to change the colors (don't check "Colorize").
When recoloring the base orb, recolor these layers with the same settings: Base, Shading, Highlight, and Star Saturate 1
When recoloring the star, recolor these layers with the same settings: Star (back), Star (front), and Star Saturate 2
(Some changes may be required. "Image - Adjustments - Levels" can help restore lost shadows if you brightened it, or highlights if you darkened it.)
- - -
Want to add your own custom symbol instead of the default star? Here's how:
- Un-clip all the layers by holding option/alt with the curser between the "Base" and "Star (back)" layers and clicking.
- Hide every layer with "Star" in its name.
- Select the "Star (back)" layer (keep it hidden). Paste, scale, and position your new symbol (must be opaque and have a transparent background). Do a Color Overlay layer style with yellow (#dde222 ). Create a new blank layer, then merge it with this layer to flatten the layer style. Name this layer "New Symbol (back)."
- Duplicate the New Symbol (back) layer 3 times and drag the copies above the "Highlight" layer. Name these layers "New Symbol 1," " New Symbol 2," and "New Symbol 3" (down to up).
- Duplicate the "Shading" layer and drag the copy above "Symbol 1." With the curser between these layers, hold option/alt and click to clip the shading to the star. Select both layers and merge them. Change the blending mode to Overlay and opacity to 30%. Name this layer "New Symbol Saturate 1."
- Select the "New Symbol 2" layer. Change the opacity to 25%. Using the "Shading" layer as a guide, erase the parts covered by the darker shadows to the right with a size 13 soft brush (30% opacity). Rename this layer "New Symbol (front)"
- Select the "New Symbol 3" layer. Change the blending mode to Saturation. Rename this layer "New Symbol Saturate 2."
- Hold option/alt and click between each layer (starting at the bottom) to clip all the layers to the base circle.
- Be sure to save the file (as a PSD), then recolor it as desired.
- - -
Yu-Gi-Oh! is ©1996 Kazuki Takahashi.
Related content


Comments: 14

👍: 0 ⏩: 0

Can I use this for a full Series 3 Template? This is the only old level template I'm finding.
👍: 0 ⏩: 1

Sure, just note that it isn't 100% accurate.
👍: 0 ⏩: 1
Eh, don't worry about that, looks hella fine to m3
👍: 0 ⏩: 0

That's very helpful
How can I reproduce dark synchro monster stars ?
👍: 0 ⏩: 1
It isn't absolutely perfect (there should be a bit of a shadow where the star starts blending into the background), but this looks pretty close:
Base: Hue -155
Star (back): Hue -160, Lightness +5
Shading: Hue -170, Saturation +25
Highlight: Hue -170, Saturation +25, Lightness +5
Star Saturate 1: Lightness +100
Star (front): Hue -160, Lightness +5 (decrease layer opacity to 75%)
Star Saturate 2: Hue -160, Lightness +5
You could also shift the hue of a regular Level Star to -165 (which gives it the shadow effect mentioned above), but the right side of the star isn't light enough. I guess you could try both methods and stitch them together somehow.
👍: 0 ⏩: 3
I try to reproduce Xyz star
Base: Lightness -100
Star(back): ok
and I hide Shading, Highlight, Star Saturate 1, Star (front), Star Saturate 2
I'm not an expert so I don't know if it is really good. Do you have an other configuration ?
👍: 0 ⏩: 2

👍: 0 ⏩: 0
I can't remember which settings I used to create a black base, but you can make a Rank Star by piecing together parts of my preview image. Copy the plain black orb into another document, then paste any of the complete orbs on top of that. Afterward, copy one of the plain stars from my preview and paste it into your document and shift it to line up with the star on the complete orb. Hide or delete the complete orb. Copy the plain yellow orb from my preview and paste it into your document (above the star layer) and click between the yellow orb and star while holding Option/Alt to clip the orb's texture to the star shape.
👍: 0 ⏩: 0
Thanks a lot, that's almost perfect
 (Wink)")
👍: 0 ⏩: 0

So in addition to level star, rank star, and dark synchro star, there is one more star and that is the "Collectors Rare" star. If you have these 4 stars then it includes all the different possibilities in Yugioh.
👍: 0 ⏩: 1
Collectors Rare stars are just the other stars with a Parallel foil over them (or, in the case of proxies, a rainbow gradient). Paste and clip this over your Stars at 50% opacity (scaling as necessary) for proxies.
👍: 0 ⏩: 1