HOME | DD
 ItsaBumbleDee — Pokemon Needle Felt Eyes Step-by-Step tutorial
#charmander #pokemon #squirtle #pokemoneyes #needlefelttutorial #needlefelteyes #needlefelted #needlefelting
Published: 2015-12-03 02:53:23 +0000 UTC; Views: 22131; Favourites: 77; Downloads: 90
Redirect to original
Description
Hi everyone! This is my step-by-step guide on how I needle felted the eyes onto my Squirtle and Charmander . I do not profess to know a lot about felting (I’m a complete beginner); there may well be better ways of doing it but this is just the way I achieved the eyes. If you have any suggestions or advice please add them in the comments
Process:
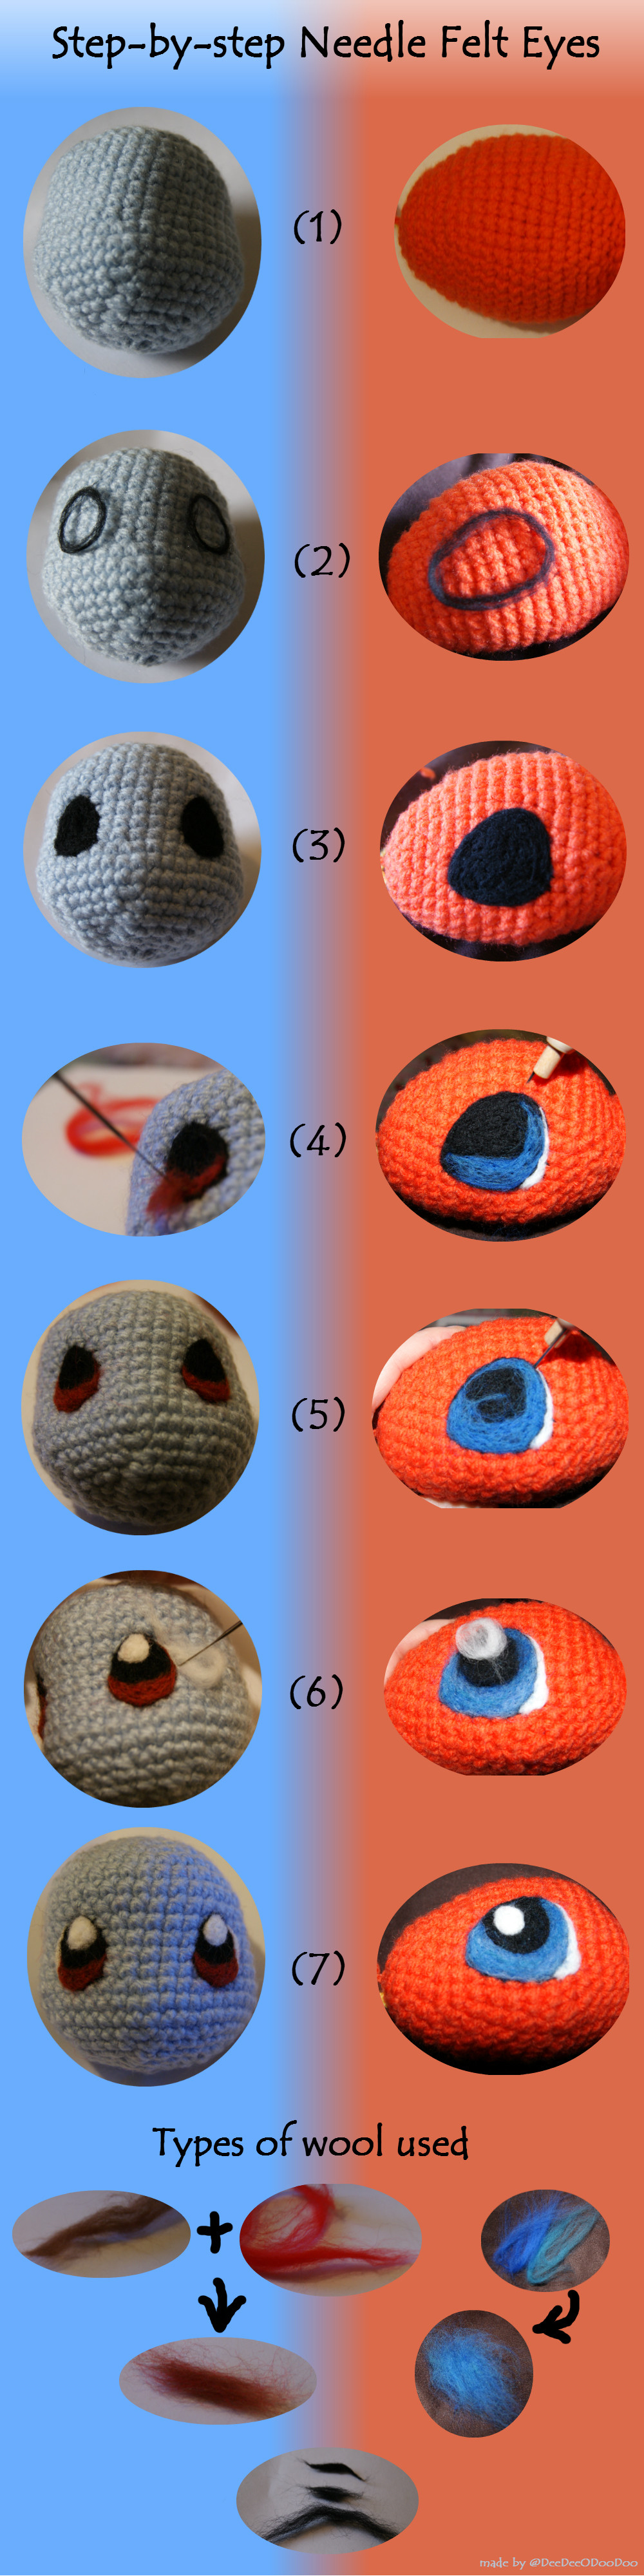
Step 1: Gather all material – plushie; felting needle; different coloured carded wool. I worked on a cushion to help hold the head into place.
Step 2: Using thin lengths of wool make the eye outline. Poke the needle through the plushie along the outline of wool while guiding the wool into the desired shape.
Step 3: Once happy with your outline begin to fill in the area with the base colour, eg black, until it’s all the same thickness and no yarn is visible.
Step 4: Begin adding the layers of coloured wool to get the shape of the iris. I used mixed colours for both plushies and added a little white over the blue for Charmander as I went along.
Step 5: Once you have enough colour it’s time to clean up the eye and give it definition. You can twist a length of black, curve it over the iris edge and using the needle poke it into place. This gives a well defined outline to the pupil. This is great especially if you over did it with the colour like I did for Charmander!
Step 6: For the white inner eye I shaped the wool into a circle and then built the layers up. For the white along the edge of the eye I used a length of wool, worked from the edge of the eye outwards and shaped it gradually.
Step 7: Finished! You should have really cute realistic looking eyes.
Types of wool used:
It doesn’t matter if you’re limited with colours – much like paints you can mix the wool to achieve whatever colour you want. I mixed brown and red to get a nice auburn colour for Squirtle. For Charmander I found my blue was too stark, I wanted a more natural toned blue colour. For this I mixed blue and a kind of teal colour. This resulted in a beautiful shimmery blue.
To mix simply take both colours between your thumb and index fingers of both hands and pull apart, then place both sets of the wool on top of each other; repeat and repeat until wool is so well mixed that you can’t identify the original colour as shown in the pics.
I’ve also included the different ways to shape the wool for. You can have long loose strands, short pieces or rolled up lengths as well as circular shapes as shown in step 6.
Hints!
Tip #1: Work on one eye at a time, one step at a time. Only once you’re happy with both eyes proceed to the next step. That way you’ll have a more consistent result.
Tip #2: If mixing wool to get a desired colour make sure to mix a batch large enough for both eyes. Otherwise you could end up with subtly different coloured eyes tones.
Tip #3: Symmetry is important and it can be tricky to keep both eyes the same shape! When positioning the eyes try to position the top and base of the eye on the same row of stitches. To maintain the same eye shape try to cover the same number of stitches.
Thanks to – I was working off her Squirtle and Chamander patterns.
Related content


Comments: 39


Awesome! Thank you. 

👍: 0 ⏩: 1

It's great my tutorial might help. Be sure to share your work with us!!
👍: 0 ⏩: 1
Thank you, I will! ")

👍: 0 ⏩: 1
Good luck! Make sure to take care too, be gentle when stabbing the plushie as you don't want the needle to bend and crack!!
👍: 0 ⏩: 1
Thank you!
I hear that tip often, so I bought a big replacement package of needles before I even started.

👍: 0 ⏩: 0

Hi - I never used needle felt in my life.
So... I just take some of the yarn that I used for example for my amigurumi and kinda rip it apart, or do I need some sepcial stuff? I don't get where the material for the eyes comes from, sorry, I am a complete beginner D:
Otherwise a great tutorial - Iwill use it, when it's time to get the eyes on my first amigurumi!
👍: 0 ⏩: 1
No problem at all and thanks for bringing this to my attention - I have now amended the tutorial.
I use carded wool. This is wool which has been combed so that the fibers are aligned in the same direction. It's really soft and is basically wool before it is spun. It's readily available to buy. But if you didn't have carded wool and only had wool yarn perhaps you could separated it using two fine carding brushes. However I imagine using carded wool would probably give the best results.
Delighted to hear you might try needle felting for your own amigurumi - I look forward to seeing how you get on
👍: 0 ⏩: 1
Ahhh thank you very much for your explanation!  (Smile)")
I try to find out what it is called in German and where to buy it. It probably will be quite a while, till I get down to do this stuff, but I will definitly keep you posted, when I finish something with your needle felt technique!

👍: 0 ⏩: 1
No problem, glad I could help. I ordered my needle felting kit on ebay and it contained everything I needed, from needles to different coloured carded wool
👍: 0 ⏩: 1
Ohhh that's a brilliant idea, I already looked it up on ebay and there are pretty cheap sets, awesome!!! Thanks!!!
👍: 0 ⏩: 0

I always wanted to try needle felt, it's a really cool tutorial! 
")
👍: 0 ⏩: 1
Thank you! Needle felting is really cool and so effective for detail if you make plushies!
Yeah you can mix wool to get a desired colour! I had no choice because I didn't have auburn and just gave mixing the wool a try and was really surprised how well it turned out.
👍: 0 ⏩: 1
That sounds pretty good, thanks for the tip
👍: 0 ⏩: 1

Thank you for such a detailed tutorial.
It must have taken both a steady hand and a lot of attention to details. I think that's a great way of showcasing a step-by-step tutorial. And the photos you have taken did a great job with conveying what you want to show and say. So overall, you did a great job!
The only thing I can think of that might make the tutorial a little better is perhaps to add a few words in the image itself. I know you have a lot of things you want to say with each step and that can be difficult to accomplish in a tutorial, but the words in the "process" section doesn't seem excessive. If you put the words in the middle between the blue and red pictures, the reader wouldn't have to flip back between the pictures and the words. It might make the tutorial even more effective.
But you already did such a good job. It's really hard to ask for more!

👍: 0 ⏩: 1
Thank you for taking the time to write such a detailed comment and I really appreciate your kind comments about my technique
After reading your's and others' comments I think I will add more words/sentences on the actual tutorial if I make new ones and who knows I just might redo this one and update it if I have the time. Thanks!
👍: 0 ⏩: 1
You are more than welcome! It's my pleasure, really.
It's actually harder to write a tutorial than first meets the eye. I think you did a pretty good job with the photographic side of things already. A little bit of words integrated into it would have made a stunning and effective tutorial. I hope you'll make new tutorials in the future, I'll be looking forward to them!
👍: 0 ⏩: 1
Thanks for all the feedback!
👍: 0 ⏩: 1
You're more than welcome!
👍: 0 ⏩: 0

This is a very interesting tutorial, I love that you didn't show just one way to do it, but two with different colors and designs

👍: 0 ⏩: 1
Wow, thanks for so much feedback!
I too also prefer tutorials which have the instructions right next to each photo, it's far easier to follow! I remember trying to format it this way but found I had too many sentences. Next tutorial I'll see if I can make it more concise
👍: 0 ⏩: 1
No problem, I hope it helps! I felt the same way with my first tutorials, I wanted to add more information and made super long sentences. I ended up realizing that it's best to "show, not tell", so if you feel that you need to explain more you probably need another photo instead. So I try to make it 2-3 sentences per photo, explaining only what's going on with that photo. I've found that people love tutorials with lots of photos and short, concise explanations... because they're lazy, and they'll just scroll past walls of text
👍: 0 ⏩: 0

I was just fretting about making child safe eyes for a Christmas present without actually going out to buy those plastic ones.....thank you kindly for this.
Blessed Holidays to you and yours
👍: 0 ⏩: 1
No problem; Glad I could help!
👍: 0 ⏩: 0

This is pretty neat! For a beginner needlefelter like you, this is incredible work! I can't believe you are a beginner! You're so much further along than I was when I was a beginner. I started in like 6th grade, and my first few needlefelting projects were garbage. Only now I've gotten better. I've made little felt animals, and I used needlefelting to make the eyes on my crochet ponies, just like you did on your Pokemon.
👍: 0 ⏩: 1
Ahh shucks; thanks! Yes, Squirtle was my first crochet and needle felt work, i'm really happy with how he turned out. Next step is to make my own patterns and OCs!
That's cool you've make felt animals. I'm on the look out for a great tutorial on how to make a realistic looking needle felt animal; if you know of one give me a shout
👍: 0 ⏩: 1
I will if I see one!
👍: 0 ⏩: 0

Awesome tutorial, I've been wanting to try this. Thanks for sharing!
👍: 0 ⏩: 1
Thanks and my pleasure! I do hope all the photos help and the two difference versions of the eye. Good luck!
👍: 0 ⏩: 0


That is an awesome tutorial.
I have never tried felting, but this was easy for me to understand.
I might try this at some point, thumbs up for a good tutorial
👍: 0 ⏩: 1
Aww thanks Panda
It was a bit daunting at first when I only had the outline of the eye - Squirtle was looking a bit dead! But you have to have faith and commit to the task and you will be rewarded with the finished piece! I hope you try it and make sure to share it if you ever do, I'd love to see it!
👍: 0 ⏩: 1
You welcome Dee!
once i figure out where to get some materials (in denmark) i will try it ^_^
👍: 0 ⏩: 1
I think I got my pack on ebay, it came with everything I needed; foam block, needles and selection of wool etc. I also saw some needles in my local craft shop so you might find the materials closer to home. Good luck with it!
👍: 0 ⏩: 1
Ty for the advice, i will look into it
👍: 0 ⏩: 0

Looks like detailed and very useful tut - thanks for sharing!
👍: 0 ⏩: 1
No problem; Glad you like it and thanks for commenting!
👍: 0 ⏩: 0