HOME | DD
 kayanah — Easy Rigatoni Tutorial

Published: 2010-12-12 21:56:53 +0000 UTC; Views: 7657; Favourites: 45; Downloads: 42
Redirect to original
Description
Hello everyone!I’m really into making your life easy these days, that’s why I made two tutorials this week! lol
This is my Easy Rigatoni Tutorial! It looks a lot like my macaroni tutorial, it’s because they were made based on the same idea…and the same day, lol.
You will need:
-Sculpey color Sunshine (or any other yellowish polymer clay you’re comfortable working with)
-A utility knife
-A small metal knitting needle
Step #1
Well, that’s what you’ll need for the first part of the tutorial, before baking everything.
Step #2
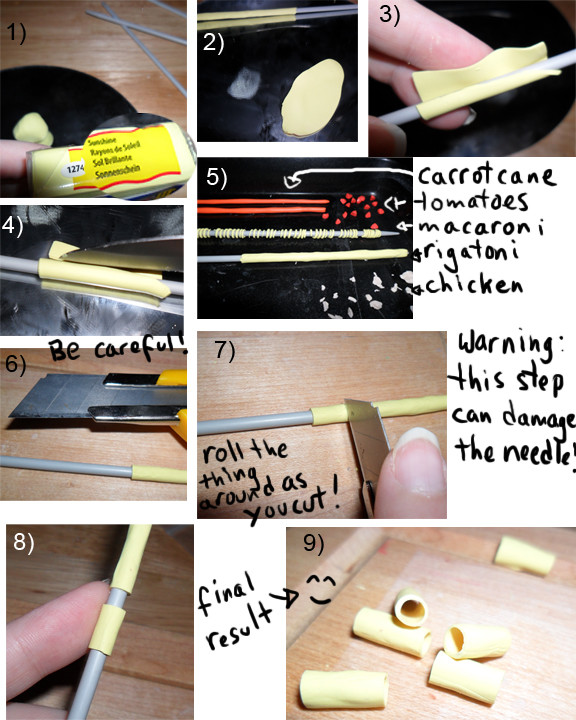
Roll your yellow clay until it’s thin enough (you can use a pasta machine, but since you don’t need a big piece of clay, I don’t see the utility of it). Roll is longer than large. It doesn’t need to be very large anyway.
Step #3
Roll the piece of clay around the knitting needle.
Step #4
Cut off the excess, to make sure the clay is even on the needle and not thicker in certain places.
Step #5
Time to bake! On the picture you can see the other things I’ve been doing that day. My carrot cane, the macaroni I made for my other tutorial, which you can see by clicking here: [link] And also small pieces of tomatoes and chicken for later use.


 Put in the oven. Carefully follow the directions of the polymer clay you use. For Sculpey clay: 275F for 15 minutes!
 IMPORTANT! After you have removed your work from the oven, wait until it has cooled off for at least 20 minutes until you pass on to Step #6.
Step #6
20 minutes later! It’s time to bring out the utility knife. Of course, there’s no need to tell you that you have to be careful with that, right?


 Don’t try to take the clay off the needle, just keep follow the steps!


Step #7
You waited for everything to cool down so the needle isn’t too hot and also the clay is much less fragile when it is cooler. Gently cut a 1,5cm (about 1/2”) piece by pressing the blade onto the clay and rolling the needle, so it makes a perfect cut.


Warning! This step can damage the needle slightly, so you better not use your mother’s needles to do it. lol You can use them again for your clay work, so I would suggest you use the needles exclusively for the clay and not for knitting.


Step #8
Gently slip off the piece you’ve just cut, then continue cutting until there’s no more clay on the needle (duh).
Step #9
You can admire your handy work because it’s finished now!


There is no problem adding these baked pieces to another unbaked work, you can re-bake them without problem! (I do it often enough to know)


Your comments would be highly appreciated! If you have suggestion on what tutorial I could make, feel free to share your ideas with me.


Related content
Comments: 2

Thanks so much this and your other pasta tutorial!
If you made thinner slices, I think this would also be a good technique for the raised bit on a bottom of a bowl, saucer, etc., and the macaroni tutorial could also make good cup handles!
👍: 0 ⏩: 1

It was my pleasure!
Yeah this technique is good for a lot of things. Next time I go to the store, I will buy bigger knitting needles and try a few other things.
👍: 0 ⏩: 0


