HOME | DD
 kayanah — Easy Macaroni Tutorial

Published: 2010-12-07 23:40:52 +0000 UTC; Views: 8423; Favourites: 61; Downloads: 43
Redirect to original
Description
Easy Macaroni Tutorial!Hello everyone!
 (Smile)")
I decided to make a tutorial on the easiest way I know to make miniature macaroni. To do this you will need:
-Sculpey color Sunshine (or any other yellowish polymer clay you’re comfortable working with)
-A utility knife
-A small metal knitting needle
-An extruder (if you wish, though I did not use one to make this tutorial)
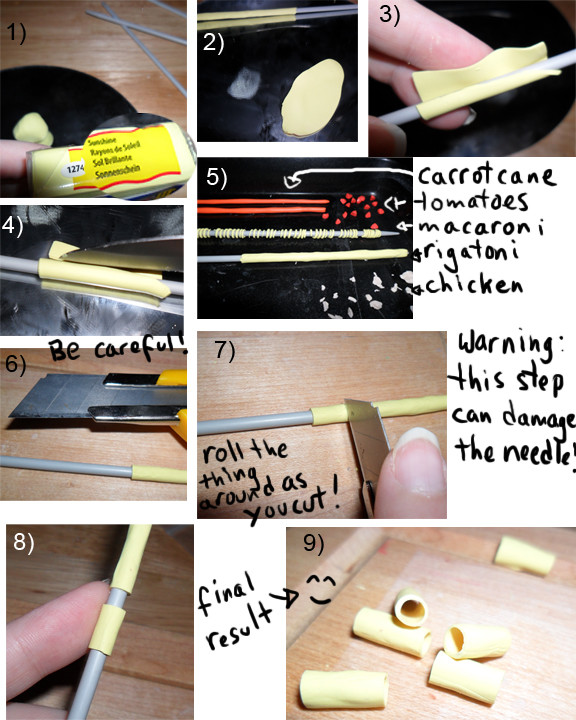
Step #1
Well, that’s what you’ll need for the first part of the tutorial, before baking everything.
Step #2
Roll the clay until it is pretty thin.
Step #3
That thin! lol Or use an extruder to made the roll even. I did not use one because my hands were hurting too much and it’s hard for me to push the clay out of the extruder.
Step #4
Take the knitting needle and carefully roll the “snake” you’ve made on Step #2. If you break it, don’t worry, it is not very important since we’re cutting it later on (you’ll see). Don’t try to repair it, it really is no problem! Try not to “squish” the clay too much as you apply it around the needle. You want a nice round shaped thing!
Step #5
Time to bake! You can see a carrot cane I made the same day for later use! lol
Step #6
Put in the oven. Carefully follow the directions of the polymer clay you use. For Sculpey clay: 275F for 15 minutes! IMPORTANT! After you have removed your work from the over, wait until it has cooled off for at least 20 minutes until you pass on to Step #8.
Step #7
This is where you will need the utility knife. CAREFUL ABOUT YOU FINGERS!
Step #8
Cut the “macaroni” off the needle. This is why you needed to wait 20 minutes before cutting, firstly because the needle might have been hot, secondly because the clay is more fragile when it is still hot.
Step #9
You can also slip the “noodles” off the needle and cut them the size you want.
LAST PICTURE (which doesn’t have a number because I forgot about it)
This is the final result. You can cut the macaroni smaller if you like (this might be what I will do eventually).
There is no problem adding these baked pieces to another unbaked work, you can re-bake them without problem!
Your comments would be highly appreciated! If you have suggestion on what tutorial I could, feel free to share your ideas with me.
Related content


Comments: 11

Thank you for sharing. Just getting into working with clay. This tut is very helpful.
👍: 0 ⏩: 1

My pleasure!
Thanks for adding it to your favorites!
Oh and I've got plenty of other tutorials in my gallery, if you're interested and a few more that are exclusive to Semi-Sweeties, which you can see by clicking here [link]
")
👍: 0 ⏩: 0

They are called "fusilli" in Italy,btw great work! *^*
👍: 0 ⏩: 0


 (Wink)")

Oh wow, this is so simple! I'd never have thought of this, thank you!
👍: 0 ⏩: 0

i've tried this one and it's work with my cold porcelain!
👍: 0 ⏩: 1
I'm glad it worked with cold porcelain!
👍: 0 ⏩: 0
