HOME | DD
 kobaltkween — A first look at Rose

Published: 2018-09-05 07:43:09 +0000 UTC; Views: 2197; Favourites: 74; Downloads: 16
Redirect to original
Description
Blender, Photoshop, Poser (Superfly/Cycles)---
Hello and welcome! Thank you so much for taking the time to look at my creations. And an even bigger thanks to those who favorite and comment.
Wow. I hadn't realized how very long it had been since I posted anything until I looked at the date of my last image. There's a lot of reasons for that, but I won't bore you with them. Well, not with most of them. The relevant one is that I decided to change direction with my work to make content based on the characters and worlds I have in my head. Which required me to learn a whole lot of new stuff, including 3D texture painting and human texturing.
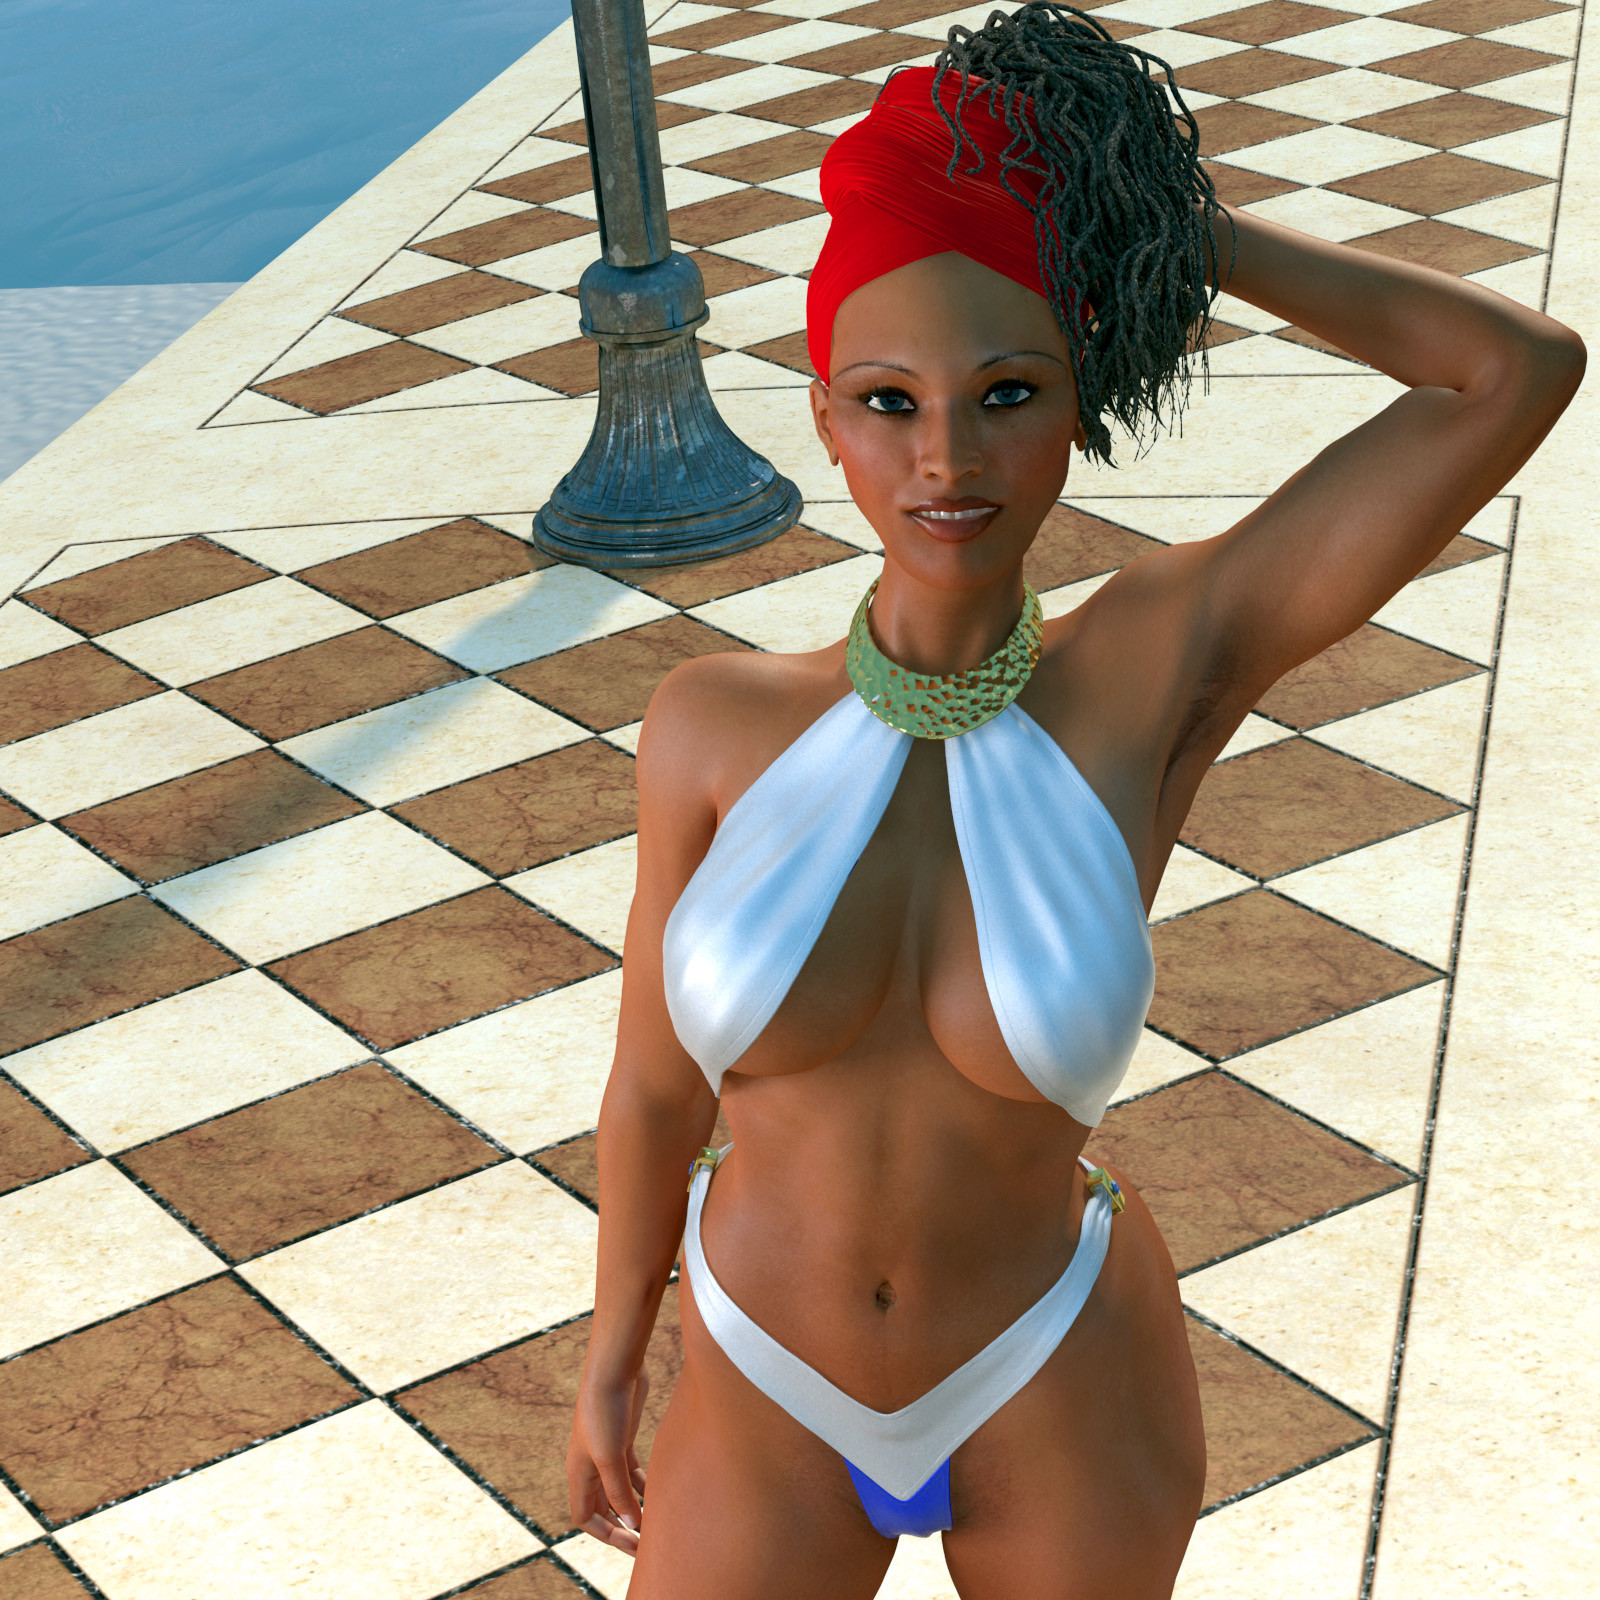
Here's a first look at my very first character, Rose. She's a custom morph for Dawn, and she's just begun Poser 11 beta testing. I'll definitely make (dynamic) clothes for her, as well as some props and jewelry. I also have hair I plan to make for her, but that's been a fight so far. I used Blender to sculpt her and paint her. Blender's 3D painting tools are great, though I did supplement my 3D painting with 2D image editing in Photoshop. Which I would have done a lot less of if Blender's 2D editing had simple image filters Gaussian blur and HSV shifting, a saturate/desaturate brush, and a way to select part of an image.
Just to give the character a bit of context, she's the older sister of my more central character, Thorn. She's calm and curvy where Thorn is wild and boyish. I've done most of the sculpting for Thorn already, though if my experience with Rose is anything to go by, I'll end up refining her sculpt several times before I finish the character. They're both kind of/sort of elves, so Rose comes with an elf ear morph.
I started with Rose because I thought her skin and body would be easiest. She's got a fair amount of obvious color variation, which is the easiest way to add skin detail, and her body doesn't require nearly as much definition as Thorn. I've been trying to give Thorn the lean defined body of an athlete or rogue that I've never seen in stores. I definitely learned a lot working on her. Just to say, Dawn's topology is absolutely _great_ for sculpting. I've tried sculpting tons of figures, and she's hands down the best.
Hopefully (fingers crossed), the step after Rose won't be a product. She renders _so_ much better and more quickly in Blender. So I'd like to be able to give away her Blender materials. But to make that useful, I'll have to figure out how to make the OBJ importer convert .mtl materials to Principled node shaders instead of what it does now. To make it possible at all, I'll have to write something that can store node trees and their zones, that can also copy those node trees to matching zones on another object. Part of what I've done since my last post is upgrade my Python skills by a fair amount, so I'm pretty sure I can do it. But I've never messed with the Blender API before, and I'm _really_ not clear on that whole second bit should work (proxy object in a .blend file? read and write JSON preset files?), so please wish me luck. And if you have any pointers, definitely let me know.
Everything but the base figure (Dawn by HiveWire3D) and the hair (Lydia Hair by Lady Littlefox, hugely edited and re-textured) is by me.
Related content


Comments: 19


Glad to see you back! Looking forward to seeing more of your Dawn characters. Great materials on the character, and great dynamic clothes, as usual!
I'd love to see a Blender materials convertor of some sort and hope that you are successful. I've tried to copy the layout of Blender nodes into Poser Pro 11 (as you likely have as well), with a severe lack of Blender knowledge and varying degrees of success and accuracy. It's definitely possible...ish.
👍: 0 ⏩: 1

To be clear, this isn't _exactly_ about porting Poser materials to Blender. Poser exports .obj and mtl files, and if you check a box on export, it will put the full path for the textures in the .mtl. Blender can import obj and .mtl. I've looked into it and found that the importer uses a general Cycles converter (other importers use it, too). To be clear, the converter works OK as is, but it's dated. It uses lots of nodes instead of the Principled node, which means it doesn't handle Fresnel as well but is more complicated. It plugs bump into the Material Output (root) node's displacement, which is what tons of people used to do. A more accurate practice is to use the node's normal input, and leave the displacement for actual displacement. It just generally needs updating.
My _guess_ is that this will be updated in 2.8, or already has been. But final 2.8 isn't due until early 2019 now, and I'd like to get this done sooner.
While the obj import code is a bit, um, old fashioned (no classes, just functions with functions inside of that function), the Cycles wrapper is very neat and clean and easy to read. I don't know Blender's material API yet, but even before reading the documentation, it seems pretty straight-forward. Right now, my problem is basically logistical. Where the current version basically maps properties to nodes (diffuse, glossy, etc.), I have to switch most (but not all) properties to map to properties of a single principled node.
Part of the issue is that I don't really know .mtl. That said, having played around a bit, I don't think I _need_ to. This is only for Poser users who want to use Blender. Even though the obj import code takes ambient information, then says the Cycles wrapper doesn't support it, I can't get Poser to export ambient information. I think the only other type of node I'd need is transparency. Which is only tricky if you want colored transparency. But I think that's a rare enough case.
You'd still need to go through and correct the materials on anything special. I don't think there's a way, for instance, for me to spot a metal just from .mtl settings.
I've had no problem translating some Blender materials in Poser, but for others I've found that a) the scale isn't the same for SSS, b) the lack of Principled node makes a big difference, and c) the lack of the wonderful and flexible ColorRamp is surprisingly aggravating.
I really can't wait for random walk SSS. I don't think I would be quite as keen on figuring out how to move to Blender/Cycles rendering _now_ if not for that. No, I take that back. Rendering in Poser without Filmic and denoising has been slower and lower quality, which makes me feel fettered.
👍: 0 ⏩: 1
Ah, I misunderstood a little, but I see what you mean now about translating and interpreting the materials. I hope you are successful at it, it seems somewhat daunting.
Funny, the past week was my first time trying to replicate a Blender material in Poser 11 (that SSS skin shader from Andrei Cristea), and had no idea what any of it meant while plugging nodes together. Finally had to start learning some of the Cycles nodes through tutorials, since the skin looked like candle wax before changing SSS falloff to Burley, and scale probably is still a factor. But a look at the Blender documentation is 100 times more informative than the Poser manual on the Cycles nodes. I'm just scratching the surface of Cycles, and it's fascinating, and it's nice that a decent amount of it works almost the same in Poser.
Interesting, the Blender manual mentioned Random Walk on the SSS node page, and I'd assumed it was already an option, but just wasn't available in Poser's SSS Cycles node. And although it doesn't directly correspond to Blender's Principled node, Ghostship made an ubershader for P11, which is at least useful to Cycles newbies like me.
👍: 0 ⏩: 1
It _shouldn't_ be daunting, code-wise. Mainly I need to know the objects and methods around creating a Principled node and setting its properties. And since the code already exists for creating other types of nodes, it _should_ (knock on wood) be fairly straight-forward.
I'm more worried about how the "hardness" property of the wrapper object should translate to the Principled node's "roughness."
Just speaking completely personally, I haven't gotten a lot out of other people's ubershaders. At least not when that trend was popular in the Blender community. Some pretty great stuff out there, no doubt, but I was happy with my own specific shaders and it was hard to undo what pretty much all of them get wrong: Fresnel and roughness. The whole reason I use the Principled node in Blender is how it works on very diffuse, low IOR surfaces. If you look up the issue, there's actually a lot of math involved with getting it really right, and pretty much everyone in the Blender community was less accurate than the Principled node, which is based on Disney's model, IIRC. In Poser, the Physical root seems to handle Fresnel and roughness pretty well, and is pretty good for most stuff.
No offense to Ghostship, who I'm sure made an incredible shader and certainly demonstrates great results. I've just gotten to the point where I tend to use the best practices solution unless it's problematic, and the Physical root is pretty solid in terms of the types of shading it's designed for (in Superfly, at least). Also, I generally find it more complex to deal with 25+ properties rather than 4 or 5 specific shaders with a few properties. I just made a compound node specifically for mesh hair in Cycles. I'm more likely to go in that direction than the other.
But that's just me and why I made those choices. I think everyone should do what makes their workflow smoother for them.
This image is almost all Physical node materials, with a specialized shader for the cornea, glass for the gem you can't see, an emitter node on the sphere inside the flower on the staff (that's what's making it glow- the bud is just plain SSS), and a special shader for those viney swirls on the staff. That actually uses a fun Cycles feature. IIRC, I kept the glass shader on the surface (I'd thought about getting rid of it when playing in Blender, but I think I ended up keeping it). I definitely put an emitter node on the volume. You can essentially make real neon with Cycles. You can't really tell here, both because of the strong ambient light and because I made their color pretty desaturated. But it's something you can have a lot of fun with.
Oh! Something to keep in mind: IIRC, at least at some point in the past, Cycles would calculate all the nodes in the tree, even if they didn't end up contributing to shading. I don't know if it changed, let alone when, so if you find a render chugging, you might try making simpler, more specific shaders.
That's good about the manual. 2.8 is in alpha, and tons of people are using/testing it. I've never paid such close attention to a major number upgrade, but I still think this one is a doozy. They're _majorly_ changing the interface, changing hotkeys, and reworking how the UI works. After this, I don't think I'll want to hear people dismiss the interface. I know that's not exactly fair, because I'm sure lots of people don't know about it, but they are taking _tons_ of feedback right now. And broadcasting about it on YouTube. They're subjecting their UI work not only to standard comments and feedback, but iterative testing and design. It's not just people's opinions guiding the project, it's their actual experiences using the new interface.
I think the 3D pros that make vague but highly negative comments like, "the interface sucks" but don't bother to give the constructive feedback Blender developers are actively seeking and using don't have much of a leg to stand on at this point. IMHO, we're at a put up or shut up point in terms of community feedback on the UI. Not that this will be perfect, or critical feedback won't be helpful long as long as Blender exists. But at this point, just saying it objectively fails without any specifics or useful feedback, and especially without speaking up when they explicitly asked for feedback, seems mostly like an excuse to say that you didn't pay $2000+ for what someone else is enjoying for free.
👍: 0 ⏩: 1
The ubershaders are good to use in a pinch for me, and helps me to learn how the nodes work somewhat. Especially since Poser's documentation about them is mostly laughable. Now that you mention it though, I'm seeing their limitations with roughness as well, or at least seeing my inexperience in dealing with it so far.
Interesting that most of your materials above are using the Physical root. I'm just starting to explore that node and will dive further into it, since you are getting good results with fresnel and other shaders. Did you use refraction on your Physical glass materials? I don't see a simple way of doing that yet. Although in lieu of the Poser manual, I just stumbled on some tutorials from the Poser creators which hopefully will be of use.
Keeping a shader simple is good advice in retrospect, after watching complex shaders take many seconds to even display their nodes on the materials page! And I should remember to delete some unused nodes that were placed for experiments, since I just left a lot of junk there for future reference. That might speed things up.
I have to admit to being one of those "What the f am I even looking at" people when it comes to Blender's UI. Not being dismissive of the program, I've seen some amazing things done with it. Just find it kind of bewildering from being used to 3ds Max for a long time. A more accessible UI would be great to see, and I would love to really dig into the program.
👍: 0 ⏩: 1
What material questions do you have? I haven't even looked at their Cycles node documentation. The whole way they added Cycles support to the interface makes it look like they were reluctant, IMHO.
The Physical node lacks refraction, probably because at the time PBRs did, too. For all that everyone's treating them like a revolution in realism in general, they're something of a step back in realism in still rendering, where unbiased rendering had been taking over already and people used complex, individually crafted materials rather than a more uniform, generalized system. They're a huge leap forward in realism for real time rendering, but since that means games, they first addressed the materials for things that interest stereotypical 15-year-old boys. So double layer reflection for car paints is a thing, but the heterogeneous layered SSS necessary for humans I saw demonstrated in Mental Ray in a late 90's PDF on skin shading? Not even on the road map, AFAIK. It took a while to even get SSS, and longer to get refraction. Because if we're talking materials for that stereotypical 15 year old male, it's all about car paint, grunge, metal, more grunge, stuff that glows, and even more grunge.
PBRs are a revolution, but in standards. And since about 75% of all materials are simple dielectric diffuse/reflection shaders, and another 10% or so are metals, just handling dielectric and metal reflections both really accurately _and_ in a standard way is _huge_.
Thankfully, Cycles' Principled node has transmission (refraction), SSS, and anisotropic reflections. And it's in the process of getting random walk SSS in addition to the existing Christensen-Burley model. If Poser still uses Cycles in the next version, it would be really nice to see this update there. But for plain glass, you really don't need all that. Just use the Glass BSDF. It handles refraction and reflection in one. It just takes color and IOR. I made a special Cycles shader that incorporates transparency to get rid of some of the shadowing I find problematic, and ported it to Poser to use on corneas, but that's probably unnecessarily complex for your purposes. The only "glass" part in that image is the viney bits on the staff, and those are just a Cycles root with GlassBSDF plugged into the surface and Emission plugged into the volume.
Which is a sort of general technique. If you want colored glass that gets clear where it's thin, use white glass on the surface and a volumetric BSDF on the volume.
It's sort of ironic you say that about Max and Blender. When I decided to start modeling, I chose Blender over Max mainly because of interface issues. As a beginner trying different software, it took me more than an hour and about 20 clicks per step with several steps to follow a Max tutorial modeling a plain, unrealistic table. No UV mapping. Just modeling. In that same time period, I followed a tutorial for Blender that had me make something more complex in minutes with a few clicks period. Even fairly recently, I've seen Max tutorials showing how it takes about 12 clicks and several mode changes to do what's about 4 clicks of the main 3D View menu without shortcut keys in Blender (and that's being generous), and 2 to 1 clicks with them. Blender is wicked fast and easy for both modeling and sculpting. Max is far and away better for procedural modeling, and I suspect it's therefore _much_ easier to do sci fi hard surface modeling in it. That said, for the stuff I make and want to make (much more fantasy and contemporary than futuristic, much more natural than mechanical), I find Blender's interface easier and more efficient on a quantitative, not even remotely qualitative or opinion-based, level.
IMHO, Max's interface shows an abundance of idiosyncratic workflow breaks where new features were obviously added on over time but never integrated smoothly. The fact that almost every Max user I've ever known felt they had to take a formal class with an instructor (and the majority of those f2f in a classroom) even after months of using it, while every Blender user I know felt comfortable learning on their own has just reinforced that perspective.
IMHO, Blender's main interface weaknesses are the right-click select, click+drag needing you to the other mouse button to drop, and needing to go into an explicit box select mode to click and drag select. Those three things work the same on every OS and in every piece of software, and I think breaking them hugely disorients beginners already learning a dealing with mastering a pretty complex piece of software. Which all 3D studio apps are, sort of like all full-blown image editor/creators are.
If you don't find the current Blender accessible at all before you even interact with it, I don't know if 2.8 will change that.
I _think_ they're going to make regular left-click select the default. I know that they're making menu placement more consistent (always top of the window, AFAIK). I know that the pie-menu that so many Blender users use for wicked fast production will now be a standard part of the interface (not my thing, but people who use it work _much_ faster than I do). I know they're changing the shortcut keys, and that you can customize those anyway. I've mainly heard UI talk revolve around Maya, though I don't know how strong that influence is. I know that they're going to make it possible to distribute UI setups, so people can distribute "beginner" interfaces and see which ones people like. I know that what used to be pull-down menu options for the interface is now tabs, which I think makes them more apparent. Those tabs will include a modeling/default (which we have now), a sculpting, and a 2D mode (because they've now expanded Grease Pencil into a full blown 2D animation feature with rigging and modifiers). I know that they've taken in tons of feedback, and gone through iterative changes in things like placement, icons, labels, etc. But for all the major changes in 2.8, I can't say whether or not a Max user like you would find it more accessible.
Maybe someone will make a Max-esque UI and distribute it. I know that people used to make Maya-esque UIs for themselves.
You can (and definitely should) judge for yourself. There's tons of videos on YouTube about 2.8 where you can see what they're doing (though it's seriously been in flux). The alpha is open, and I know they _were_ taking interface feedback, if you want to give it. They might have finished that phase for now, though. I heard they were only taking fatal crash bug reports, but I've personally seen developers address regular bugs over at Blender Devtalk . I think the beta begins soon, and they'll definitely take non-fatal bug reports during the beta.
👍: 0 ⏩: 1
I don't have specific questions for now, I just need to continue to view some of the tutorials out there and build a general understanding. But I'll definitely ask if I'm totally stumped on something. Unless you want a laugh, there's no need to look at the Poser docs for Cycles. They basically use terms to define themselves ("The Fresnel node makes fresnel occur"), at least for the things I searched for at the time.
Right after I asked you, I found SM's video tut on physical rendering and saw the answer about refraction. It's funny, a week ago I had no clue about PBR or Blender's Principled node (or what ubershaders really were despite the fact that I was using one) until you mentioned some of those subjects above. It finally prompted me to do a little research, and a flood of tutorials and terminology fell into my lap. So I kind of have you to thank for that.  (Smile)")
Thanks for the advice on the glass, I will definitely keep your Cycles techniques in mind.
From other accounts I've heard, Blender seems like it would be easier to pick up for users who weren't first exposed to Max and other Max-like modeling programs. I and other Max users would probably have to unlearn a workflow to grasp Blender. I'm just used to switching between various modes and menus to get things done. I'm not especially loyal to Max, it's just the thing I've used for so long, and the few 3D artists I met long ago used it and similar programs. You can't easily sculpt in it, and it thinks that a graphics pad is just another mouse, so if modeling and sculpting in Blender is easier, I'd be more than happy to try it. I think I got the most out of Max from watching a free video series of modeling a vehicle from start to finish, and I probably need something like that to learn Blender. Just a matter of finding tutorials that appeal to me, among the plethora available.
It's probably less of an interface issue for me than a matter of can I make the mechanical stuff I want to make as well as/better than Max. For Blender it seems likely the answer is yes. But I'm going to take a look at some of the YouTube videos.
👍: 0 ⏩: 1
Yeah, grunge is exactly where PBR techniques are really superior. They came out of the Allegorithmic and Toolbag Marmoset people, who were focused on game asset creation. They designed a system that a) allowed them to paint several types of game textures all at once (color/albedo, normal, AO, etc.), b) in general, used the same number of textures per workflow, no matter what the item (as opposed to layering materials, which means that each layer adds a mask and textures for the new material), and c) supported several different types of material per texture. One of the _huge_ things I struggled with in my version 2 of Essential Materials I never published was how to handle patina on metal. Because you want to be able to thin it out, and have a sort of in between state. It's not easy to transition from a metal to a dielectric without it going crazy. But PBRs mastered that, because again, metal, grunge, and paint are huge in games.
Oh, yeah, I figured that PBR shading systems would be _great_ for you. They're pretty much designed specifically for mecha. And if I haven't talked it up enough, I'm _so_ in favor of a unified shading system. Blender 2.8 is getting a new renderer, Eevee, for real time rendering. CG Cookie has a game content instruction series based on using Blender with Unity. Eevee results are being compared to Unity results. Everyone wants to be able to work in their respective software and have it all render appropriately in game. I'm already seeing a lot of Blender works cite Zbrush and Substance Painter as additional tools.
I'm also strongly in favor of high accuracy Fresnel and conservation of energy, which was a big part of that original push to get metal, gloss, and grunge right. IMHO, good SSS, volumetric shading, refraction, and caustics are a much bigger deal and easier to spot when they're not exactly there, but I'm fine with really mastering metals and ordinary dielectrics as a core.
Unfortunately for me, PBRs generally weak(er) on the stuff I'm interested in, not in small part because all of the people working on those shaders don't use them as much as I do, and don't pay as much attention to the weaknesses of their version of those types of shaders. Blender's Principled node accounts for anisotropic reflections, but most don't seem to. That completely eliminates satin, lycra, and several other fabrics with directional weaves, along with hair and feathers. Velvet, suede, and basically any material that's got a sort of surface volume to (most knits and natural weaves that aren't perfectly smooth) need some amount of edge blend/sigma. You can add that to some PBR style set ups, but not all. Those painting systems I mentioned aren't set up to control their appearance with maps either, so you couldn't recreate my velvet/satin and velvet/satin/lace texture sets I've used in every single clothing product of mine. They just recently added SSS control, but I've yet to see them actually use it. So they've only just gained the ability to make decent leather and mix it with other types of material, like, say, metals.
In total, that's about 8 or so out of my 20 original Essential Materials that either couldn't be made in the PBR system until recently, needs some shading help to work in some PBR systems, or can't be properly done there at all. I'm using them as a sort of yardstick because I chose those materials based on what I see in most Poser renders (outside of skin and hair) and what I personally render a lot. Which is why it's OK for me that PBRs don't solve all my shading problems. I have no problem either using other techniques with the PBR system or making shaders that don't use it at all. But I've seen a lot of people adopt PBRs as an advance for realism in all materials. As someone who likes water with proper caustic reflections and gems that sparkle, who followed unbiased renderers like Luxrender and Octane since they were first developed and in alpha, I find that perspective a little mind-boggling. TM2 is a nice renderer, but it's no Octane.
Polygon modeling, NURBS modeling, Bezier modeling, and sculpting in Blender are all really easy and fairly fast. I'd _personally_ need instruction to do mechanical stuff, but so far as what I've looked at (out of curiosity), I think that's mostly a case of just not being familiar with topological methods to solve specific problems. I've seen some talk about how beveling could work better, and that's probably true. I mean, I haven't had a problem, but I don't hard surface model much, and when I do it's architecture or jewelry. That said, I've seen it on the devtalk site with suggestions, so they might improve it in 2.8.
That's really the thing, IMHO. While I'm sure the major changes that would make procedural modeling easier are beyond what could be addressed for upcoming versions, people are saying, "This would be a better way for [this aspect of modeling/shading/etc.)] to work," and developers are responding. If you can clearly explain what workflow or functionality you need, developers will listen. I won't say they'll always agree with the need, but they'll listen. Not to mention, two of the commercial modeling courses I know of are for sci fi mechanical modeling. Even if core developers aren't interested, other Blender developers might be, because the kind of work you do is highly popular in the Blender community
Also , there's always a huge focus on ways to streamline modeling. The F2 addon just made polygon modeling faster, and it ended up being incorporated into the core distribution. Same goes for pie menus (in 2.8) and Bmesh/n-gons. If you can suggest ways to reduce the number of clicks in a common workflow, there's a lot of Blender developers who will want to listen.
👍: 0 ⏩: 1
Sorry it took me so long to reply.
One of the first things I came across looking into PBR was Allegorithmic's many free videos and documents. It's taken me several views to absorb it, because as they said, a good amount of the methods and terminology are contrary to what artists have been used to in the past. But it is exciting what can be achieved in just one shader with a few maps, and have it generally translate to other engines. You mentioned trying to create metals with patinas, and Substance demos of metal with rust or with chipped paint was the first thing I saw that piqued my interest, and I really can't wait to try it out on some mecha.
Ooh, I didn't know about Blender getting a new renderer. I had to pause on watching Blender videos (I was following a simple glazed donut tutorial), but I'll definitely check into that and CG Cookie. I'm curious to see how artists use Blender with ZBrush. Actually I'd like to have Blender as an alternative to ZBrush, because it falls flat for non-sculpting work (for me, at least).
Funny that you mentioned PBR and fabrics, as I was trying to make some quick polyester and wool, and they look kind of "meh" so far. And I noticed that although various fabric PBR shaders were available on websites, they are generally only cotton, maybe due to the difficulty that you spoke of. But I'm kind of between worlds right now because I want to do one project now that involves people and cloth--basically starting off with PBR's weakness--before I get to another project that's mostly mecha and mecha cockpits.
I think I can understand why some might want to stick to one render engine at all costs--stubbornness and lack of knowledge. I took me ages to adopt Firefly in Poser 5 instead of its original renderer, and only in the last month did I finally take Superfly seriously. Basically I didn't want to change what I was doing, and didn't see the benefits of other methods yet. Kind of like the reason I didn't pay that much attention to Blender until recently...
I am curious to see the more advanced techniques in Blender, some of which I never touched in Max. First I have to be able to model that donut.
👍: 0 ⏩: 1
As long as you have either a person or documentation that can give you information, you probably don't need to work that hard at taking up a new renderer. They're all just trying to copy real world optics. The real issue is setting up your test lighting set up appropriately and finding out the terms. So yeah, getting familiar with methods and terminology is a biggie, because that's where the translation is. That said, take all the Allegorithmic stuff with a full tablespoon of salt. Because they've based their entire business model on how epically unique and necessary PBRs are. And really, the core maps are just the same diffuse, specular, normal, and displacement maps we've always used, with the specular controlling more reflection properties than usual.
IMHO, the biggest problem with shifting renderers is that lighting affects shading, but setting up your lighting requires seeing how shaders render. I know that with Iray, I just didn't know enough about photography to have an easy start. Thinking about it now, I'd say it's probably best to go to HDRI Haven (they have CC0 HDRIs, donate if you can), choose an HDRI that renders easily (in my experience, smaller and brighter light sources are slower to render), and just try to match a plain balls on a white plane like in their previews. With no extra lights.
That said, directional light is key for testing scattering, so you might want to add one light once you get the render and HDRI settings down.
Just keep in mind that all of real world shading is just diffuse reflections, glossy reflections (both regular and anisotropic) controlled by Fresnel, refraction, scattering, blackbody emission, and volumetric fakes for stuff like velvet, all limited by conservation of energy. And the more realistic the renderer, the more accurately it handles CoE and Fresnel. No matter what system you pick up, those are the elements you have to translate. So you might have "translucence" for single layer items that should have scattering (like curtains, lampshades, or leaves), and you might have a tricky time with scattering designed mainly for simple volumetrics (like Iray's or Luxrender's), but it's still all just those elements. Setting up materials is a PITA that takes a while, but I've used Firefly, 3Delight, Iray, Superfly, Cycles (advancements make this slightly different than Superfly), Blender Internal, Mitsuba, Luxrender, Yaray/Yafaray, and other renderers, and it's really been the work of no more than about 3 or 4 days or so to get a handle on the core basics, and no more than a week or so to be pretty solid on matte, glossy, metal, refracting, and simple scattering.
Oh! And progressive rendering is key to mastering shading and lighting. It makes iterative testing _so_ much faster.
The trickier stuff has been dealing with the specific procedural textures available, skin (multi-layer, heterogenous scattering is no joke- people have recently been just ignoring the problem to use one simple, constant level of scattering with a color map), refraction and volumetric shading (that often has specific vagaries), and mesh hair. That last one, I've never found a truly satisfying answer to in any system. I think that's partly because hair is just difficult, partly because mesh hair isn't as volumetric yet individual as real hair, and partly because each hair model is unique in how closely it approximates hair. And the textures people make, with all those burned in highlights, don't help a bit.
I'm always open to new renderers, precisely because I spend so much time on materials. I have a "gem" material for Firefly that built a hatred in me for renderers that don't support caustics. My favorite things in art are light, water, glass, draping and flowing fabric, and the human form. That means I'm in an eternal struggle with renderers to depict scattered, refracted, reflected, and concentrated light. What I love most is _the_ hardest stuff to calculate. I want hair that catches light, falls of water that cast beautiful caustics on everything around them, and stained glass that casts beautiful colored shadows. I'm always hopeful that a new version or a new renderer will make it possible to have simpler shaders and faster render times to achieve the effects I want.
Just in case you'd find it useful, here's my Blender tutorial playlist . You should probably go to the end and work backwards, because that's where the latest stuff is. I don't know that it will be much use to you, because it's so nature and people focused. In terms of hard surface modeling, Gleb Alexandrov has a commercial series on it that looks good, but he also has a lot of free tutorials on modeling and composition that I've found very helpful.
👍: 0 ⏩: 0

Welcome back! Lovely soft and natural looking character.
👍: 0 ⏩: 1
Thank you! That's definitely what I was going for. I hope you're doing well!
👍: 0 ⏩: 0


Thanks! I eventually want that to be part of a prop set for her.
👍: 0 ⏩: 0


She is really looking wonderful! I totally like, from the distant look, that she is neither supper model like, nor aged 19 something...
 (Wink)")
I really love her skin - reminds me of milk and roses
👍: 0 ⏩: 1