HOME | DD
 Midday-Mew — Tails at the Beach Avatar-sized Thumb

Published: 2011-11-24 20:48:18 +0000 UTC; Views: 2379; Favourites: 53; Downloads: 40
Redirect to original
Description
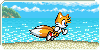
EDIT: I discovered that it is too large of a file size to use as an avatar. So I decided to re-purpose it as an avatar-sized thumb. I'm sure you can use the avatar on other websites though.This is an avatar version of [link] . Due to the popularity of the group icon version of this, I decided to make an avatar version. It wasn't hard to make that change.
You may use this avatar if you wish! It's free! ^^ Just be sure to give me credit! Perhaps in your signature or something!
Tails, Emerald Coast, and Neo Green Hill Zone belongs to Sega.
Sonic Advance 2 Tails sprites ripped by Kevin Huff of TheSpritersResource.
Neo Green Hill Zone sprites came from a sprite sheet assembled from the following website: The BG HQ. Credit to Shadowbot for assembling/ripping the sprites.
The border of the animation was edited from the deviantArt default avatar and therefore the border belongs to deviantArt.
Animated by me, Midday-Mew.
Related content


Comments: 21

people at the beach and they saw tails passing by them: Oh, a walking fox, A WALKING FOX?!
👍: 0 ⏩: 0


Umm...Just to let you know I would LOVE to use this icon for my avatar! But its too big.
👍: 0 ⏩: 1

I already know it's too big. This was originally intended as an avatar, but it has since been re-purposed as a thumb due to the filesize. I have no plans to fix the thumb to be usable as an avatar.
👍: 0 ⏩: 0


True that. Unless he's actually going in a circle around the edge of an island.
👍: 0 ⏩: 0


How I wish to make moving background x) I really like this, maybe I can use this sometime soon
👍: 0 ⏩: 1
Awesome. I really do want people to use this avatar. ^^
Oh, and I animated the background in Photoshop. A moving background is like moving a sprite, except that it needs to be looped properly, so a careful measurement of the distances from start to finish needs to be done. Meaning that the starting point and the ending point have to be at the same part, but the frame of the ending point should be left out by "tricking" Photoshop into thinking that the ending frame isn't there.
This is accomplished by using Photoshop's timeline editor of the Animation window.
* First you have to do the following:
(1) Duplicate the background layer(s).
(2) Then you have to transpose the new layer(s) over in the direction of how you want the little fifty-pixels-by-fifty-pixels "window frame" to move.
(3) The new background layer(s) need to be just touching the original background layer(s) in such fashion so that they "tessellate".
(4) Repeat steps 1 through 3 to make the background move faster, as long when I tell you to move the background layers that one iteration of the animation moves from the start of the background layer to the start of the last background layer in the sequence, without changing the length of time of one iteration of the animation.
* Next, at the start of the timeline, you need to make a keyframe at the start of the background. Do this by doing the following:
(1) Click all the background layers or just the ones you want to "move", and link the layers together (the link icon in the Layers panel looks like a "chain of links"). You can find the link icon at the bottom of the Layers panel.
(2) You have to move the animation to the start of the timeline by dragging the red-and-blue slider (looks like a blue upside-down water droplet attached to a thin vertical red line) all the way to the left of the timeline.
(3) Move the background layers to where you want them to appear in the animation, then...
(4) In the timeline, click on the names of the layers you want to move to expand the tabs. You should see options for animating those layers.
(5) Click on the stopwatches of the "Position" attributes for each of the layers you want to move.
(6) Next to each of the stopwatches you just clicked should be a gray diamond. If you see it, good. If not, click on the icon shaped like a "^" (without the quotation marks) to turn it into a gray diamond. The gray diamond indicates that there is a keyframe at the current time in the timeline.
(7) If you did this correctly, you should see that there is a yellow diamond in the timeline editor at the keyframe you chose. If you see the yellow diamond, congrats! You've made a keyframe!
* After that, you should go to the end of the timeline to the last frame.
(1) Do this by dragging the slider all the way to the right of the timeline.
(2) In the timeline, for the background layers you want to "move", click on the icons that look like a "^" (without the quotation marks) next to the stopwatches of the Position attributes of those background layers.
(3) Use the Move tool to move the background layers to where you want the background to finish one iteration of movement. This will usually be the start of the last background layer that looks like the start of the first background layer.
(4) Select the last keyframe of each of the background layers you want to move, and drag the keyframes one more frame to the right. Doing this is important as it ensures that the starting frame of the animation isn't repeated twice when the animation is looped.
* Then you need to use the Crop tool. Drag a 50-pixels-by-50-pixels "window frame" where you want the animation to be focused on. At the top of the window, you should see options for the Crop tool. Change the setting for "Cropped Area:" to "Hide". You do NOT want "Cropped Area:" to be set to "Delete" or your animation will NOT work.
* Next, if you want a custom border (like what I did with the "Tails at the Beach User Avatar", first create a new layer.
(1) Then in the new layer, create the border with opaque pixels using the Pencil tool (right-click the Brush tool, and choose Pencil tool). If the brush size is too big, look in the tool options at the top of the window. Next to the icon (the icon looks like a circle above a number) is an upside-down triangle that's an arrow for a drop-down menu. Click that upside-down triangle-arrow and set the size to "1". Make sure that the border is completely enclosed by opaque pixels, or the next step won't work.
(2) Change to the Magic Wand tool (right-click the Quick Selection tool's icon and choose Magic Wand tool). Then, in the tool options at the top of the window, change the "Tolerance" to 0 (zero), and uncheck "Anti-alias". Make sure "Contiguous" is checked and "Sample all layers" is unchecked. Click in the area enclosed by the border to select that area, and create a new layer.
(3) On your keyboard, hold down Ctrl (if you use Windows) or hold down Command (if you use a Mac) and press either Backspace or Delete (doesn't matter which you choose). This will fill the selected area with a solid color.
(4) In the main menu bar at the top, go to Select...Deselect. Then go to Layer...Layer Mask...From Transparency.
(5) In the Layers panel, between the Layer mask thumbnail and the Layer thumbnail is an icon of a chain. Click that chain icon to turn it off. This unlinks the layer mask thumbnail from the layer thumbnail.
(6) Then hover the mouse cursor over the Layer mask thumbnail in the Layers Panel, hold down Alt (Windows) or Option (Macs) and drag the Layer Mask onto a background layer.
(7) Repeat Step 6 for each of the background layers, until each of the background layers have the Layer mask thumbnail.
(8) Using the Alt/Option-and-drag method explained in Step 6, put the layer mask thumbnail on anything else that is to be in the animation (such as the animated character sprites).
* And...that's it! You have your animation! Congrats!
👍: 0 ⏩: 1
Thanks, now I can test some animtaions out  (Smile)")
👍: 0 ⏩: 1
You're welcome. ^^ If you have any more questions, just ask me.
For instance, how to save it as a gif without any "artifacts" so that it is a clean animation:
(1) First, save your finished animation as a .PSD file (from the main menu bar, File...Save As. Then use the drop down menu of file types and change the file time by picking the one for .PSD files. Then you want to change the name of the file to something appropriate regarding what the animation actually is).
(2) Select all of the layers. You can do this in the Layers panel by clicking the bottom-most layer and Shift+clicking the topmost layer.
(3) In the Animation window (in this case, it is also the Timeline editor), in the upper right corner, is an icon. If you click it, a drop-down menu should appear. In that menu are some commands. What you want to do is to click the command "Select all Keyframes". Then in that same drop-down menu, click "Flatten Frames into Layers".
(4) Next, you want to go below the newly added layers (all of which have a visible eye icon next to them) and remove the invisible layers (which don't have an eye icon next to them) by dragging them and dropping them into the trash icon in the bottom-right corner of the Layers panel.
(5) After that, write down the current frame rate of the animation. The default is 30 frames per second (I only use 25 frames per second to make it run better on slower computers). You want to calculate the multiplicative inverse of the frame rate, specifically, you want seconds per frame, not frames per second. The inverse of 30 frames per second is approximately .033 seconds per frame or 33 milliseconds per frame. This won't do, considering that it's rounded and that when you re-add the frame rate later, it'll end up being sped up to being even faster than how you originally had it (since you're rounding down the frame rate). What I would do is, before you ever start work on the animation, set the frame rate to 25 frames per second. The inverse of that, incidentally, is exactly .04 seconds per frame or 40 milliseconds per frame. That is a good number to use. It's too bad I can't figure out how to make the default for the timeline to be 25 frames per second. D:
(6) Back on topic, what you want to do next is to "delete" the animation itself. You do this by going to the drop-down menu in the upper-right corner of the timeline editor and clicking "Delete Animation".
(7) This next step is very important! What you want to do next is to go to the main menu bar at the top of the Photoshop window and go to the drop down menu from "Window"...and you should see Animation on the list. Click it to uncheck Animation to turn off the animation window.
(8) Now, from the main menu bar, go to File...Save As and save it as a PSD file, but change the file name to include the word "GIMP" in it.
(9) Next, what you want to do is to check to see if your computer has GIMP on it. If you don't see it on the list of programs, then go to GIMP.org and download the latest stable version (GIMP is free!).
(10) Then open up the PSD file from step 8 in GIMP, and go to File...Save As. In the window that pops up, at the top, you'll see the name of the image, followed by the .psd file extension. Click on the image name, and go to the end of the file extension, and remove "psd". Type in "gif" in its place (without the quotation marks) and click Save at the bottom of the window.
(11) You should see a window pop up with some options. Click the bubble next to "Save As Animation" and the bubble next to "Indexed".
(12) Then click on the button "Export" and change the GIF comment to whatever you want. Make sure "Loop forever" is checked.
(13) Set the "Delay between frames" to 40 milliseconds if you used 25 frames per second. Set it to 30 milliseconds if you used 30 frames per second (this will change the speed of the animation compared to how you had it originally, so watch out!). If you want to use 25 frames per second instead, then use 40 milliseconds.
(14) Change the Frame Disposal to "One frame per layer (replace)".
(15) Make sure the checkboxes for "Use delay entered above for all frames" and "Use disposal entered above for all frames" are checked. Click "Save".
(16) You're done! Congrats!
👍: 0 ⏩: 0

hmm I might use this if I get tired of this one someday
👍: 0 ⏩: 1
Cool! ")
👍: 0 ⏩: 1
I will when I get tired of this one (which may take a while ^^' )
👍: 0 ⏩: 0