HOME | DD
 MidniteWolf139 — Amulet Instructions
Published: 2006-03-17 06:51:56 +0000 UTC; Views: 5612; Favourites: 31; Downloads: 247
Redirect to original
Description
Instructions for Amulet, 1.0.A few notes, first:
The colors and materials are customizable. If this is to be a personal item you wish to use in your own rituals or meditations, I suggest you change it to your own personal tastes. If you can, I suggest using whatever natural materials you can find.
I had compensated for a few design flaws when making the blueprints, however there may be a few minor ones left. Once I have created a better one, I will improve upon the design and update.
Here is what you will need to make one of these:
- Leather cord of your desired length and color
- Two wooden disks [The ones I used for the one in the pic are 1 ½ inch in diameter and 1/8th inch thick]
- Indian seed beeds
- Two or three small black binder clips [gotten at office supply store] [See figure A.]
- Clay [in the example I used polymer clay, granted it’s a man-made product, but it’s easy to work with and comes in a wide variety of colors, I suggest Fimo or Sculpey brand, if you go with that type of clay, they come in small rectangular blocks.]
- Acrylic Paints [in my finished original in figure C, I shamefully used a sharpie marker for the paw print. I’m not good with paints, however, that’s probably the better thing to use]
- Sewing Thread
- Special Clasp [See Figure B. The circle piece is obviously what you’d use.]
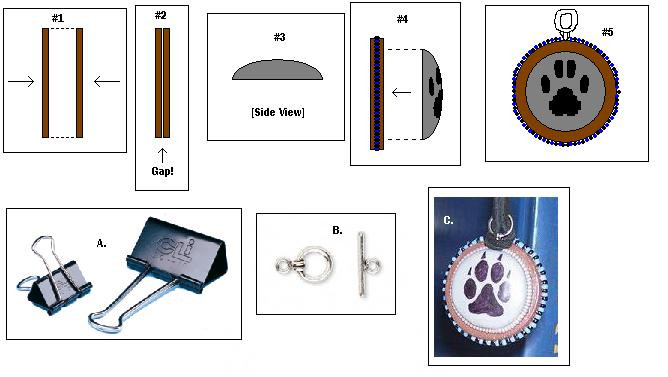
1. Paint one side and the edge of the two wooden disks of the color you want. [Might want to do a few of these, as backup and incase the following step don’t work out for you at first]
2. Glue the two together, with the painted sides facing out. [Diagram #1] Make sure when you glue it that there is a very small gap between the two pieces of wood. [Diagram #2] That gap will help “set” the beaded string mentioned later in the instructions.
***Special Notes for step 2***
- Make sure the wood pieces don’t warp while the glue dries. It will make one side of the assembly have a much wider gap, while the opposite side will be almost touching. I suggest using the small black binder clips to keep the wooden pieces together and even while the glue dries.
- Make sure the gap is even all the way around, too. Also, the glue may not be thick enough to form a small gap around the edge, a segment of paper between the wooden pieces might help solve that. However, I can’t emphasize enough how important that little gap is. If the gap isn’t there, the strung beads will move a lot when you’re trying to put them on. The gap is your friend. Not sure if your gap isn’t wide enough? After gluing, if you can slip a piece a paper into the gap with just a little bit of resistance, you should be good.
3. Next form clay into marble sized balls, then shape into a dome about 1 and ¼ inch diameter [it’s advised you make several of these, at least a dozen. [Diagram #3]
***Special Note for step 3***
Do this at least a few more times to make several. Why? If you don’t consider yourself adept at drawing and/or painting; you will need the extras for practicing your final design in step 5. For mine, I probably went through 5-6 clay pieces before coming up with a satisfactory paw shape.
4. Bake the clay according to the manufacturer’s instructions. After they are done, take out of the oven and let cool, the clay will harden substantially.
5. If you desire, paint or mark a design onto them after they cool. Use the extra clay-domes as practice until you get a satisfactory design. You might consider using a pencil or pen to lightly mark out your design in order to get it the way you want.
***Special Note for step 5***
If you desire, paint a “finish” of some sort onto the front of the clay-dome so that your design is in no danger of rubbing off. I personally couldn’t find a satisfying type of finish, so I just diluted some tacky glue with water and “
 ainted” that onto the clay-dome. It’s an unorthodox method, but I think the effect turned out nicely.
6. String up enough beads along with the special clasp, this string will go around the outer edge of the creation. Use the gap as a guide and a place for the bead-string to rest comfortably. It’s always best to test the fit of the bead-string before the final gluing of it.
7. When the bead-string is satisfactorily long enough and fits around the creation snugly, you’ll have to tie the ends of the bead-string together, before gluing it to the wood assembly.
8. Carefully glue the bead-string to the wooden assembly. [Diagram C.]
9. After that has dry, glue your clay-dome/design to one side of the wood/bead assembly. [Diagram #4]
10. String the leather cord through the special clasp as shown in Diagram C.
It should look something like Diagram C. when complete. You now have a potentially useful item that -you- created yourself.
Again, this is an easily customizable design, if part of the design doesn’t fit your tastes, adjust it to your own. If anyone has any tips or suggestions on this design, please let me know.
ADDED 10/03/2007 If you do make one of these and post it on Deviant Art, be sure to link your work from this design, as well as note me and let me know. I really would like to see the different variations that come up. ^..^
Enjoy your creation! ^..^
Related content


Comments: 2

heh, cool. looks almost like the patch I did for another deviant
 (Smile)")
👍: 0 ⏩: 0
