HOME | DD
 NocturnalEquine — Gomamon Plushie Pattern Guide
Published: 2011-01-16 02:01:01 +0000 UTC; Views: 8810; Favourites: 53; Downloads: 211
Redirect to original
Description
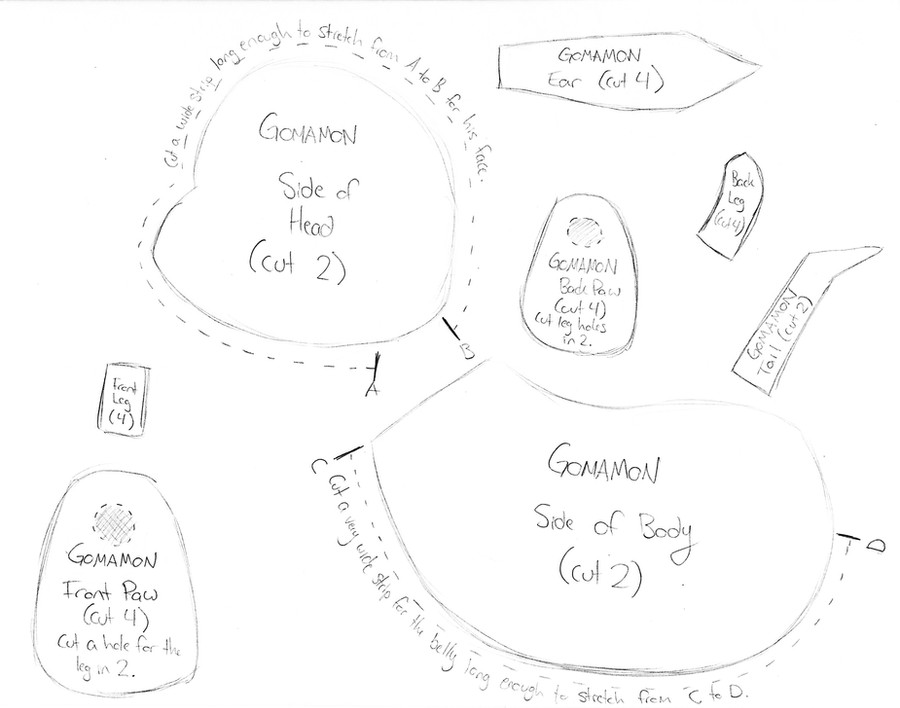
Caution: This pattern is not exact; it is meant as a rough guide to the pattern pieces you will need to make a Gomamon plushie like the one ~Espeakus and I worked together on: [link]I sketched this out after a request from ~Eulasia and I hope she and others find it helpful.
General Instructions:
Cut out all pieces, making adjustments where you see fit. Sew each part of Gomamon separately and then put him together.
Notes on the feet: For each set of feet (front and back) you will have 4 feet pieces. The pattern has a shaded circular area; cut this hole into only 2 of the feet pieces for each set. The pieces with the holes in them will be the top of the foot; the bottom edge of the leg pieces get sewn to the circular edge of the hole in the foot.
HEAD
Sew the edge of one side piece to the long strip from point A to B. Do the same with the opposite edge of the long strip and the other side piece. Turn inside out and stuff. Sew 2 ear pieces together, leaving the short edge open to turn it inside out; repeat with the other set of ear pieces. Attach them to the head.
BODY
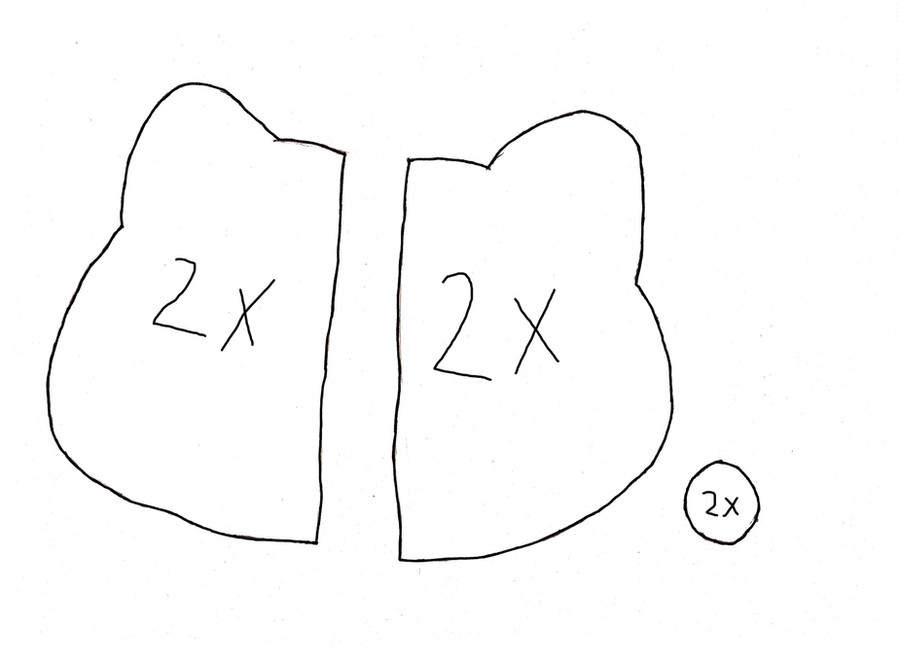
Sew the tops of the side body pieces together, from the top left "corner" to approx. point D. Sew the long body strip from point C to point D to each of the body pieces, creating a sort of bag with the neck as an opening. Turn inside out and stuff.
FRONT LEG
Sew 2 leg pieces together along long sides, forming a tube. Turn inside out. Sew 2 paw pieces together; turn inside out through through the hole in one piece. Sew the leg to the edge of the hole. Stuff. Repeat for the other leg.
BACK LEG
Same process as for front leg, except that the back leg will not be a tube shape. Just leave the straight, short edge open.
TAIL
This is the easy part! Just sew the pieces together, leaving the short, straight edge open. Turn inside out; stuff.
Now put all the pieces together using the invisible stitch (Google it if you don't know it) so that it resembles a Gomamon! Add his markings and features using paint, felt, and whatever else suits your fancy.
Like I said, this is not an exact pattern, so change and adjust whatever suits you to get a Gomamon you are happy with. Good luck and have fun!
Related content


Comments: 15

Thank you for your comment.
If you wanted a pattern for a plushie that I have already made, I might be able to put that up for you. But creating a new pattern takes a lot of time and effort, so I'm afraid I can't make you a new pattern and put it up here for free. That doesn't mean I will never put up another free pattern; it's just not something I have time to do for everyone who might request it. Thanks for understanding.
 (Smile)")
👍: 0 ⏩: 1

ok, I understood ... Then you could pass me the pattern of Lucario?
👍: 0 ⏩: 1
Ah, I'm really sorry, but I didn't use a pattern for Lucario. I made him freehand. If you'd like, I could send you some tips on how I made him in a note.
👍: 0 ⏩: 1
ok, certainly, I would rather that you give me some tips via note
Thanks ^ ^
👍: 0 ⏩: 0

With this pattern in mind, how long should the strips be? I looked at the plushie you made, and it seems fatter at the chin than the forehead XD
👍: 0 ⏩: 1
The length is as long as it needs to be to fit around the edge of the side piece. Did you mean how wide...? Yeah, it would probably look good to make the chin part a bit wider than the forehead.
👍: 0 ⏩: 1
Yeah, I meant how wide haha XD I tried using my usual head pattern on him. It didn't turn out TOO bad. xDActually, Gomamon overall turned out horrible. While sewing, I made a random bump a bit back behind his shoulder. So I put the arms there to cover it. xD So it looks kind of... Disporpinate ^^' When I get more fabric, I'll try again. Although, I really wanted to make a Vaporeron, but I can;t find any decent patterns xD I think I might be able to make one, once I figure out how on earth to make it more 3d as opposed to flat.
👍: 0 ⏩: 1
Ah, I'm sorry to hear you're having trouble with him. 
👍: 0 ⏩: 1
Well, to be fair, I really should start with less complex characters. It's just that, simple plushies are too easy for me, and I can't find any easy things XD And I have a habit of altering things. Like, instead of the feet you'd have, for example, I'd want to combine the arms with his flipper. If that makes sense XD
I want to try a Terriermon/Lopmon when I get more material. They must be a bit easier, right? *wishful thinking*
👍: 0 ⏩: 1
Terriermon/Lopmon does look like a much simpler pattern to start with.
👍: 0 ⏩: 1
XD Yeah haha. The one pattern I've found makes no sense to me though tbh ^^' And I've yet to learn how to make them, so I usually improv. I might make like, a creature I make up myself, so if it comes out weird, it won't be so noticeable, if that makes sense XD
👍: 0 ⏩: 0
One question; The strip thing, is that like... Hmm... Well, what exactly is it? I figure that it's like, for the sides, it's his belly, for example. Is that the sort of idea?
And what are those little cross-coloured holes?
Other then those little confusions for me (which, don't worry, I'm not use to patterns yet) this pattern is fantastic! Thanks SO much for uploading it :*
👍: 0 ⏩: 1
Yeah, for the strips, I meant basically just a rectangle of fabric long enough to stretch between the two points I marked. It's just to make a flattish area for the face and the belly.
The cross-colored holes mark where to cut out holes to attach the feet to the legs. For the front feet, for example, cut out 4 pieces total. Take 2 of those foot-shaped pieces and cut out the shaded circle area. That is where the bottom of the leg piece will attach to the top of the foot. Thanks for letting me know that was confusing--I will try to clear it up in the description. I hope everything else works out for you!
👍: 0 ⏩: 0