HOME | DD
 Orochimarisu — Fran Helmet -with Tutorial-

Published: 2009-11-20 20:28:14 +0000 UTC; Views: 59225; Favourites: 861; Downloads: 705
Redirect to original
Description
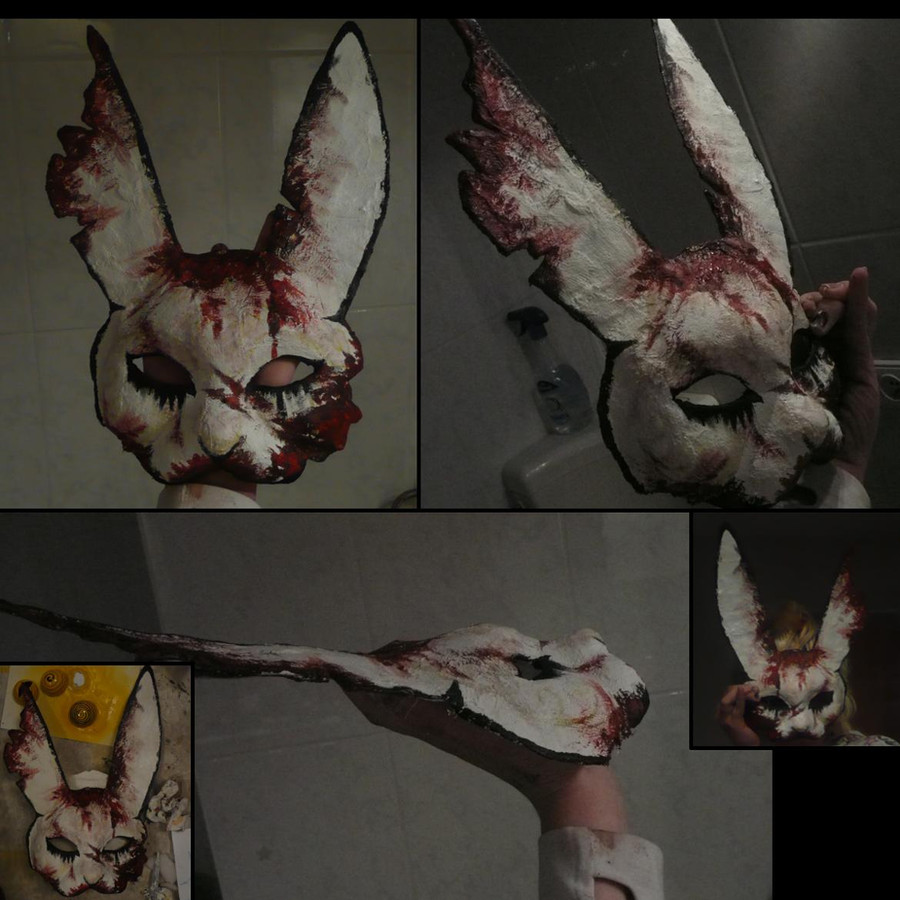
Voila, 4 pics of my Fran helmet! These are meant to help those who have asked how I did pieces of my Fran cosplay, and I'll try to describe as good as possible how I've done it.First of all, I'll describe what's on the pics: (top left to bottom right)
1) The interior of my helmet (which doesn't look as charming as the exterior does, but... who sees this anyway, right?) As you can see I used a headband to HELP keep the helmet on, besides that I pin the headband down to my wig/head with bobby pins, AND even then, you'd still need to be careful not to run into things or lower your head abdrubtly... REALLY! It's called gravity, and it's no fun, but in all these times I wore her, it has only fell over ONCE! As you can see I used wonderflex as a base, and the craftfoam does the rest of the work! ^_^ The wonderflex reached only till ... somewhere around the ears! ^_^
2) Front, not much to say, you can see I used two different kinds of furs though.
3) Side, as you can see I used two layers of craft foam, it's highly flexible, lightweigth and easy to form.
4) Up, to show you the designs from above! ^_^
Alrighty then, now on to the actual making of it:
1)Fior starters;
I started out with these supplies:
-wonderflex
-craftfoam
-Acryllic primer
-fabric and hot glue (and gluegun, of course!)
-fabric (I like my ears, a LOT, but I can imagine you'd want different fabric) I used fake fur (fake RABBIT fur to be precise! 8Dand the average long haired christmas fake ones, only a bit though!) and something they call Mousefleece in Holland, it's special plushie fabric and VERY soft. Should you have trouble finding it, I can easily get more of white and beige (for the ears) and send it to you for the price it would cost me to do so! ^_^
- Markers (black one)
- Blushing powders
- Tissues
- Black spraypaint
- Gunmetal and Silver acryllics (I have Aleen's)
- A towel
- Round forms
- Scissors (duh!)
- A broad, sturdy hairband.
Optional
- An old white wig with fake skin-top. (This is used to get that V-shape coming out from under the helmet at tha front...)
For wig help I suggest you check on cosplay.com, I know at least one good one is on there (which I wished I had seen BEFORE tackling Fran's wig XD I did it slightly the same way, but... not as perfect as she did!)
For a more easier method on the wig, try a curly (or curl it yourself) midlength wig and a clip on extension, and see what you can do about the eggshaped head.
2) Make the ears! ^_^
I did so by cutting a very long u shaped form out of wonderflex... twice ofcourse! Make sure the u is a bt roundish at the tip though, but I guess this is mostly trial and error, as you can cut something to big to begin with, heat it, shape it, cut some off, reshape it, etc etc.
For first-timers with wonderflex, find some tutorials on the internet, all I can say is, be careful, you're working with hot equipment.
Use little pieces of leftover wonderflex to attach\melt your ears on a hairband (this is why I choose one with holes in it, so you could wrap it around it, see the top left image!)
If you're happy with your ears get the beige\skincolored fabric. Put a nice (thin, otherwise it'll bleed onto the fabric) layer of fabric glue on the inside of the ears and press the fabric onto it, making sure they're tight, no folds, etc etc. cut the excess.
Repeat the process for the exterior of the ears, except instead cut them 5 mm-1 cm longer then the ears are. Fold and glue them around the corners. Tip: Stretch the fabric (as mine was a little stretchy) so you'll have less folds when you fold the fabric around the corners.
You now have plain white ears, and here comes the artistic input. Fran has black tips on her ears, what you do is grab your plain black marker/sharpies/that kinda stuff, and just go wild on the tips, make sure you press really good on to the fabric so the base is black as well, and not just the tips of the hairs of the fabric. No worries, it will not bleed onto the inside, because of the wonderflex! ^_^
If you're happy with that, grab your blushing powders (preferrable bronze ones) and use it to blush the inside of the ears, if you're not so sure where to, check either mine (if you like them LOLOLOL not saying mine are good!) or check tutorials on shading and google rabbit pictures, check their ears! Glue some long haired fake fur (the ones on your christmas outfits) on the base inside and outside of your ear! ^_^ You're done for now!
2) The helmet! Step ONE! (a)
I do hope you have an oven with see through glass (or now is the time to clean it! XD) because I found the over to be the best way to do this. Grab your towel, cut a shape out of wonderflex, I CAN not describe (I'll sketch one later, but in the meantime, please people, use your imagination) to be safe, cut it out bigger then you think you need, it's better to cut some off then melt things on (not to mention, make it uglier!)
Put your oven on... wait for a bit, lay your wonderflex in it (to be safe, use baking foil under it, so it won't stick to your oven for eternity!) and wait till you see it CLEARLY getting soft and wobbly. Get it out (Use gloves for this, or a friend with gloves on would probably be even better) and make sure you have the towel (or cloth, whatever, something thin is better, but you'll have hot plastic on it, so beware!) on your head and lay the wonderflex on it, and quickly press it in the shape of your head (not TOO tight though, you'll be wearing a wig, this is why I choose a towel! ^_^ Shape it some more till you have something you want. Cut out holes for the ears as well, cut them bigger then the actual ears' base is, you'll need to put the ears through them and Fran's are as well. No need to make them TO big though, as the bigger they are, the more you'll see!
Step 2b) Get your Craft Foam!
Cut out once for every side whichever shapes you want for the bottom part of the sides. As you can see on the pics, using double layers allowed to to easily get 3d effects.
Please refer to the pics for how I've done. Please remember just because you can only see one layer (the upper one), doesn't mean you don't need that shape on the bottom one as well, for sturdyness as well as keeping it all in shape! ^_^ I have no sketches on the forms, so I won't be able to help you with that, do check the pics if you'd like to copy it! Basically make sure that the bottom one is long enough to glue on the inside of the helmet. Copy the helmet PLUS bottom side made out craft foam in one go (one half would take up a A3 sized craftfoam sheet) and cut it out as well... Glue everything together, and make some extra details for in the middle. Craftfoam is VERY forgiving, so you can make some mistaked on this one! (not big ones though!)
2c) (this is how I've done ALL of my Fran cosplay, paint-wise) Use the Accrylic primer to cover EVERYTHING (including the inside do this... 2 or 3 times, and sand the wonderflex inbetween (careful on the craftfoam, you DON'T want to sand the primer off, since craftfoam absorbs paint A LOT, this would result in ugly spots!) Check if everything is smooth, and covered, and spray'
 aint it BLACK~!' When this is done, grab a piece of old cloth (cotton, or something like that, smooth fabric the least) and a THIN layer of gunmetal on it... rub it on most of the helmet, leaving only the hard to reach spots black. Don't go wild on the paint, only a REALLY thin layer is needed. If this is done, and dry grab the silver one, and do the exact same thing except with even less paint, and make sure only spots that would easily wear out should this be painted metal, get silver. (e.g. corners and raised bits)
2d) Now you have a completed set of ears, and a completed helmet... all you need is get it together!
What I did is get a newspaper, hotglue and put the hairband on my head, covered it with hot glue and then press the helmet on to it. Of course you'd need to wiggle the helmet on your ears for a bit already, or the glue will be dry by the time you do so. This is something where a friend or mum would come in handy! XD If everything is dry get it off, remove the newspaper, and voila...
A FRAN HEADDRESS! ^____________^
I might have missed spots, or I'm not very clear on things, let me know if so, and should you've made helmets with my help, please do show me them! If you think this tutorial (plus me) stink, please let me know as well, and perhaps provide things to make it better.
*sigh* aaaand... DONE!
Related content


Comments: 76

That's absolutely fine, don't worry about your english, I noticed you're from Germany and I'm so ashamed to say my German is the absolute worst! I understood your question just fine, so I might be able to help anyway. What you could try to do, is either to tuck the hairband, if possible, in the wig, by making small slits. If your hairband is too wide, you might get little combs and glue them in. Rossmann will have them, I'm sure, they're usually packed by two. This way you have some hold in the wig.
👍: 0 ⏩: 0

for the love of God thats the best fran helm ive seen...(throws money at you) gimme!! XD
👍: 0 ⏩: 0

I hope it's useful! ^_^ Good luck and loads of fun making and wearing your Fran! ^_^
👍: 0 ⏩: 0

This is so amazing! You're so talented really. Must look awesome!
👍: 0 ⏩: 0


Id rather just buy them lol! but nice job at the helm tho O.O
👍: 0 ⏩: 0

This tutorial... you are a goddess!
How much wonderflex did you need to make the whole helmet? ^-^

👍: 0 ⏩: 2
Oh never mind, I noticed that someone else asked about the same thing. :3
👍: 0 ⏩: 0
Not all that much, but I can't tell you how much exactly.
30cm x 10cm for one ear, and I guess around 30cm x 40/50cm for the headpiece if I would have to guess.
I hope this tutorial helps you a lot! ^_^
👍: 0 ⏩: 1
Oh it will
It's like a dream coming true, really.
")
👍: 0 ⏩: 0


You're very welcome, I hope it's useful!
👍: 0 ⏩: 1

rofl since im lazy would you make one for eme and send it to me and ill pay you  (Wink)")
👍: 0 ⏩: 0

Where could i get wonderflex? I cant seem to find it. does it have another name?
👍: 0 ⏩: 1
[link]
[link]
[link]
Those are the three I know off.
Back then I bought my sheet through cosworx, but they stopped. I wouldn't recommend Dazian if you don't live in the USA.
👍: 0 ⏩: 0


I'm glad it can help! ^_^
👍: 0 ⏩: 0

wonderful tutorial Orochimarisu, i have add this tutorial in our final fantasy cosplay tutorials list at [link] work from you!!
👍: 0 ⏩: 1
Thank you, I got so many questions how I did things, that I decided a tutorial would help best, and I hope it does. That's a nice list of tutorial *faves it for later uses*
👍: 0 ⏩: 0


umz. . . how much did it cost for the supplies? it looks amazin
👍: 0 ⏩: 1
Ow... I had quite a lot already laying around. But should you need to buy everything new, glueguns aren't THAT expensive (mine was like... 5 euro I think) craftfoam.. I needed two sheets which are 1,20 each, wonderflex is quite expensive at a 35 euro a sheet (75cm by 100cm sheet) but are available in smaller pieces. Spraypaint and acrylics were 12 euro I think. But like I said, I already had most of it laying around for other projects.
👍: 0 ⏩: 1


THANKS! I hope it helps, or at least inspires! ^_^
👍: 0 ⏩: 1

Believe it or not but I have a very hard time with helmets on my anthro bunnies, this will help sooooooo much!
👍: 0 ⏩: 0


Thanks, I hope the tut is of some use for you! ^_^
👍: 0 ⏩: 0

this tutorial rocks and your headdress is great! out of curiosity, how much wonderflex/craftfoam did you end up using?
👍: 0 ⏩: 1
wonderflex... hrmmm I'd guess a plate of 40cm by 40cm would be enough (40cm is about 16 inches) craftfoam, I had two bigger sheets (the A3 sized ones) and I think 2 to fill them up. I had the two bigger ones just because they cover a lot of space, and you'd be able to do more out of one piece... but if you work miracles with craftfoam, you might as well be done with 5! ^_^
Hope this helps you!
👍: 0 ⏩: 1

Very much welcome! ^_^
👍: 0 ⏩: 0


This is awesomely done! I'll have to do this sometime just for the heck of it.
👍: 0 ⏩: 0


Hopefully I can use this as a way to make my very distant but coming up Mjrn cosplay. That Viera get no attention. *A* Beside FRAN.
Beautiful job though.
")
👍: 0 ⏩: 0
| Next =>