HOME | DD
 pythos-cheetah — Furry Photomorph Tutorial: Part II
by-nc-sa
pythos-cheetah — Furry Photomorph Tutorial: Part II
by-nc-sa

#anthro #furry #photomanipulation #photomorph #photoshop #tutorial #anthropomorphic
Published: 2015-03-07 04:23:27 +0000 UTC; Views: 15042; Favourites: 103; Downloads: 144
Redirect to original
Description
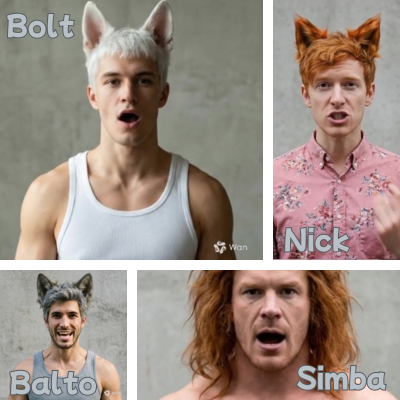
Here’s part two. It covers how I do the head, as well as the other main coloring technique that I use.
Fox by woxys
Related content


Comments: 27

👍: 0 ⏩: 1

👍: 0 ⏩: 1
👍: 0 ⏩: 0

👍: 0 ⏩: 1
👍: 1 ⏩: 1
👍: 0 ⏩: 0

Nice tutorial and work. Pretty much the way I do it too
 (Wink)")
👍: 0 ⏩: 0

Just a question, I'm using an online photoshop copy called toolpic ( www.toolpic.com/ ) What would it's equivalent of Hard Light and Soft Light be?
👍: 0 ⏩: 1
It has a hard light option (conveniently called "hardlight") but I didn't see any obvious soft light analogue. You might be able to get away with just duplicating the hard light layer and reducing the contrast way down
👍: 0 ⏩: 1
Ok, then. Thanks! I can't wait to start manipulating!
👍: 0 ⏩: 1
Another question... Where is hardlight xD
👍: 0 ⏩: 0

Can you make one of these detailed tutorials for simple color skin? Black, green blue, like that.
I want to make two photoshop's. A killer whale & a Zora-Link from Majora's Mask.
👍: 0 ⏩: 1
Well, for just skin color, you can do all of the steps up through where I start adding the fur cut outs and stop there. The green layer I use makes for a good Incredible Hulk, but you can really use any shade you'd like there
👍: 0 ⏩: 1
I tried making an orca using this techneck & the colors went back to the skin colors. I tryed a variaty lighter blacks & the same thing.
As for making a Zora-Link. I'm having truble on making the boomarang fins & head. Have any tips for that?
Id love to see your verson of Zora-Link.
")
👍: 0 ⏩: 1
Do your layers look like this?
-Layer with the skin parts erased/masked out/whatever
-Soft Light layer
-Hard Light layer
-Layer of solid color
It can be tricky to get a good rich black sometimes without losing the definition of the body this way, so you might also try just applying a couple of adjustments to the skin. A combination of a Levels adjustment to darken and Hue/Saturation to desaturate might do it.
👍: 0 ⏩: 0

Thank you for these tutorials. This will be a big help in my job, when I need to do some copy/pasting, and blending.
👍: 0 ⏩: 0

Wow. From the bottom image it looks like that character Is going to be pretty nice. Are you going to show a image of just her after the tutorial is over ?
👍: 0 ⏩: 1
Yeah, I'm going to post it as a regular submission
👍: 0 ⏩: 1

Where do I find saturation levels in Photoshop CC?
👍: 0 ⏩: 0
I almost have the technique down for fur on Gimp.... But I still can't figure out how to soften the edges of the fur!
👍: 0 ⏩: 1
Do you mean the edges of the body, or the edges of the fur layers where they overlap?
👍: 0 ⏩: 1
where they overlap. I am going to try PhotoShop CC so I can better understand what you are saying in your tutorial.
👍: 0 ⏩: 2
Add a layer mask to each layer of fur, and then use a soft black brush at about 20% opacity to go over the edges of each layer. You might have to make several swipes around the edge to make it blend in to the layers beneath it.
👍: 0 ⏩: 1
OK. I actually tried it without the layer mask and it worked fine
👍: 0 ⏩: 0

Yeah. With Gimp it's more complicated. It's better to blur this edges with a small soft Brush. But it work too
blackwoodwolf.deviantart.com/a… and blackwoodwolf.deviantart.com/a… i done with Gimp 2.8.14 - i think it's not too bad
Don't forget: Gimp is a free open source Software runs under GPL. Adobe PS is an expensive professional Graphic Software
 (Smile)")
👍: 0 ⏩: 0

well there is one thing I have learnt without following this tutorial on something-what the saturation tool does in various programs, I have only being using it with one thing instead of two no wonder I saw no difference
👍: 0 ⏩: 0