HOME | DD
 R0tti — Corel Painter Ovals in a row
Published: 2008-05-31 19:34:44 +0000 UTC; Views: 3845; Favourites: 18; Downloads: 101
Redirect to original
Description
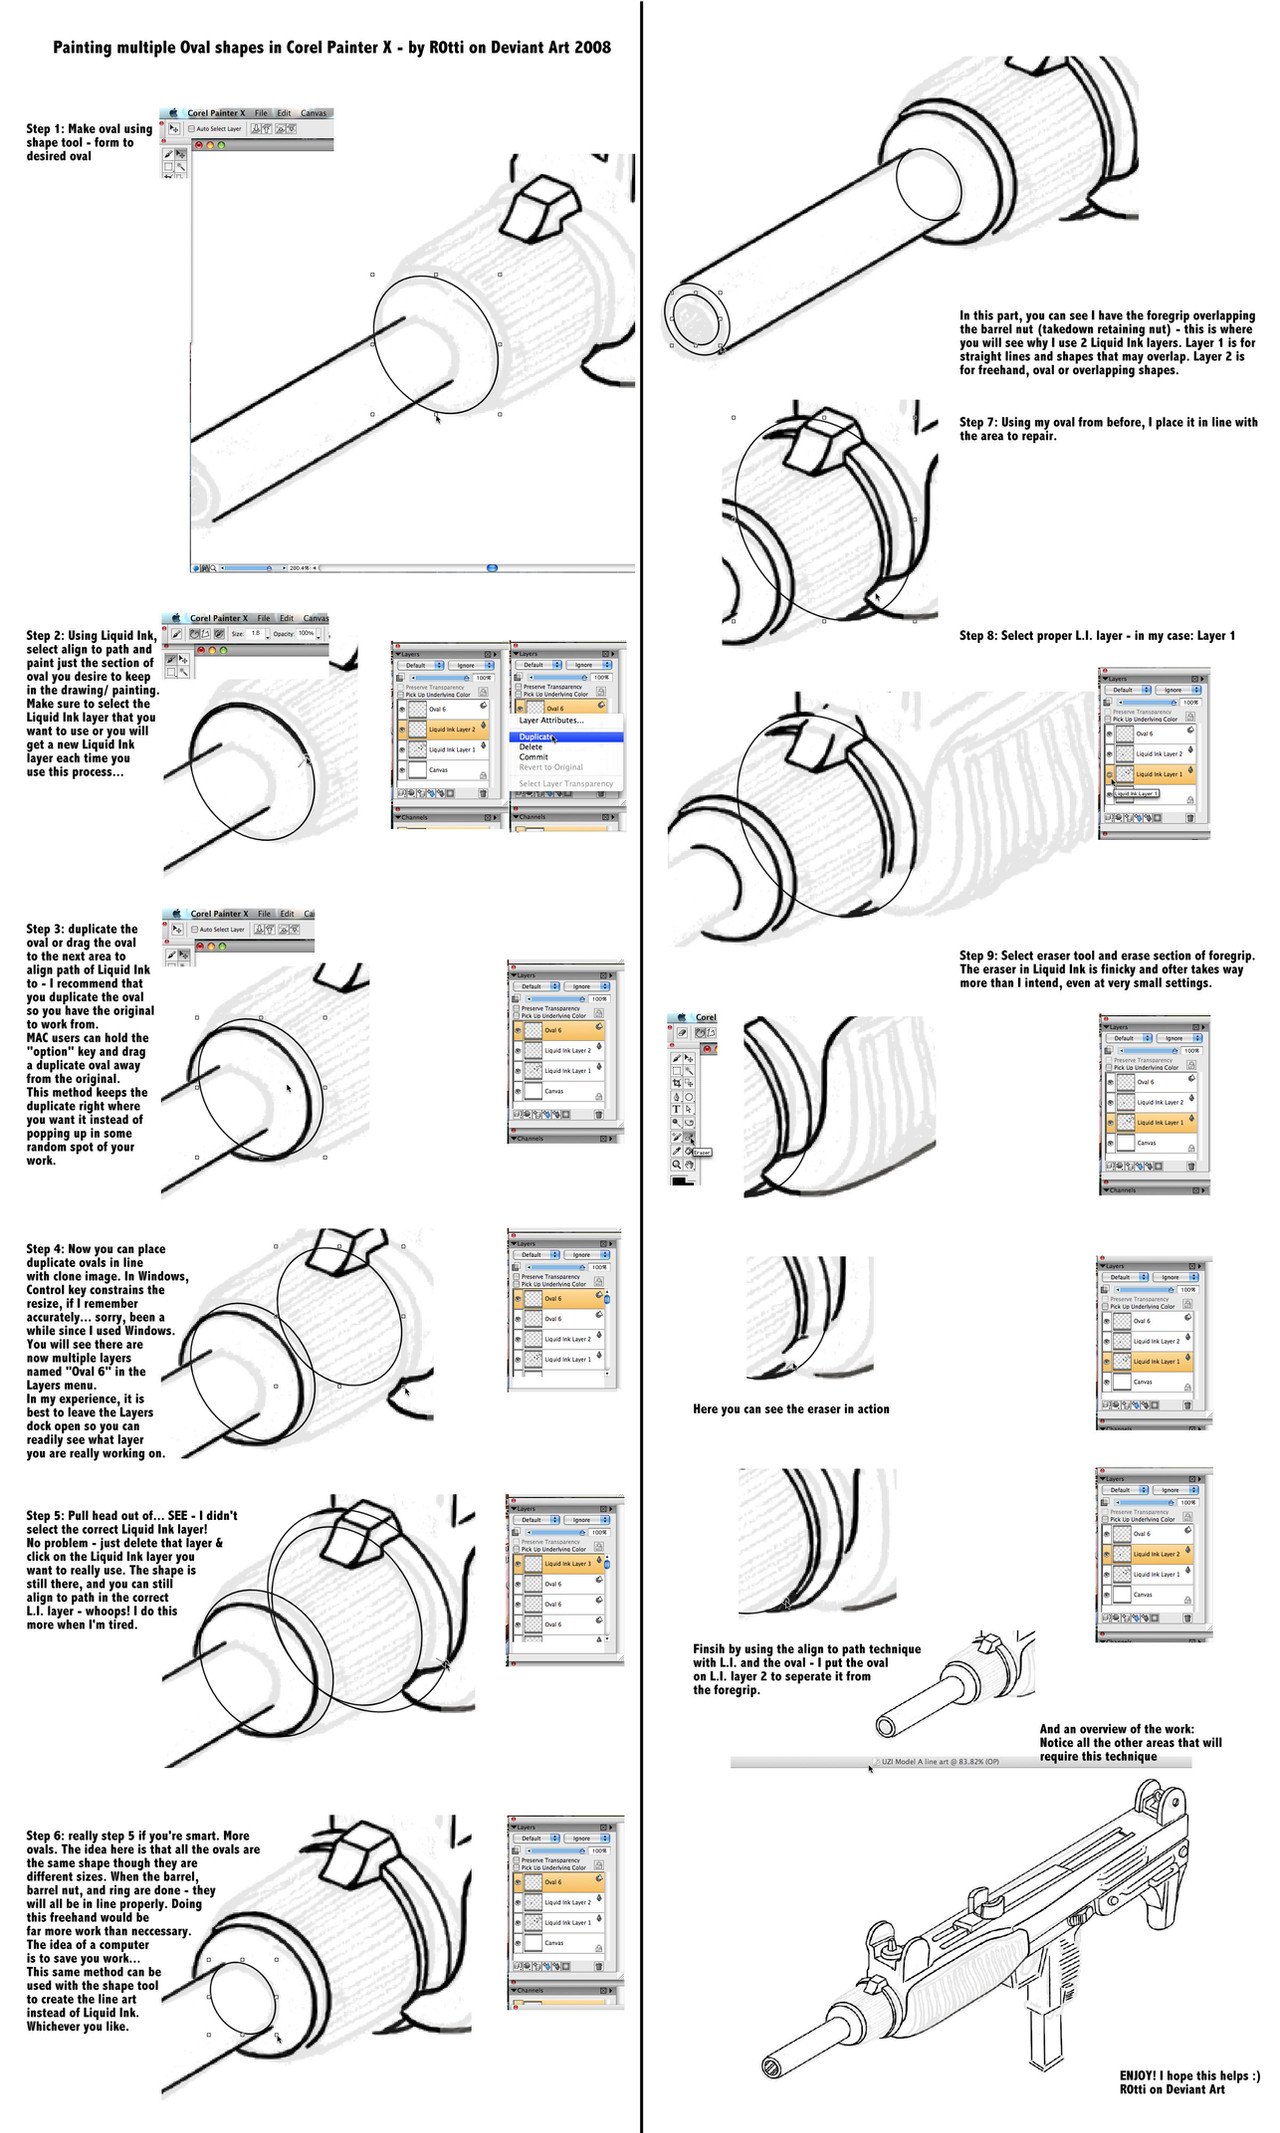
Here is an better look at the process of using Painter to draw over a cloned image.In this tutorial, the goal is to get several ovals of various sizes to line up and to paint them in Liquid Ink to save as Line Art layer to be used as the top layer of a painting. Really, this is the tedious part but the part that makes the final render so clean and clear. The Liquid Ink lines will look jaggy or pixelated until saved as a jpeg or TIFF. If you save a file as a TIFF, deselect the "save Alpha Channel" box or you will only see the Alpha channel
") .
.Look closely at the steps to see where the cursor is - this is an actual live screen shot of what I am doing at that time.
In step 8, you will see that you can click on the "eye" icon in the layer menu to make a layer visible or invisible. This helps you to know what is on that layer.
Hope you enjoy and hope it helps!
Up next is detailed look at Selections and how to save time making multiple masks where selections overlap or are alongside each other - necessary for the next stage, color
 (Smile)")
Related content


Comments: 6

Now that I actually have Painter X... I'll go ahead and give this a shot!
👍: 0 ⏩: 1

Cool Suds! Can't wait to see your work.
👍: 0 ⏩: 0

Browsing quickly though this it seems like a lot of work!! lol!
First you have to do the lines and THEN you lock onto and paint over them?? wow, it would take ages. But then again it gives a more realistic pen-made feeling to it.
Could you explain a bit more on the brushes, cause it's got tons of them and I'm somehow lost.
Good toot by the way!
👍: 0 ⏩: 1
It is a bit more work for this result than just snapping a bezier line and "stroking" the shape to get a line. By stroking the shape, I mean adding color and line width to the shape's line. The two main drawbacks to me on vector type lines that way are the rigidly exact line (no variable - good for technical, but not always good for cartoons)... plus, I'm not a real vector master (I've used 'em but just for precision drawings - not artsy ones).
The second drawback for me is you end up having to manage a few hundred separate shapes (I'm sure that I've missed some way to simplify that - just haven't figured it out yet... this is very part time for me).
With the liquid ink layer, I end up with ALL of my line art on a nice clean layer floating above the background, the painting - everything.
So when I drop the layers to the canvas (look under "Layers"), the line art is on top and I don't end up with any funny white pixels randomly jagging up my lines.
A quicker way, if you just want to run with single width lines is to draw a shape (mentioned in some earlier tutorials), convert to selection in order to paint inside, then convert back to shape and "stroke" the shape to get the line. Quick. That's what I've done on my cars to a degree... but I didn't like it on other people or landscapes. Though it would make more sense for a gun
Have you located the Liquid Ink brush?
I use the Fine Point variant - my main stay. You can spend months playing with all the variables in brushes or even creating new brushes!
Under "Corel Painter X: Preferences: brush tracking" you can set up the general feel of how your stylus reacts to the tablet. I'll put something together more in depth on brushes in a bit
👍: 0 ⏩: 1
Of course, I forgot to mention the other reason why I like Liquid Ink - I can freehand ink on the layer easily or erase from it easily - that is way quicker than the bezier options for me. The reason I use the bezier (vector) option is for exact line control while still being on the Liquid Ink layer...
You can also "snap" a Liquid Ink straight line - look up in the right corner when you have a liquid ink brush open - there are three icons - the first one is freehand (swirly line), second one is straight line, the last one is "align to path" (brush tip with semi-circle around it) and only works in conjunction with the freehand icon. Make sure you click on the Liquid Ink layer you are wanting the lines to go into or you get a new L.I. layer.
There are a few ways to adjust the Liquid Ink brush on the tool bar (should be at the top of the screen): Size, Opacity, Smoothness, Volume & Feature.
Feature will add to the realism of bristles leaving little variations, Volume lets the ink flow or restricts it. I generally just adjust the size and opacity - a bit on the light side for opacity to keep it from bleeding all over. It acts like wet ink.
 (Wink)")
👍: 0 ⏩: 1
One last thought: the effort in drawing a shape is actually the most work. Once a shape is made, it doesn't take but a second for me to slide a brush across it - no more time than it takes me to access the shape menu to change a lines width or color...
👍: 0 ⏩: 0