HOME | DD
 Riveda1972 — [MMD] Making material sliders for RayCast? (UPD.)
#effects #environment #hdri #material #mmd #mme #pmx #shader #shaders #sphere #textures #toon #tutorial #raycast #ray_tracing #help #lighting #mikumikudance #pmxeditor
Published: 2019-09-11 13:13:33 +0000 UTC; Views: 11161; Favourites: 90; Downloads: 19
Redirect to original
Description
Both a "tutorial" and a help request...")
Usable for both raytracers and for common uses with other classic shaders
Some months ago when I was still working on my previous C6V2 base, I've read some articles and tutorials, mostly written by Trackdancer , DisastrousBunny and vasilnatalie or found on learnmmd.com , all about the various settings involving the model's materials, and accessible from the Materials Tab in PMXEditor. Many models have their own sliders/facial to control some materials settings, for example in order to change some colors, to increase or decrease the reflections on some parts, and so on. reading those tutorials I started being persuaded that the recently increasing popularity of Lighting environments like RayCast MMD, IK polish and others, makes the need to provide models with some extra sliders other that the usual ones. yes maybe most of MMDers won't use hard (and real) lighting/raytracing environments and they'll just go on using their favorite shaders. But the number of MMD artists that use these advanced tools is increasing more and more.
As far as I've seen and read these environments take full control over the lighting, and so the shading and the drawing of shadows. More they also allow to take control of the subsets of materials, applying custom normal maps and reflections, overriding the original settings. But as many MMD artist just use the basic features of these environments, what often happens is that the standard material setting are conflicting with lights, which will cause unwanted reflections, hair or cloth seeming like made in glossy plastic, eyes reflecting lights as if they had a full white autoluminous effect on, and so on.
So, what I was wondering about, is how the standard material settings (I mean the ones that can conflict with the ray-tracing environment) can be zeroed without need to open the models in PMX editor and manually change the default values. As far as I've seen, the most conflicting settings are the ones concerning the ambient lighting, the toon shaders, the specular settings and the sphere/sparkle textures.
What I'm doing on my new models (not only my WIP C6V3, but any recent model I'm working on) is providing them of global material sliders useful to remove these unwanted interferences.
Ideally I'd then group all of these sliders into a global new one, called something like "RayCast Optimization". If only i hadn't a problem in controlling the toon texture (read below and if you have suggestion I'll thank you until the end of the universe!).
EDIT: Actually, as discussed with vasilnatalie it is highly probable that such of sliders will be almost useless when paired with RayCast as it tends to ignore most of the material sliders, but they can be useful for other purposes anyway. Definitively, the only way to be sure that a model will work as predicted/wanted once in the RayCast environment, is to make a specific version of your model for RayCast and providing it with materials settings specifically customized for RayCast. Unfortunately it seems there's no escape from this. I'm not going to delete this tutorial just because such of slider can help you in other ways (in the worst of cases you'll learn something more about how MMD materials work)
All these sliders affect the whole model, i.e. they have been set on the material having Index Value -1. This way the slider will be applied on the whole model.
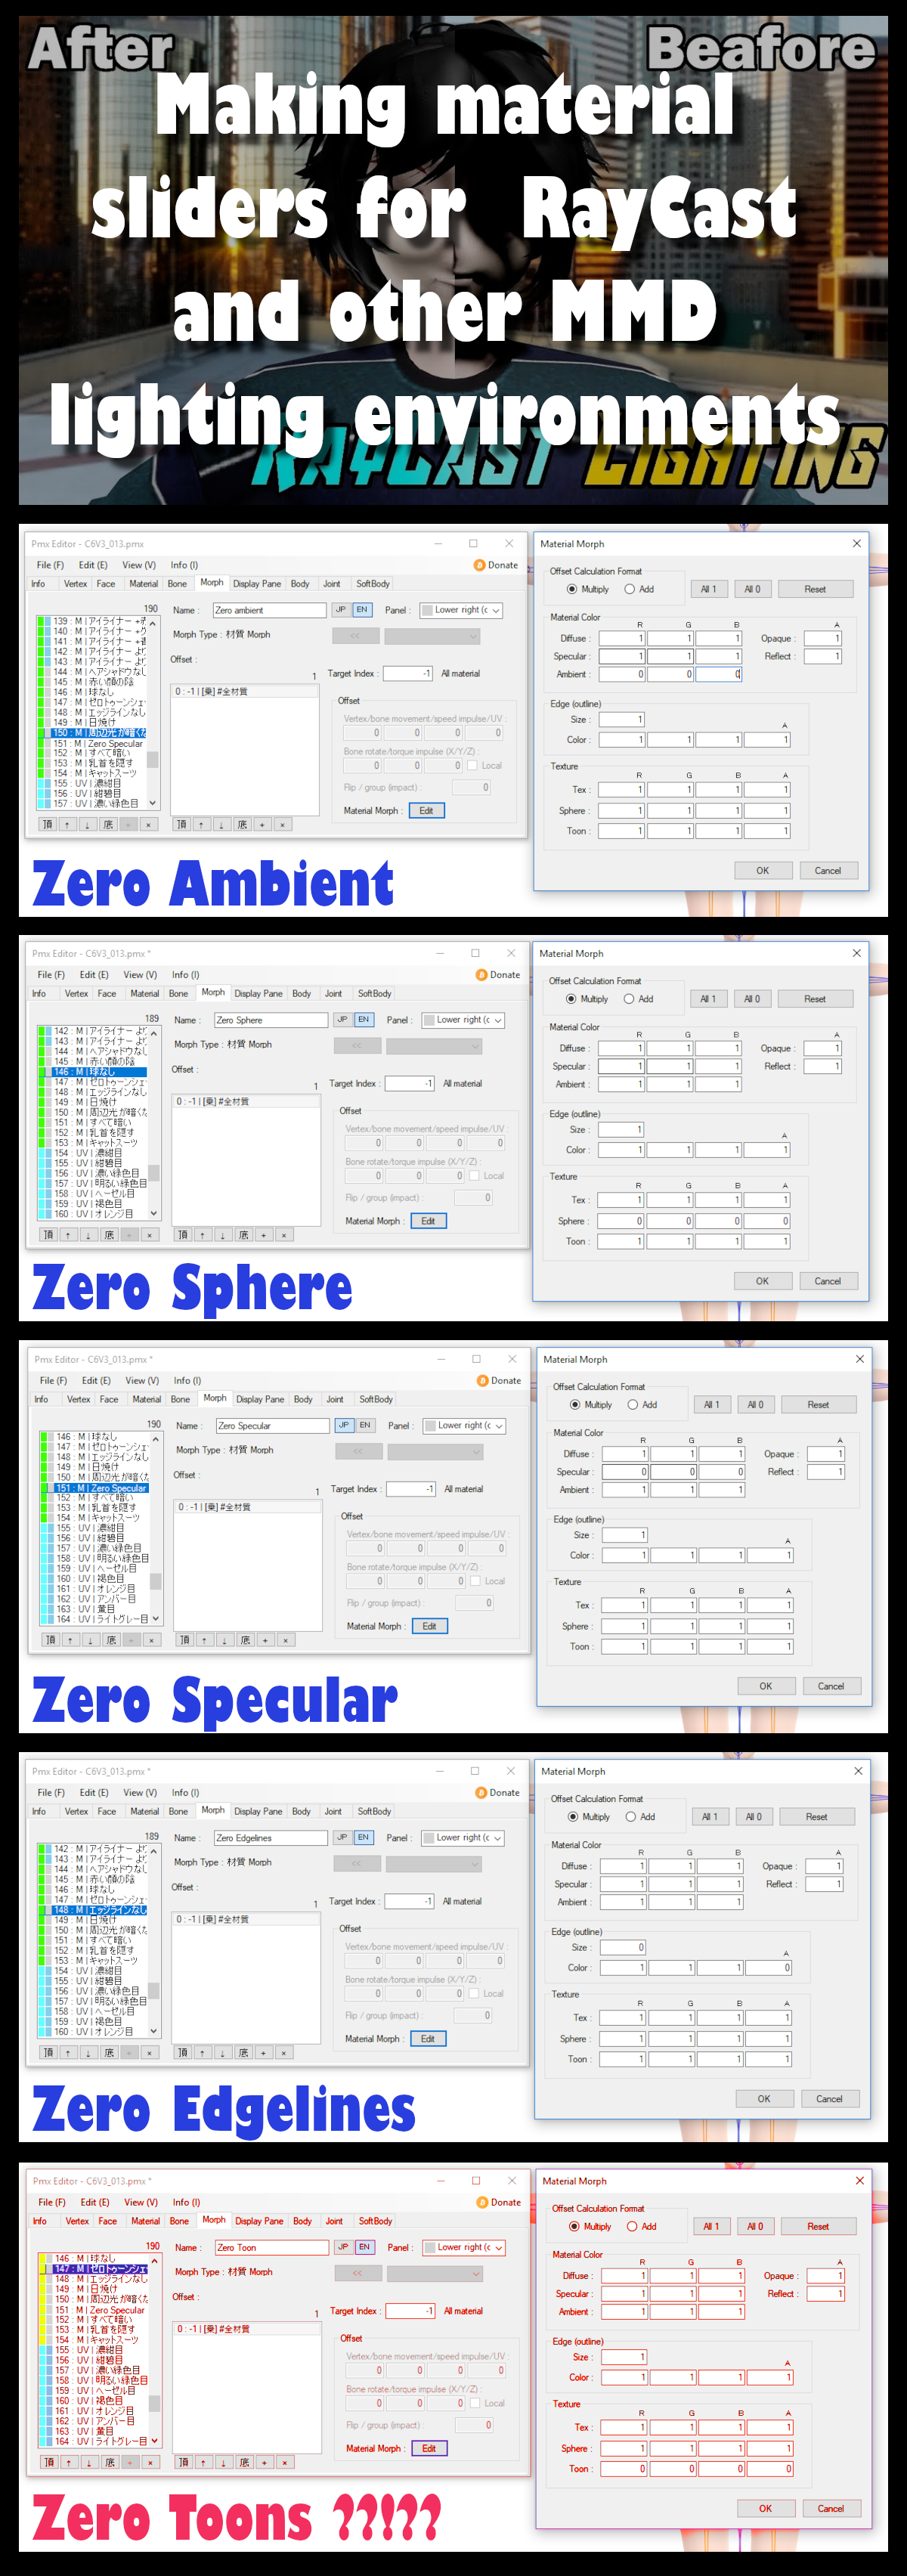
1) Removing the Ambient light settings
This is probably the easiest one. The theory is that in a full dark environment without any light source, the model should be totally black, so this value (if MMD selfmade lighting system was a real lighting system) should be black too, i.e. having 0,0,0 as values. The fact that the hardcoded MMD lighting system is not a real lighting system, makes uncomfortable to set these values to zero, because the model, in a default MMD window with default lights and without any MME effect active, will seem too dark, very darker than what's considered normal.
This issue has caused the (bad) habit for modelers and editors to use the Ambient values for normal coloring purposes instead of its strict function. Playing with both Diffuse and Ambient colors has been for a long time a handful way to quickly get new colors, or to hack the color resulting from the textures applied on the materials.
And this is one of the reasons of the weird effects when you load such of models into a dark scene and they seem very brighter than what they should be,
Our goal, here, is to zero any inner setting defining how the model is affected by the environmental lighting.
So the first custom slider (I'm calling it "Zero Ambient) uses the Multiply factor, and values of 1 on all the settings but the Ambient Colors, where you can set 0, 0, 0.
----
2) Removing the Specular light settings
Probably one of the most misunderstood setting, including for me. I had to beat my head on the ground a lot of time before understanding what I was doing wrong. Well this setting defines how light is reflected by the chosen material. But it's actually a compound setting, formed by two distinct elements:
- 1) Specular light (the classic RGB values, from 0 up to 1), defining the color and the intensiry of the reflected light
- 2) Specular power (the final value, from 0 up to 100 or more), defining how much "diffuse" is the glossiness of the material
The first 3 values (as usual in RGB system where R = Red, G = Green and B = Blue) define what part of the light spectrum is reflected. When you have the three values all on the same value (examples: 0,0,0 - 1,1,1 - 0.5,0.5,0.5 ...) you have black/white type of reflected lights, but the reflected lights can be colored depending on the material you want to simulate. For example settings like 1,0,0 (full red) will mean that only the red part of the incoming light is reflected by the material, while a 1,1,1 setting will mean that the light is completely reflected as a full white white. Note that values lower than 1 will reduce the global amount of reflected light, while values higher than 1 will be ignored. Zero means that no light is reflected.
Now, let's see the misunderstood value, i.e. the second one, the specular strenght. This value defines how "diffused" is the light (defined in the RBG settings) when it's reflected. This can be confusing (I was confused too, actually). A low value means that your material will have isolated, thin spots of highlights, while higher values will mean that your material will diffuse the reflection on larger portions of its surface.
You can actually play with these values (both the RGB settings and the specular power value) to get shiny/glossy/rough reflections, as the two settings are independent but having a compound final effect.
Considering that RayCast and other popular advanced lighting environments have their own settings to simulate specific materials like hair, fabrics, rocks, skin and so on, we probably want to control and remove the standard specular settings used in pure-MMD artworks or in combination with basic MME Effects that don't affect the reflection. So our goal, here, is to remove the reflection settings, allowing the user to use the material settings provided by the raytracing environment.
So the second custom slider (I'm calling it "Zero Specular) uses the Multiply factor, and values of 1 on all the settings but the Specular Colors, where you can set 0, 0, 0. Actually the real meaning is that the reflected light is "black" but for practical purposes we'll say that the material is reflecting nothing.
For the Specular power, you have two alternatives, resulting in the same way when your slider is totally activated (100% slider is ON), but with different behaviors when you use drag the slider along intermediate values.
a) Multiplying the Specular power to 0
b) Multiplying the Specular Power to get a 100% final result. (it's depending on the starting Specular Power value you've set. If your material has Spec power of 20, you could put 5 as multiplier, to get 100 as final result; if you start from 50 a 2x factor is enough and if you start from a value of 5 you'll need a 20x multiplier, etc)
As the Slider will involve both the lowering of global RGB reflection (color and intensity of reflected light) values and the general specular power (smaller or diffused highlights), while using your facial slider you'll end up anyway with a "black light" reflected (i.e. no reflection), but the behavior and the look of the material crucially changes depending on what you have chosen, a) or b) along any intermediate value of the slider. If you chose the first option (a), raising the slider you'll get darker reflections and highlights gradually smaller than the original ones; while choosing the second option (b) you'll gradually get darker reflections, but they'll also be diffused around all your material surface. When the slider is on 100% active, the result is the same, as the reflected light is totally black (no reflected light, under a practical point of view).
Note: This setting (Specular Power) is also used by Autoluminous and Objectluminous, popular MME Effects that are triggered by any material having 0,0,0 on RGB specular color values, and 110 (or more) as roughness strenght. Just take this into account if you plan to make models that could be used both with standard MME shaders or effects like Autoluminous or ObjectLuminous, and advanced raytracing environments. If you give your models some autoluminous preset settings you'll probably need to add a slider that will remove these setting if the final user won't use Autoluminous at all (As a general rule is however a good idea to not set an autoluminous material as lit on by default, providing sliders able to switch it on/off at will).
----
3) Removing the Sphere/Sparkle texture settings
This is another important factor affecting the way your material will reflect lights. So, in case you're going to use a raytracing environment with its own material settings, you may want to cancel the default effect added by the spa/sph texture (if present). These textures are normally used to apply specific effects making a material lookig like a metal, or glass, or as a wet skin, or as a rough fabric cloth. If you're applying shaders provided by the raytracing environment, though, these sphere setting would be useless. Note that providing such of slider can be useful regardless the fact the final user is using raycast or not. It can be however handy to have a slider to control how shiny is the material and allow the user to control this once the model is loaded in MMD.
Our goal here is to lower to zero the effect of the sphere texture set on the material.
So the third custom slider (I'm calling it "Zero Sphere) still uses the Multiply factor, and values of 1 on all the settings. here you won't change the default main values: you have to find the sphere/sparkle setting in the lower part of the dialog window (see the image) and set 0 (zero) on the A (Alpha = Visible/invisible) value. This should be enough, but you can also set on 0 (zero) also the Sphere RGB colors.
----
4) Removing the Edgelines settings
The edgelines don't affect lighting at all but they draw a line around the material, giving the model a comics styled way of drawing. This setting is also used, sometimes, giving the line a size of zero, but some color values: this will simulate a "inner face" color on the selected material. it can be useful in some cases to hide annoying clipping issue (if badly used it can also ADD troubles and make more evident the clipping issues). regardless of what it's used for, it's pretty useless when using a raytracing environment. We're supposed to use raycast to get more realistic artworks, and having comics style edges around the models surely doesn't match out goal. So we'll just remove the lines. Note that many model neither have edgelines, but if you want the final users to be free to use them or not use them, just add this slider to make them control it.
The fourth custom slider (I'm calling it "Zero Edgelines) still uses the Multiply factor, and values of 1 on all the settings. You have two values to manage here. Just ignore the Edgeline RGB values as controlling the color of the lines is not our goal (unless you want this too). Just put 0 (zero) on both the Size/Thickness value and the A = Alpha value. The Alpha values is optional, as this will remove also the fake "inner face" effect, while the very must is to decrease the line size to zero.
----
Just ignore this one, as is pretty useless with any MME shader, which will just ignore any toon texture preset
5) Removing the Toon texture settings
Ok, this is my worst nightmare. Toon textures (if present) draw in MMD a fake, simulated shadow on the affected parts. But of course if you are using a raytracing environment, having fake shadows is totally useless. So our last slider will remove the toon texture effects.
For reasons that I currently don't understand, my "no toon" sliders work in PMX Editor only (when testing them in the T/Posing window) but they don't work at all when I try using them in MMD. Maybe there's something wrong I'm doing. Any suggestion will be appreciated. Anyway this sliders is pretty equal to the one used to remove the sphere texture, you just have to Multiply zero on the Toon texture setting instead of the Sphere setting.
Ideally you want to decrease to zero the A = Alpha value on the toon texture. I wouldn't touch the RGB values for the toon textures and just lower to zero the alpha (visibility) value.
----
Bypass this one too, if you're using RayCast: it will just ignore material sliders
The final touch: merging all these sliders in a single one
Supposing that you've managed in making the wanted sliders, you can let them as they are, or you can provide to the final user a nice, handy global slider controlling all of them together. I'll call it "RayCast Optimization". In the morph/facial tab, select the wanted sliders, right click, and choose "Join to group (G)". You'll get a new (black type) slider. When it's triggered it automatically uses all the previous sliders together. Handful, isn't it?
Just remember, for all these sliders, to give them both jap and English names and to add them in the Dipslay tab, once you're done.
Credits
- The "be(a)fore/after" picture on the top is parto of this tutorial by 180 Studios (Albert) youtu.be/ZDV17_QCX-Q
- Model used to show the testing sliders is my WIP Caprica Six Version 3 (C6V3) [MMD] The path from C6V2 to C6V3
- vasilnatalie for his explanations, as usual
 (Smile)")
Related content


Comments: 6

> This means that rough materials should have high values, while shiny materials should have lower values here.
No.
There are two different components to how shiny an object looks. One is how *much* specular there is: a shiny object has a lot of specular, and a rough object has a little specular. This is controlled by specular color-- if you use 1,1,1 white for specular color, you will get a lot of specular. If you use 0.5, 0.5, 0.5 gray, you will have less.
The other component is specular *power*. This is referred to in various translations as "reflect" or "shininess"; in other game engines, it might be called "gloss" or an inverted value might be called "roughness"-- but specular power is the best word for it. A shiny object has very bright highlights, but those highlights are very *tight*. They don't spread across the model. Whereas a rougher model has very dull highlights, but they're very broad.
The problem is that the way that MMD calculates specular, these two values are not independent. If you leave your specular color at a certain brightness and decrease specular power, you will see your specular becoming both more broad and more bright. And if you increase your specular power, your specular will become tighter, but duller. But that relationship is exactly opposite to what you want: broad should be dark, tight should be bright.
So unfortunately you can't just tune these independently of each other. If you want to make a shiny object, you need to both increase specular power and increase the value (brightness) of the specular color. If you want to make a rough object, you need to both decrease specular power and decrease the specular color.
> Ideally you want to decrease to zero the A = Alpha value on the toon texture. I wouldn't touch the RGB values for the toon textures and just lower to zero the alpha (visibility) value.
This may be where you're having trouble. Toon is a little complicated to understand.
There are two different ways that toons are handled, depending on model, including type (x files are handled differently), self shadow settings, and MMD self-shadow mode.
Without self-shadow, all "lighting" is really toon color, and toon alpha *should* (untested) affect model transparency like any other alpha. But with self-shadow, toon alpha is completely ignored.
In self-shadow mode, your toon is multiplied into your shadow color. So if you use a white toon, you won't have any shadows, but if you use a black toon, you'll have stark, black shadows. (And only the lower left corner of the toon texture matters for self-shadow mode.)
So blacking out your toon is really cancelling out your ambient lighting-- much more so than blacking out your "ambient" value, which will leave you with color in your shadows.
This varies depending on implementation, of course, and toon is something where there is wide variety. The published "default shader" doesn't handle toon in exactly the same way that the default MMD shader actually handles toon (but the differences are minor.) And the great majority of effects that create their own lighting straight up ignore toon color/texture because it doesn't fit into their lighting model.
👍: 0 ⏩: 1

Thanks you, as usual your corrections are useful. Actually I got the point but I used the wrong terms to express it. So, under a practical point of view (considering this particular use) it's better that the reduction of the RGB values goes together with the reduction of the specular power, right?
About toon I didn't imagine it was such o mess °_°
But this "The published "default shader" doesn't handle toon in exactly the same way that the default MMD shader actually handles toon (but the differences are minor.) And the great majority of effects that create their own lighting straight up ignore toon color/texture because it doesn't fit into their lighting model" could sound good, if this means that also RayCast ignores them. This would mean that for these purposes (an "optimizing" slider) the toon settings can be ignored.
btw, do you know how does IK Polish work? I've seen only some videos but the final effect is good. Is it similar to RayCast or...?
👍: 0 ⏩: 1
> the reduction of the RGB values goes together with the reduction of the specular power, right?
Yup.
> sound good, if this means that also RayCast ignores them
Raycast does ignore them, other than, IIRC, you can use the toon texture slot to store a texture used by a Raycast material if you define the material to do that. (Raycast also ignores material morph sliders IIRC. But it offers its own HSV based sliders that you can take advantage of simply by adding an empty group morph.)
> how does IK Polish work?
Sorry, haven't checked it out, don't know.
👍: 0 ⏩: 1
Ok so I'm correcting the description, here. Actually on my C6V3 I already lower both values using the same slider, what's funny is that I've modified it - leaving unaltered the specular power - right for the purposes of this article
Hmmm are you sure that RayCast ignores material sliders? This sounds less good actually. As I'veseen many pics and videos where some basic tools of Raycast have been loaded but not its materials presets, and as a result the original material settings defined on the models cause the mentioned weirdnesses with reflections, parts looking as glossy plastic, and so on... if material sliders are just ignored this mean the only way to be sure that a model will be seen in a proper way even if the user doesn't apply raycast materials is to edit the model and change the default values...
")
👍: 0 ⏩: 1
It probably depends on the specific slider and the way the material is set up. There are a lot of combinations possible.
To use raycast well, you really need to make raycast specific materials for your models. If you want your model to work well with Raycast, distribute it with Raycast material files.
👍: 0 ⏩: 1
... *** going for suicide ***
👍: 0 ⏩: 0