HOME | DD
 rockgem — Fractal Maniputation tutorial for Photoshop -Piggy

Published: 2014-03-24 14:12:01 +0000 UTC; Views: 1642; Favourites: 18; Downloads: 20
Redirect to original
Description
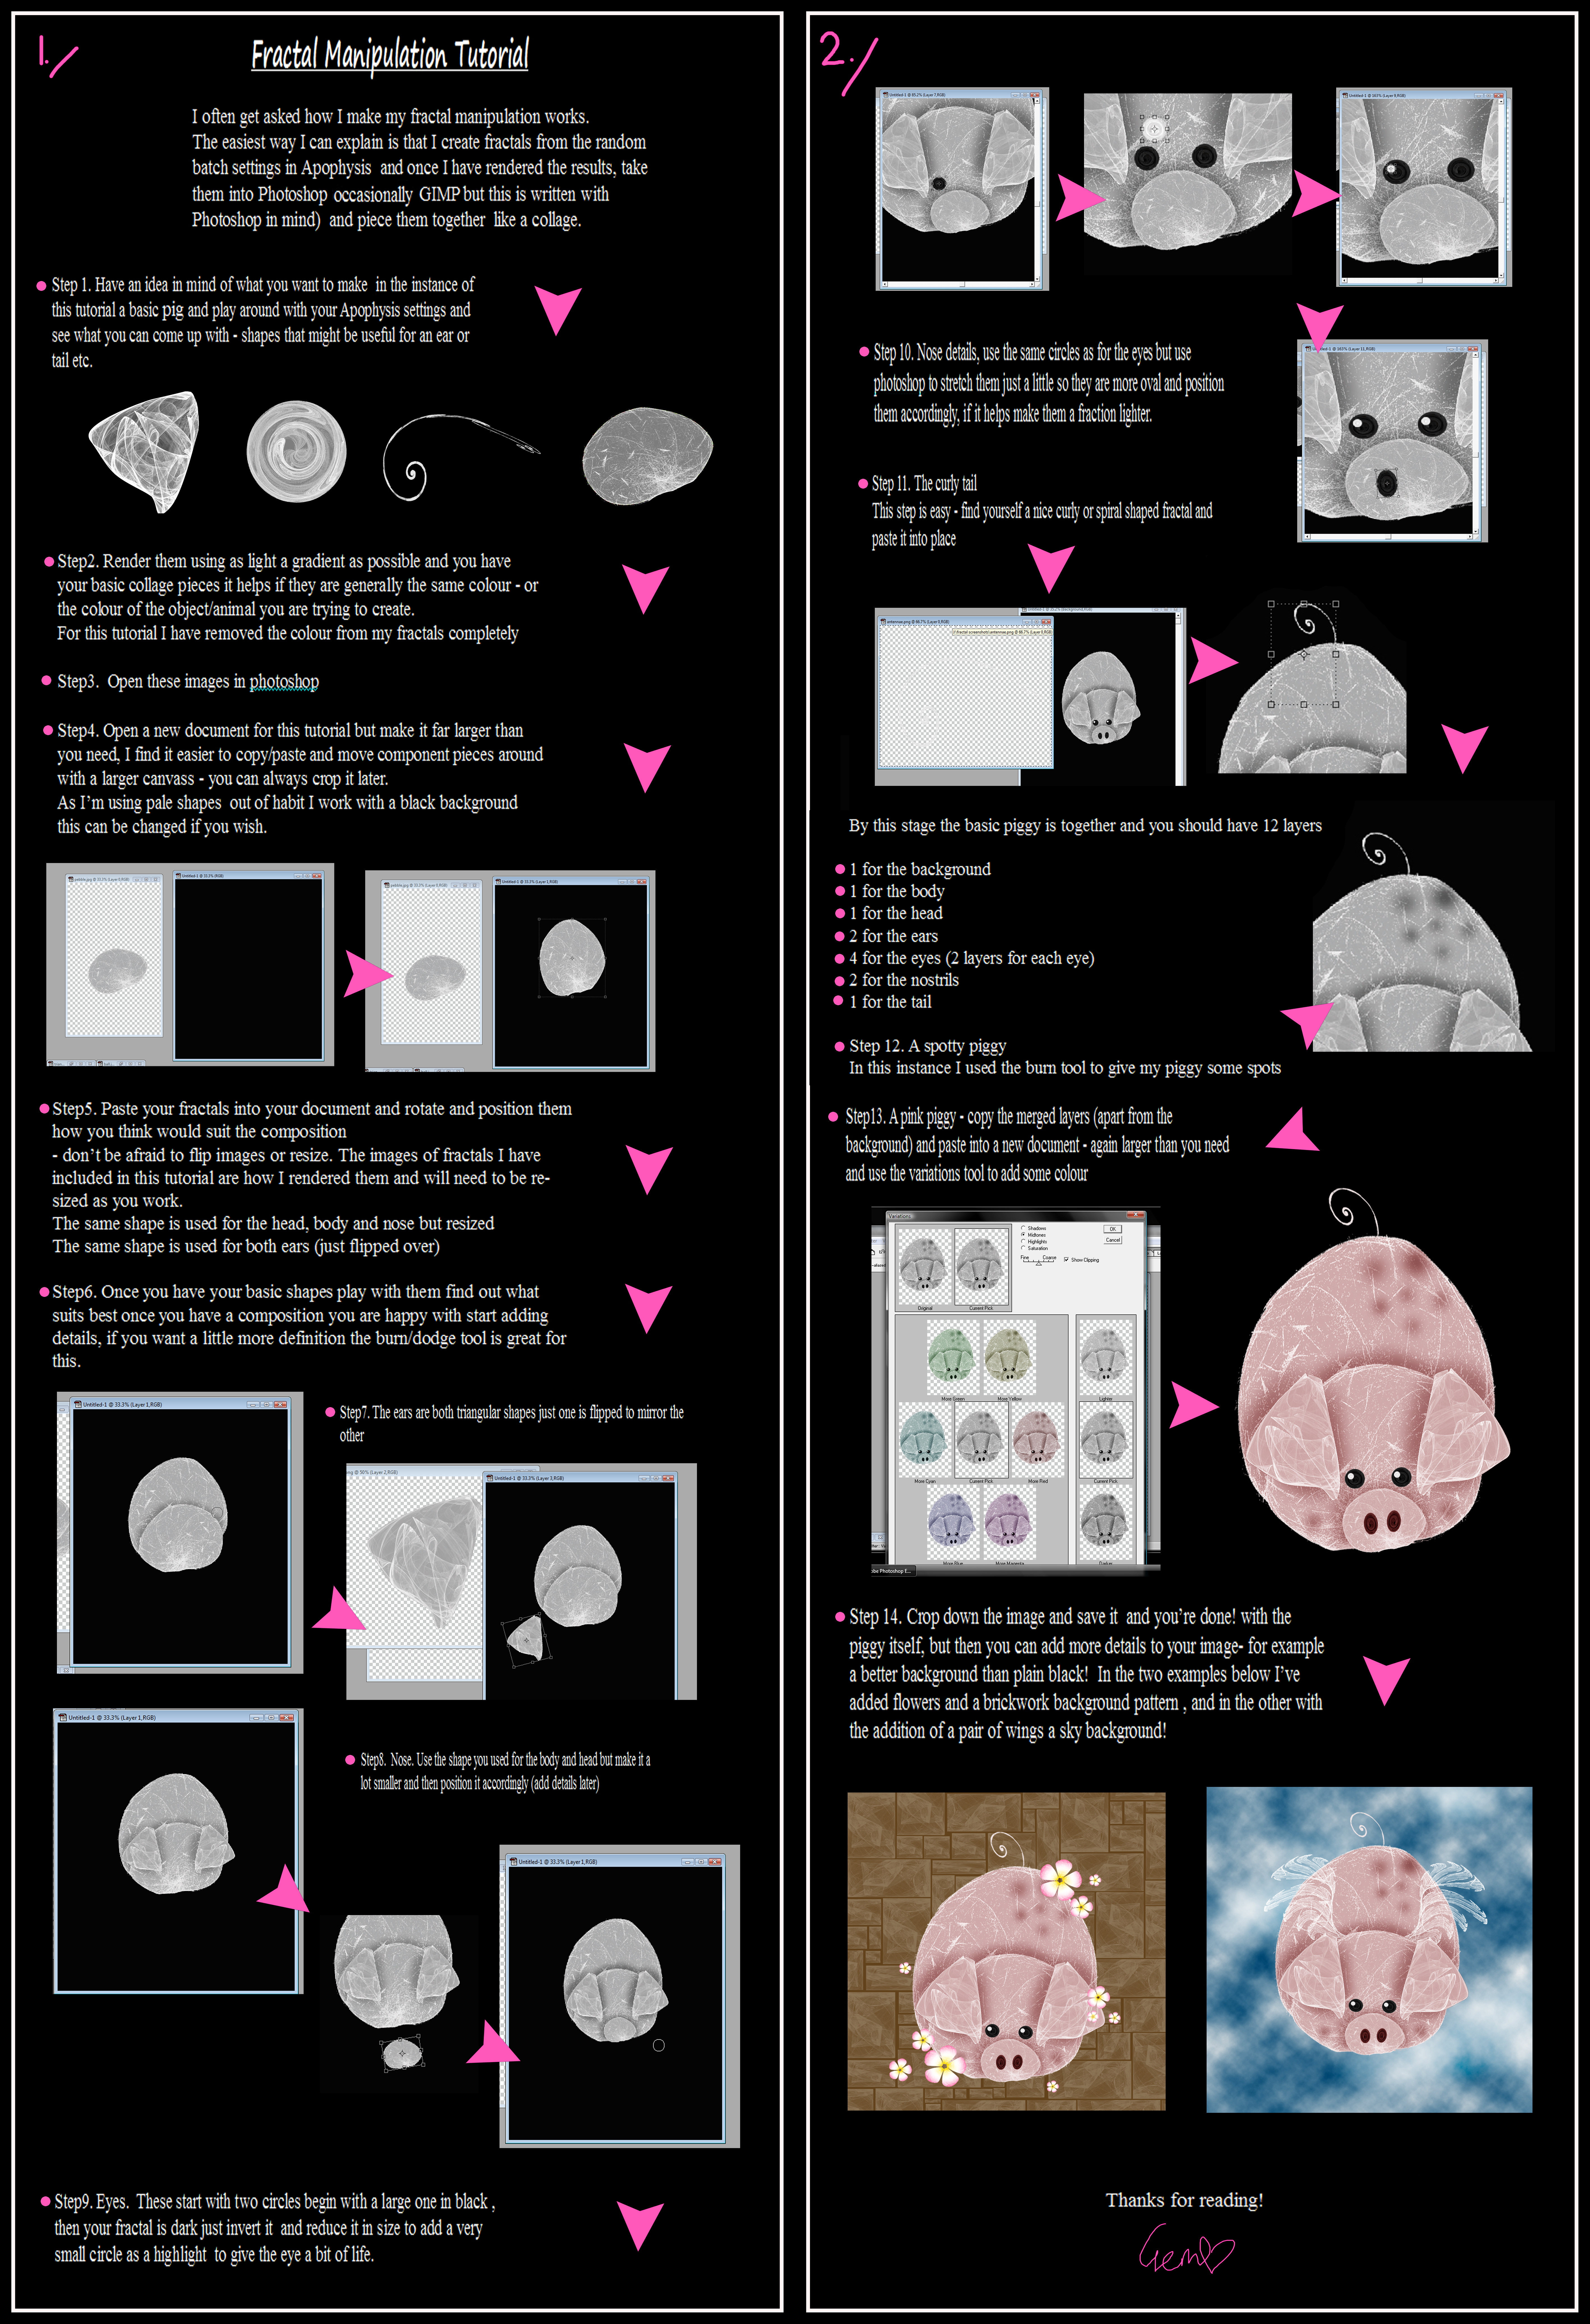
I often get asked how I make my fractal manipulation works.The easiest way I can explain is that I create fractals from the random batch settings in Apophysis and once I have rendered the results, take them into Photoshop (occasionally GIMP but this is written with Photoshop in mind) and piece them together like a collage.
Fractal Manipulation Tutorial
Step1. Have an idea in mind of what you want to make (in the instance of this tutorial a basic pig) and play around with your Apophysis settings and see what you can come up with - shapes that might be useful for an ear or tail etc.
Step2. Render them using as light a gradient as possible and you have your basic collage pieces it helps if they are generally the same colour - or the colour of the object/animal you are trying to create.
For this tutorial I have removed the colour from my fractals completely
Step3. Open these images in photoshop
Step4. Open a new document for this tutorial but make it far larger than you need, I find it easier to copy/paste and move component pieces around with a larger canvass - you can always crop it later.
As I’m using pale shapes out of habit I work with a black background this can be changed if you wish.
Step5. Paste your fractals into your document and rotate and position them how you think would suit the composition
- don’t be afraid to flip images or resize. The images of fractals I have included in this tutorial are how I rendered them and will need to be re-sized as you work.
The same shape is used for the head, body and nose but resized
Step6. Once you have your basic shapes play with them find out what suits best once you have a composition you are happy with start adding details, if you want a little more definition the burn/dodge tool is great for this.
Step7. The ears are both triangular shapes just one is flipped to mirror the other
Step8. Nose. Use the shape you used for the body and head but make it a lot smaller and then position it accordingly (add details later)
Step9. Eyes. These start with two circles begin with a large one in black , then your fractal is dark just invert it and reduce it in size to add a very small circle as a highlight to give the eye a bit of life.
Step 10. Nose details, use the same circles as for the eyes but use photoshop to stretch them just a little so they are more oval and position them accordingly, if it helps make them a fraction lighter.
Step 11. The curly tail
This step is easy - find yourself a nice curly or spiral shaped fractal and paste it into place
By this stage the basic piggy is together and you should have 12 layers
1 for the background
1 for the body
1 for the head
2 for the ears
4 for the eyes (2 layers for each eye)
2 for the nostrils
1 for the tail
Step 12. A spotty piggy
In this instance I used the burn tool to give my piggy some spots
Step13. A pink piggy - copy the merged layers (apart from the background) and paste into a new document - again larger than you need and use the variations tool to add some colour
Step 14. Crop down the image and save it and you’re done! with the piggy itself, but then you can add more details to your image- for example a better background than plain black! In the two examples below I’ve added flowers and a brickwork background pattern , and in the other with the addition of a pair of wings a sky background!
Thanks for reading!
Note: I’ve included the fractals to make the basic pig shape in a zip. With this tutorial - i.e the shapes for the body, head, eyes, nose, ears and tail.
( remember the head nose and body are all the same shape)
Only one larger circle is included in the zip. - this is not a mistake you need to make it smaller and lighter as the tutorial states to make other parts


the other elements used are from my own stock folders and can be found here on dA
For the flying piggy shape I used a wing shape given to me by AnthroShogun
The finished image at the bottom of this tutorial can be found here also
EDIT: this tutorial got a feature! fav.me/d7buwgy
All images and literature/written work in =rockgem's gallery are © Gemma Hart. All rights reserved. Reproduction and/or retransmission of all or any part of this gallery are prohibited under copyright law. Users desiring to reproduce or retransmit all or any part of this gallery must first secure in writing the appropriate copyright and other authorization from the copyright owner. My work is not public domain.
Thankyou.
Related content
Comments: 6

excellent tutorial on workflow. Very well written even i can follow it. Gr8 work as always
👍: 0 ⏩: 1

thankyou kindly - glad you like it, i've tried to keep it simple as i can because i always have issues jotting down how i make things i sort of usually go off into my own little world then sometime later - look artwork! haha
👍: 0 ⏩: 1

you show the way and we go off on our own.
👍: 0 ⏩: 1

if thats the case then you better hope that i'm going in the right direction!
👍: 0 ⏩: 0

I am sooooo delighted you have done a tutorial on this!!! I have adored your fractal manips for many years! You really have a knack for not only creating the fractals to use, but also the way you put them together boggles my mind! Thanks, Gem, so much for sharing this technique with us. I have a feeling you will inspire a number of people to try this out. I know I will, if I can find the time. Things have gotten a little complicated these days. But, I will look forward to giving this a try. Have a great day, Gem!
👍: 0 ⏩: 1


👍: 0 ⏩: 0


