HOME | DD
 rooteh —
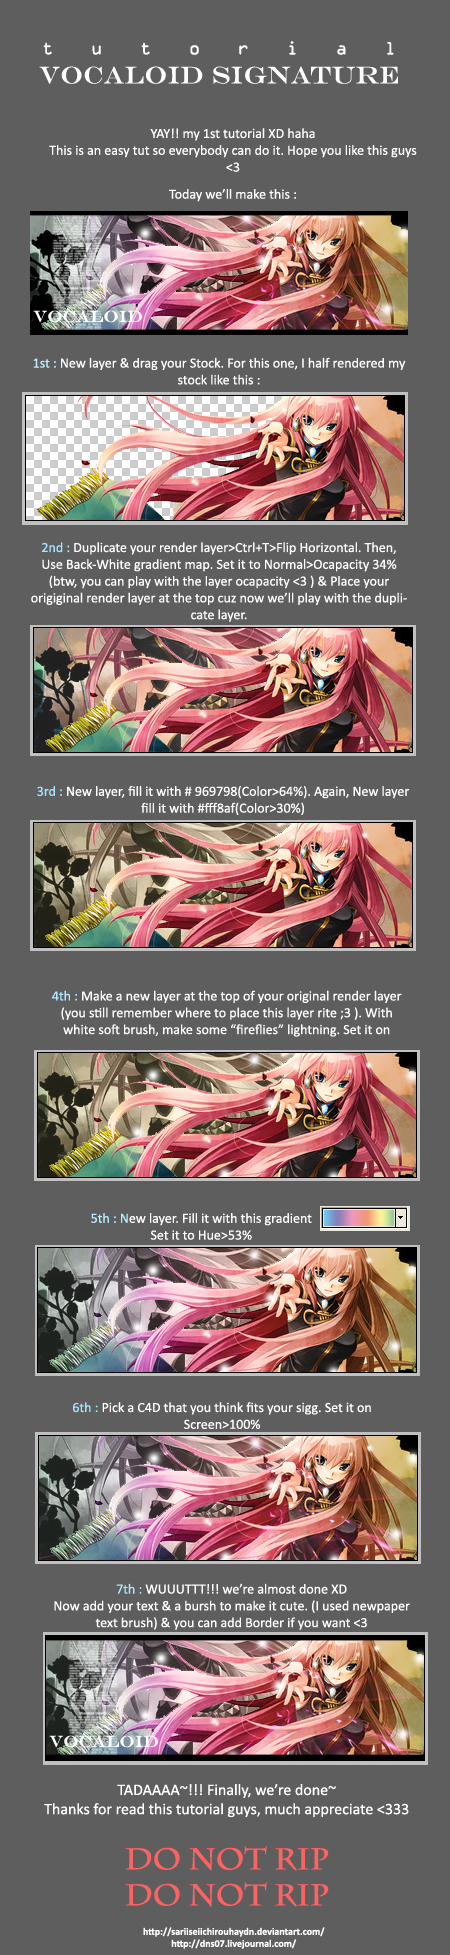
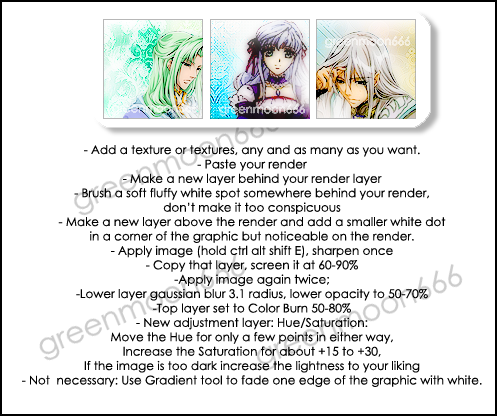
Postprocessing Tutorial
rooteh —
Postprocessing Tutorial

Published: 2010-04-15 21:46:21 +0000 UTC; Views: 27844; Favourites: 734; Downloads: 373
Redirect to original
Description
I guess some could need a little help!Download GIMP: [link]
Oh, and one last advice:
Always resize your picture so it can fit on an average screen, either by resizing it in an image editor and saving it before uploading or by using deviantArt's resizing features (which are sometimes buggy for me).
My works may not be copied, altered and reproduced in any way without my permission. This includes uploading at other websites.
Sonic & Co. © Sonic Team & SEGA
Blaze x Silver Picture © ~THEATOMBOMB035
Tutorial © Me
Picture used (with permission)
Related content


Comments: 143
 (Smile)")

Wow, thanks! This helps me out so much(and a lot of other people, too)!
👍: 0 ⏩: 1
")

Great tut! This will come in handy to many!
👍: 0 ⏩: 1


Thank you so much for making this!
👍: 0 ⏩: 1
You truly are great for doing this! <3
👍: 0 ⏩: 1

I had absolutely no idea about this. I'd just been selecting the white and hoping it picked it up.
Sincere thanks.
👍: 0 ⏩: 1


As far as I researched there aren't Adjustment Layers in the GIMP, yet. But you can find some tricks to achieve similar effects by googling. Basically it's just duplicating the layer and fiddling with the opacity  (Wink)")
And I can imagine it will be a high priority for the next versions, since it's a popular feature in Photoshop.
Thanks for a cool tutorial that shows that you can achieve such practical things with open source software, too!
👍: 0 ⏩: 1
Kein Problem, ich hab mir die Frage auch schon mal gestellt und nachgeguckt
👍: 0 ⏩: 0

Wow... this is really useful!!!!! thanks for sharing!!!
👍: 0 ⏩: 1

"I guess some could need a little help!"
👍: 0 ⏩: 1


Deutsche Screenshots!
Ich hasse es, wenn ich erst ewig überlegen muss, wie das Zeug wohl bei mir heißt....
DANKE!!
")
👍: 0 ⏩: 1

Ist halt ein kleiner Nebeneffekt, wenn man selbst deutsche Programme hat...
👍: 0 ⏩: 1

Excellent tutorial! I've been lamenting my marker scans. This should enable me to clean them up nicely.
👍: 0 ⏩: 1


Brilliant work!
I like that you made examples with both GIMP and Photoshop, it's going to be great help when I'm trying to teach my friend to work digitally.
^^

👍: 0 ⏩: 1


Very useful tutorial, I normally use brightness/contrast option, but I will try this one.
👍: 0 ⏩: 1
Brightness/Contrast is alright, but depending on the picture, the result might not be the most satisfying one~
👍: 0 ⏩: 1
Actually, I had some troubles lately because of that, I was thinking about change my method, thanks for the tut ^^
👍: 0 ⏩: 1

I have to be honest: assuming people pay attention and use this tutorial, you have officially made DA a better place!
👍: 0 ⏩: 1
I got a load of faves today....
I hope it is helpful to at least a few of them
👍: 0 ⏩: 0

| Next =>