HOME | DD
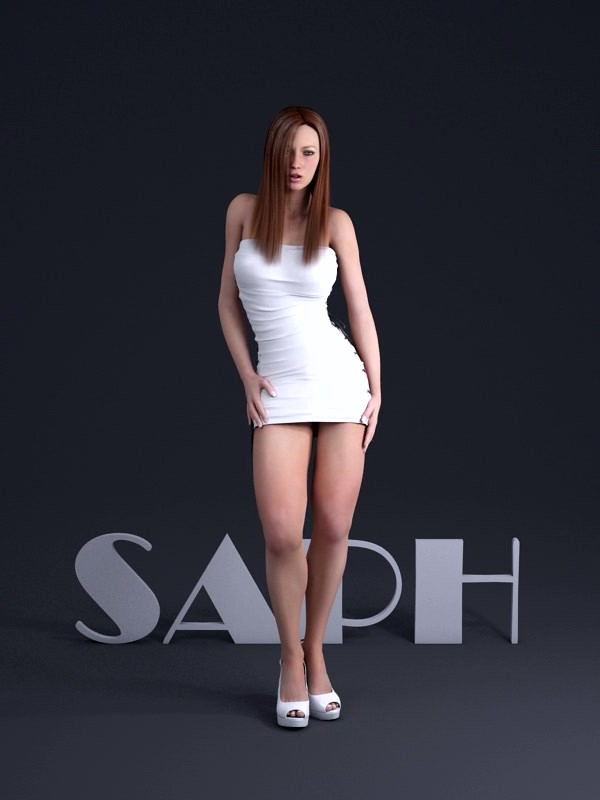
 SaphireNishi — walk cycle 06

Published: 2013-02-16 18:43:45 +0000 UTC; Views: 24898; Favourites: 199; Downloads: 1271
Redirect to original
Description
no more slippery feet.. more sway in the upper body now too.. still far from perfect but again one step closer to what im trying to achieve
 ")
861 frames @ 512x720 pixels
total render time: i really have no idea
program used:
photoshop
poser
zbrush
3ds max
Related content


Comments: 319

I've seen all your previous walk cycles and you've improved SO much since the first one, it's great to see the progression, keep it up! Can't wait to see more
👍: 0 ⏩: 1

thank you very much for the compliment..!!!
👍: 0 ⏩: 0

This is looking a lot better - I will say it still has to come along way she is very heavy footed, but wow - this is FAR better than I can do, and it is amazing how far you have come!
Keep up the great work :!
👍: 0 ⏩: 1
thanks a lot.. yeah, its like she is dragging.. i have that in ll the walk animations i did.. im not really sure where thats comes from.. but ill figured it out one of these days..!!!
👍: 0 ⏩: 1
I am wondering more than anything that maybe it isn't enough FPS?
👍: 0 ⏩: 1
its running on 30 fps now.. that should be more then enough.. so i dont think thats the problem actually.. maybe some motion blurring will give better results.. but i havent experimented with motion blurring at all yet..
👍: 0 ⏩: 1
Um okay no if it is running at 30fps that is fine.
Are you doing the animation in 3dmax or Poser? If in poser it surprises me because it is almost like there are elements missing from the positioning in the motion which is making it look "jerky".
However, I don't know anything about 3dmax  (Smile)")
Blur might help - but I am not really sure... however it is worth a try - um - not sure what 3dmax is like - but prepare to go away for a holiday while waiting for it to render if you are using poser
👍: 0 ⏩: 1
i think that will fix the problem.. the problem is now it are very sharp render without any blurring at all.. so its steps we are looking at now.. now if we add motion blurring it adds the transition form one frame to the other so you end up with a nice moving object then instead a jerking effect cause its not jumping from one frame to the other... then again thats just my logic, and i have no idea if it really wotks like that..
im render my renders with vray, so its a lot faster and way better quality the poser could ever do..
👍: 0 ⏩: 1
how hard is it to move stuff from Poser to Vray and can you just use the textures out of poser in VRAY?
I am looking at doing my stuff outside of poser - however I really am lost on best options and how to make renders easier.
For my comic stuff I to a lot of frames for a lot of different poses - would be a massive pain in the.... if I had to retexture everything for each frame.
👍: 0 ⏩: 1
well its really easy and you can use the same texture.. shaders are setup differently and you really dont want to use standard shaders with vray.. it works but it looks just a lot better if you use vray shaders..
there are a lot of different render engines out there.. so it kinda depends on what it is you want to do..
when working with the same scene over and over again the you dont need to setup the texture and shader ever time.. you only have to do it once and then you are done.. you just have to do it again if you change anything in the scene or the scene it self.. its the same as in poser.. if you create a scene then when you are done with the scene and you can save it like that and use it any time you want.. it works like that inside any 3d program..
i did some testing with motion blurring now.. there is a huge difference between a vid with motion blurring and without motion blurring.. ill upload it in a little bit..
👍: 0 ⏩: 1
With a comic you create a scene, and typically move figures around that scene?
With one that I was using I found that everytime I moved the figures around the rendering engine would require me to redo all the textures again. So the way I was having to do it was
1) Create scene and position characters
2) Export to Third Party Software for Render
3) Add textures
4) Setup lighting (save as preset)
5) Render
6) Change position of characters in Poser
7) Export to Third Party Software for Render
8) Add Textures
9) reload lighting preset
10) Render
(Repeat)
This was a huge pain when you are doing about 10-20 parts of a single scene, and the only thing changing was the position of the actors.
Can't wait to see the motion version - would be interesting to see what effect it has on the feel....
👍: 0 ⏩: 1
what software were you using ? most 3d applications have an option to save texture groups.. so you can setup a set of texture with shader for character or multiple characters depending on what you need and then just load that textures set every time you need it..
👍: 0 ⏩: 1
Oh nothing now - I am using Poser only - especially since 2012 supports SSS and the way it does it is pretty darn good.
one of the things I don't have much time or interest in is going through learning and doing a whole heap of work on getting the texture right
But, the Render in Poser (even 2012) is very slow, and the behavior depends on if you smile or not. Daz is good until you turn on some of the advanced features and then it is very slow (more so than poser) and it doesn't do very good SSS either.
So really looking to get a better render which allows me to still do out of the box - but better than poser
👍: 0 ⏩: 1
have you tried lux ? i never used it but people get really nice results with it.. render time are very long tho..
👍: 0 ⏩: 1
VERY long - same render - and not all that better render quality - over 2 times slower
👍: 0 ⏩: 0

If anybody says she would walk strange here is my offer: I carry here!
👍: 0 ⏩: 1
aww.. thats so sweet..!!!

👍: 0 ⏩: 1
Sometimes I am real sugar...(:
👍: 0 ⏩: 0

Wow, lady, that's soooo much closer
👍: 0 ⏩: 1
cool.. glad you think so.. i like it too.. its a lot better then all the previous attempts.. hope the next one is going to better too
👍: 0 ⏩: 0

Oh yeah you are getting better with every attempt. The movement of her whole body is just a delight to behold , the swish and sway are mesmerizing  (Wink)")
")
👍: 0 ⏩: 1
hehe.. thanks a lot babes.. its definitely starting to fall together now.. its still far from perfect and way to stiff but i think im beginning to understand how to body movement is working in walk cycle..
👍: 0 ⏩: 0

Getting better and better!
Footfalls just don't seem entirely right, but aside from that, it's a big improvement.
(:
👍: 0 ⏩: 1
thanks..!!! yeah, i dont like that yet either.. i actually tried to correct it a little here but its just not working yet.. next one ill see if i can correct it completely..!!!
👍: 0 ⏩: 1

Oh looks nice. Timing and pacing is the key, but your movements are much more fluid than before.
👍: 0 ⏩: 1
timing is indeed the problem.. i havent found any logic that i can apply to timing vs movement..
👍: 0 ⏩: 1
Choreography helps, in dance choreography everything timed out to the tempo of the music. Do you have any musical background? Music is the art of sound, but it also functions a way to measure time. Andante which means "walking pace", is roughly 69-72 BPM (beats per minute). It easier to start with 60 or 120 bpm. So 60 bpm would be one beat a second, 120 bpm is 2 beats a second (1 beat for every half second). So if you are animating lets say at 30 frames per second, then 60 bpm would be one beat every 30 frames, and 120 bpm would be one beat every 15 frames. Lets say you decide to make her walk at 60 bpm and you are animated at 30 fps. You could make her step on every beat. Which means she takes a step every 30 frames (1 sec). Or you could do the "&" of every beat (half point in between beats) for a faster walk. Which would mean she takes a step every 15 frames. For simplicity sake, lets theorize 30fps, 60 bpm, and beat for every step. So every 30 frames she takes a step, every 15 frames is the apex or "stride" of the step (half point) when both feet are spread apart. Lets say its a 5 pose walk cycle. 30/5 is 6, so a segment of 6 frames represents a pose coming in and going out, and then the half point of these 6 frame sequences (the 3rd and 4th of each 6 frame sequence) would be the key pose, which is where your main keyframes would be. Once you have that mapped out, timing would no longer be an issue. Also it would help to draw out your key poses, in the example I used 5(Contact, Recoil, Pass, HighPoint, Contact). That is a like a general walk cycle pose amount, check out this one here a simple walk cycle pose. I know this isnt a sexy model walk like yours but I think it is still helpful. Also here is another great walk cycle pose example.
👍: 0 ⏩: 1
well what you are doing now is just breaking up the animation.. but thats not really the problem.. i mean i can use exactly 30 frames for one step or 60.. that doesnt really matter.. the problem is what happens in between beats.. for example.. when you have the left leg behind and start raising it.. how many frames should it take to get your leg half way in to the step.. if we take your example then that would me right in the middle.. but if you look closly at a walk cycle then you will see that the first half of the walk cycle is actually really fast and second half is slowing down.. and this is the problem over the whole body.. if you step out with you left leg then you right shoulder moves forward just a little later then when you step in and it goes back at the exactly same point when the other leg is on its farest point in front again.. these are really subtle differences but they make a huge different if you want a realist walk or a cartoon walk.. so the problem isnt setting up a bpm system.. cause thats easy.. its what happens in between every beat what is the problem.. when does one thing start and one does it stop.. i like the idea of using music to setup a time line tho.. i wouldnt have thought of that, but its not really the problem im trying to figure out..
👍: 0 ⏩: 1
As far controlling easing, like when you describe speed up and slowing down. that it where adjust curves in the motion graph comes into play. Adjust the curve effect how your animation tween from one key frame to another. Fluid animation is about setting as least keyframe as possible and working the tweens in the motion graph. The motion graph is the main answer to your problem. I dont know much about the motion graph in 3DS MAX or Poser, for I use Maya. 3DS should be roughly same as Maya since they are both by Autodesk. But Im sure you find motion graph controls tutorials online somewhere.
👍: 0 ⏩: 1
oh i know how to work with the motion graph editor.. the problem is the control you have over the graph inside poser.. inside 3ds max or in maya we have a curves with those side thingies to get a big or small curves.. we have an amazing control over how far and when a curve stops and end inside maya and max.. but the problem we dont have that inside poser.. so getting a good control over the graph itself is just really hard inside poser.. i can make a very fluent movement inside 3ds max with just a few clicks.. but doing the same motion inside poser is taking a lot more work.. and thats one of the big problems inside poser when animating.. it actually takes a lot of the fun out of it too.. i rather animated inside 3ds max then in poser.. but i dont have saphy rigged for 3ds max yet, so im still stuck at using poser for my animation till i finished my saphy rig for max..
👍: 0 ⏩: 1
Oh I see. Poser just may not have best tools then. Until you get saphy rigged you could probably get some practice by downloading a free rig from Creative Crash. I recommend the Andy rig: [link] Just for practice it can give you a good experience. Maybe you will even figure out a work around for posers clunky animation tools just from playing with it.
👍: 0 ⏩: 1
oh i have a couple of rigs already which i use to play with.. so no problem there.. i just need to work on my rigging skills now too so i can start using saphy soon in 3ds max as well.. it will make things so much easier and faster then
👍: 0 ⏩: 1
Well im doing rigging right now as well, maybe we could help each other out. Maya and 3DS Max should be close enough.
👍: 0 ⏩: 1
so what are you using to rig now ? just normal bones ? i think we can work together, as long as we keep things pretty standard.. swapping file should work perfectly then when we are using that fbx file format...
im not sure how that works in maya but in max we have a thing that is called the morph modifier.. inside that modifier you can add different shapes of the same geometry, like different facial expressions for example.. and once you have a couple of facial expression loaded into the modifier you can mix those expression up in any way you like.. its actually really easy to do..
👍: 0 ⏩: 1
Yeah in Maya there is thing called blend shapes where you take some geometry like a head, and duplicate and make different adjustments with curve controls. Basically you make multiple heads, then they are parented together in sequence. In 3DS have you work with driver keys? That is something I recently learned. Basically you create new attribute sliders for controls (like the default rotate, translate, scale, visibility, etc). And parent them to things like light shaders brightness and rotations for joints. That is what I am doint current. I have robot to rig, so no skinning in this particular situation, however, I am making attribute sliders for things like curling of individual fingers, finger spread, Fist, Grab, etc. Once that is done I can just animate the sliders from 0-10 or whatever I set the parameters to be. So for fist. 0 is open hand, and 10 is closed fist. rather than animating individual joints I can animate the sliders. Here is what I am working on: [link]
👍: 0 ⏩: 1
yeah i know what you mean but i never understood why we would make controllers like that for a rig.. is there a good reason for doing that ? i mean if i use that morph modifier for example, then i already have my control for that morpher in the modifier stack.. so i dont get why i should make an other controller inside the view port as well that does exactly the same thing.. it seems like just a lot of extra work for something we already have easy access too.. but all the professorial rigs have it.. so there has to be a good reason for doing it.. i just dont see it..
👍: 0 ⏩: 1
May be that is one of the difference between Maya and 3DS Max. In maya there is no easy access for those things. I would have to key frame and animate each individual joint and that would be a pain to manage every joint with its own timeline. Setting drivers kind of groups them together so I that I could make a fist and rotate it with only like 2-4 key frames rather that a bunch of movement for everything. I have a Master Environment controller as well for a mechanical door, which has gears and stuff that are all trigger by a slider, as well an access panel key pad with a passcode and each button animates with the slider, and sliders for exterior lights, and interior lights as well. It makes managing an entire scene easier. For the access panel I have each button going in every 10 values so instead of key framing each button separately, I can animate one slider to control the buttons. Also they keypad has a texture that is an animated sequenced image, with asterisks on it, and I have it adding asterisk as each key is pressed (like typing in a password that look like "****"). So with the slider I and have multiple animations going on at once. The door mechanics have one master gear that turns other gear, that moves bolts and pistons to move the door, again all control by one slider. Rigging like this makes the animators job easier.
👍: 0 ⏩: 1
i see.. well that exactly makes a lot of sense.. it will speed up thing tremendously that way.. i can see how this would make your life easier in max too.. at least for a couple of things..
👍: 0 ⏩: 0

Every time I look at your walk animation I'm always bugged by the stiff ankles, but It looks preety hard to get everything running smooth. On another note I always think shes a picture of someone when ever i see her icon in my inbox even tho I've been watching you for awhile now.
👍: 0 ⏩: 1
well it is hardto make a smooth animation.. doesnt really matter on what part of the body.. goes for any part.. the ankles react on movement from the hip up to the upper leg and then the lower leg.. so there is a lot of external movement from 3 other parts of the body that effect the ankle.. and then the ankle rotates to all sides as well.. so its hard to keep the movement under control..
👍: 0 ⏩: 0

every time it was better and better !!
👍: 0 ⏩: 1
thank you so much, babes..!!!
👍: 0 ⏩: 0

Did you know that the Microsoft Kinect can be used in some 3d programs like 3DS max and poser?
👍: 0 ⏩: 1
yes i know.. its not yet perfect since the resolution of the Kinect is very small so it doesnt work for fingers or for face expressions yet.. but the basic movements of limbs and all that work really nicely on the Kinect.. only problem is, i dont have a Kinect..

👍: 0 ⏩: 1
You're probably making a killin with your amazing rendering skills! Get one!
👍: 0 ⏩: 1
actually i started looking a couple of days ago on ebay for one.. but i dont want to spent a fortune on it.. i just need the Kinect itself.. not all the other stuff that comes with the xbox.. so its kind hard to find.. but as soon as one shows up on ebay then its mine..!!!
👍: 0 ⏩: 1
Have you checked with gamestop? They have them for barely cheaper than the original price.
👍: 0 ⏩: 1
never heard of it before.. but ill check it out now.. thanks..!!!
👍: 0 ⏩: 1
I just realized there may not be gamestops in the netherlands. My bad.
👍: 0 ⏩: 0
<= Prev | | Next =>