HOME | DD
 silverjow — Tutorial - Skin tone
#skintone #tutorial #silverjow #color
Published: 2015-07-29 08:36:47 +0000 UTC; Views: 200776; Favourites: 3630; Downloads: 2791
Redirect to original
Description
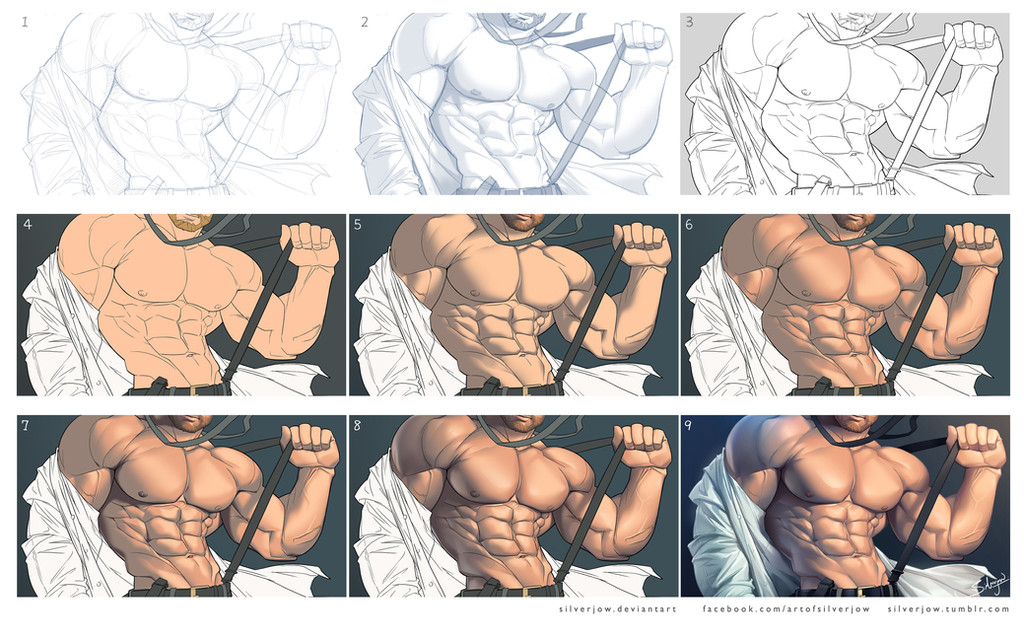
I received a lot of questions asking about my rendering technique, and requested by some of you to make a tutorial. So here you go, a simple tutorial on how I render skintone.
1. Start with rough sketch.
2. Going to detail. I like to experiment with basic shading at this stage, to design lighting and make sure the value, space and perspective is correct.
3. Create new layer, draw the OUTLINE by using Wacom tablet and default brush tool in Photoshop. Fluid thin to thick line can be created with pen pressure.
4. Fill in the body with neutral skin color under the outline layer.
5. Pick a darker tone of the skin, create a new layer on top of neutral skin color and apply SHADOW by using airbrush.
6. Create new layer between neutral skin tone and shadow, apply MIDTONE shading.
7. Create another layer on top of shadow, apply CORE SHADOW with darker tone.
8. Apply HIGHLIGHT on a new layer between neutral skin tone and midtone. Lock transparent pixel for each shading layer, adjust color value with airbrush and gradient tool.
Create a new layer(how many layers already?) on top of core shadow, specify the blending mode for the layer to screen/overlay, and apply reflected light. Reflected light is optional, but it helps enhance 3d effect of the subject.
9. Final touches: Adjust outline color to match skin color. Change overall color and level with adjustment layer. Add minor details like backlight and texture if needed.
And here we have it! Hope you guys like it!
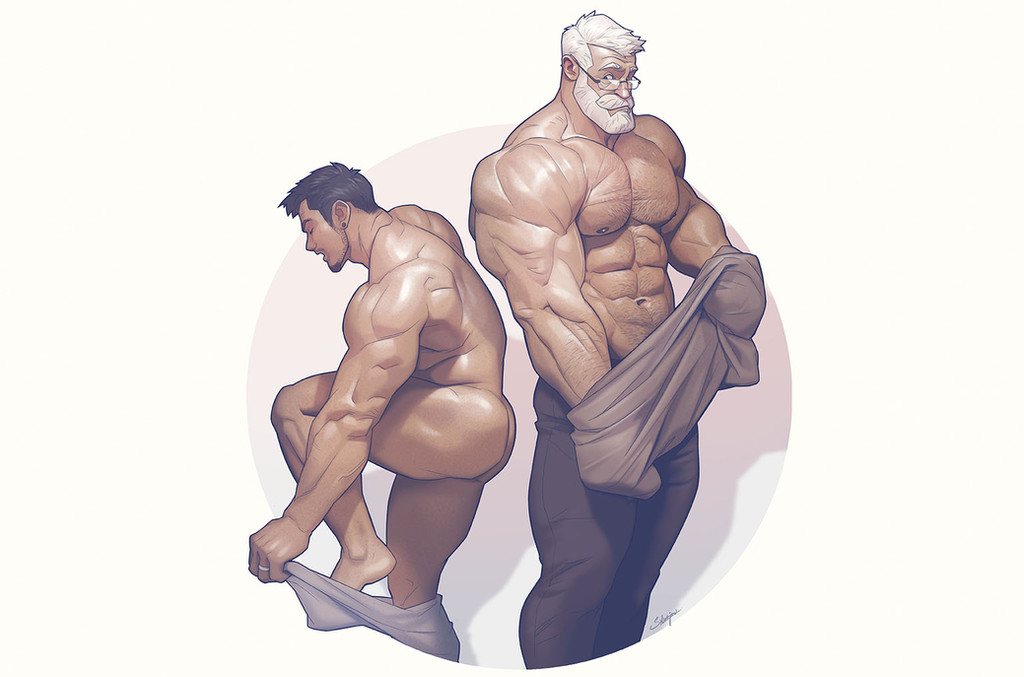
Final Artwork:
Related content


Comments: 60

👍: 0 ⏩: 0

👍: 0 ⏩: 0

👍: 0 ⏩: 0

👍: 1 ⏩: 0

👍: 2 ⏩: 0

Thanks for making this. I never thought of doing the shading on different layers but I think I'll have to play with that now... your work is incredible and inspiring as always.
👍: 1 ⏩: 0

can i ask you question please?
in the first step can you give the type and the setting of brush you use and thanks
 (Smile)")
👍: 0 ⏩: 0

Thank you very much for sharing this. I need the practice and your steps will help get from point A to B.
👍: 0 ⏩: 0

I can't thank you enough for this simple but efficient tutorial. Month after month, it became my (strategic) reference for all skins than i have to draw. I've worked/reproduced it on a bunch of PSD (~250) until i've finally understanded than this way is very intuitive and offer a very good margin of liberty (specially with B&N/grey stuff). I must say than before it, the skin volume/texture/render was a nightmare for me. Now it's an obsessionnal pleasure. Crazy share.
👍: 0 ⏩: 0


Isn't this the basic natural technique for coloring?
8->9 is a huge change tho.
👍: 0 ⏩: 0


Amazing. I was wondering about some techniques for the tablet. I'm workin on it but it just doesn't seem to go right some days. This this will help. At least to get started. Just gorgeous work.
👍: 0 ⏩: 0

Thanks so much for the tutorial! I love your work.
👍: 0 ⏩: 0


Thank you so much for walking through you technique!
👍: 0 ⏩: 0

Wow that's some pretty slick rendering. Thanks for sharing your process !!

👍: 0 ⏩: 0

Out of curiosity, what settings is your airbrush at? As with the gradient tool
👍: 0 ⏩: 0


so you only use blend modes for reflected light? I've gotten so used to using multiply and screen/overlay for all my shading that I'm having trouble unlearning that for more professional rendering techniques.
👍: 0 ⏩: 0


Thank you b/s of this, I know what I forgot, 3d of the body, when I draw
👍: 0 ⏩: 0


Been wondering how you're doing the tones. Thanks for sharing this, mate!
👍: 0 ⏩: 0

I'll definitely have to try this out next time I work digitally! Awesome tutorial and much appreciated!
👍: 0 ⏩: 0


oh dear lord thank you!!!! I needed help with this so badly! Thank you so very much Silver.
👍: 0 ⏩: 0

Thank you for this!!! I was really hoping you would do a simple tutorial!!
")
👍: 0 ⏩: 0

I really love your work. This is so helpful. (Coming from someone who rarely works in color)
👍: 0 ⏩: 0

Thank you so much for posting this. It's definitely made coloring digitally easier, as someone who mostly works with traditional art.
👍: 0 ⏩: 0

I really thank ou for positing such a helpful tutorial. Your shading/highlighting always comes out so smooth and rich and I've been curious to see what your process is. I have to ask three things though if you don't mind?
1. In step 9, you mentioned adjusting the outline color to match the skin color... Is there a certain way to do that? I remember when I tried coloring my outline on the lineart layer, it just comes out rather sloppy and unseemly... So I was wondering if there was a trick for it lol.
2. The Gradient shading method? Is there a certain way how you do that?
3. On textures, do you recommend using Paint Bucket textures (Texture pattern) or texture brushes?
👍: 0 ⏩: 1

Thanks and sure!
1. To adjust the outline color consistently, you can do it with image>adjustment>hue/saturation>lightness and then image>adjustment>color balance (Remember to lock transparent pixel). I personally prefer paint it manually, easier to control.
2. Again, lock transparent pixel of the layer you're working on. Select gradient tool(I usually use linear gradient tool), adjust blending mode and opacity according to your need. and then apply.
3. I prefer texture brushes. I personally don't like to apply too much texture. Keep it minimal, or no texture at all. I occasionally apply them on certain fabric and object with rough surface, or dirt and bloodstain.
I'm terrible on tutorial or stuff like this, I hope I answered your questions.
👍: 0 ⏩: 1
So sorry for the belated reply. Thanks for the tip though just to reiterate on "1", do you change the image>adjustment>hue/saturation>lightness on the lineart layer only?
👍: 0 ⏩: 1
No. continue with image>adjustment>color balance
👍: 0 ⏩: 1

Oh wow, I thought you used a hard brush for your art. Nice tutorial
👍: 0 ⏩: 0

Thank you so much for posting such an awesome tutorial :3
👍: 0 ⏩: 0

")

That's cool of you to share your coloring method. Thanks for that, much apreciated
👍: 0 ⏩: 0

thank you so much for this!!! I've been looking for a really helpful tutorial on digital painting, and I think I struck gold on this. You're fantastic!
👍: 0 ⏩: 0

This is very very helpful and informative! Thank you for taking the time to share!
👍: 0 ⏩: 0

WOW this is awesome! And will help a lot thank you!
👍: 0 ⏩: 0

Thanks for the tutorial. I just tried it. It really helped me out a lot.
👍: 0 ⏩: 0
| Next =>