HOME | DD
 SirLadySketch — Saix Puppy Tutorial

Published: 2007-09-18 03:26:01 +0000 UTC; Views: 15795; Favourites: 104; Downloads: 371
Redirect to original
Description
WARNINGBIIIIIIIIIIIIIIIIIIIIG file.
And kind of crappy. (I said I'd make a tutorial. I didn't say it would be good) Just the images to go with my step by step tutorial, found below.
Anyway, follow the links to the patterns. Just let me know you're making one, give me some credit, and let me see what you make. And, most importantly...
HAVE FUN!!!

Puppy Pattern: [link]
Saix Pup and DemDem: [link]
Annnnnd, now for the tutorial:
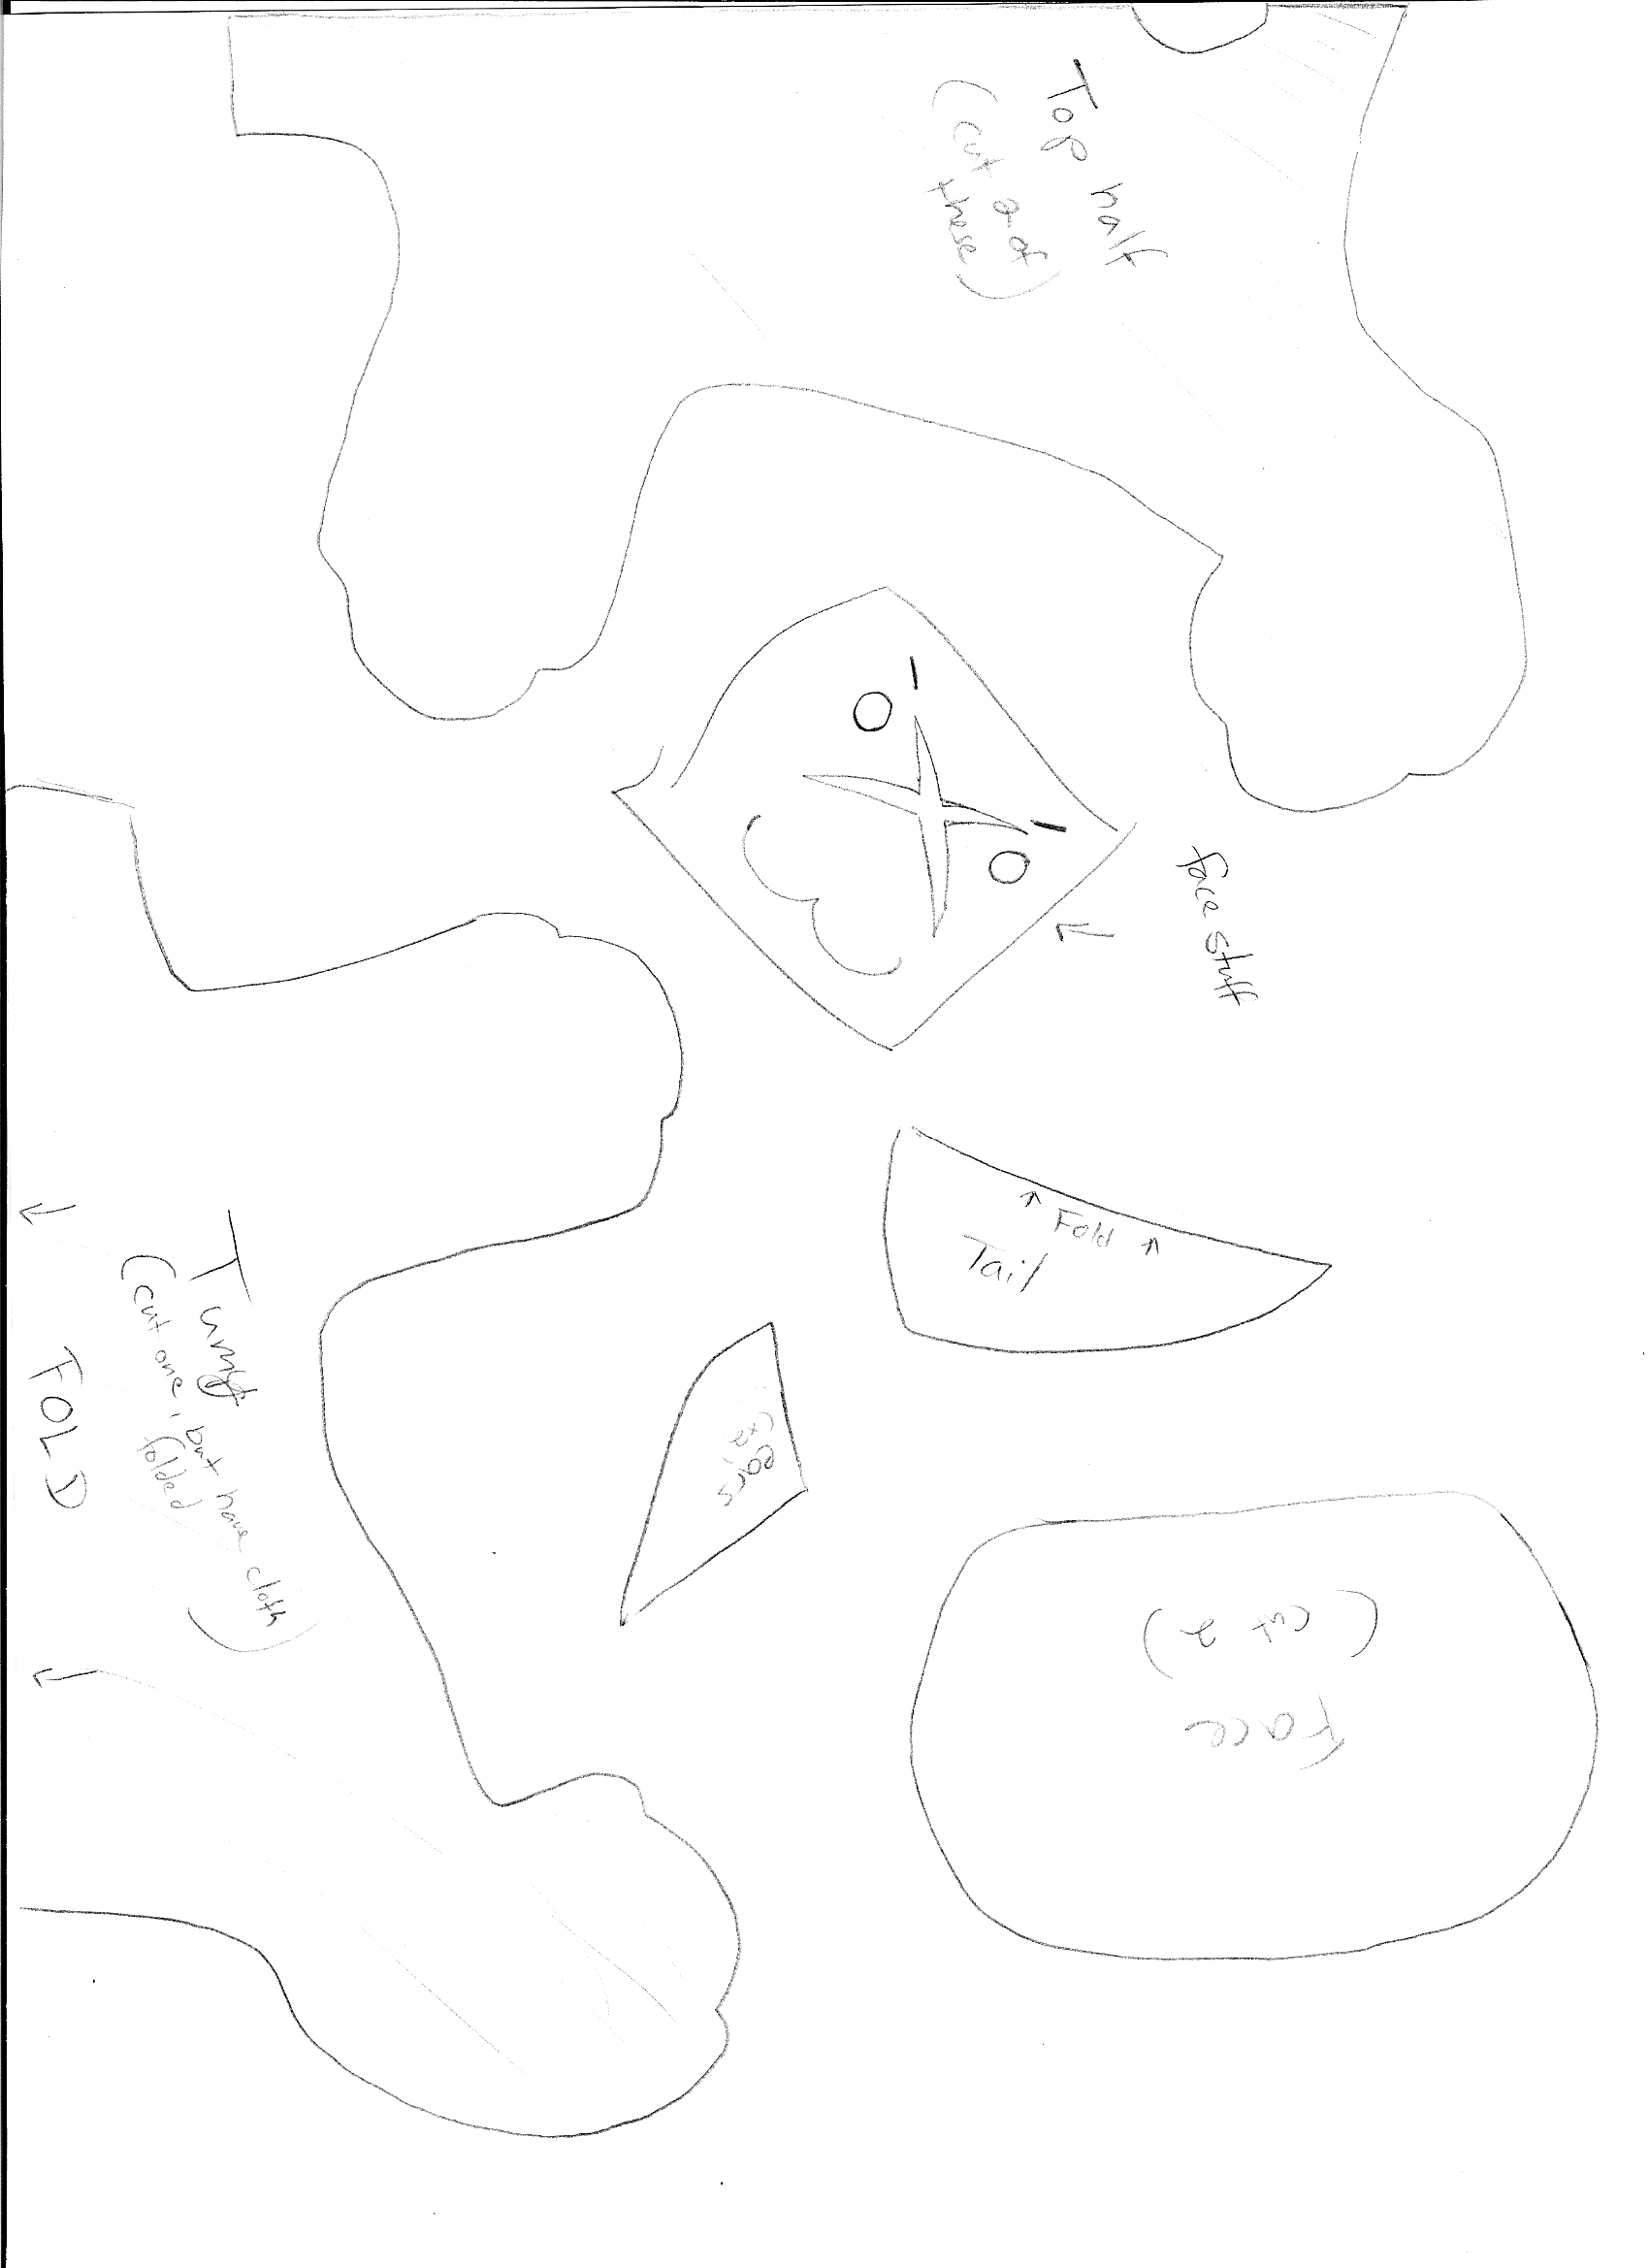
Saix Puppy Pattern and Directions
So, you want to have your own Saix puppy, huh? (Of course you do. Look at that adorable expression!) Anyway, there are several steps and a fair amount of time that goes into this project, so let’s get started!!
1) First off, gather your supplies! For the size pattern I’m providing, you’ll need:
-1/4 yard of black fabric/flocked fabric (that’s a meter for you metric users
") )
)-1/4 yard of blue fabric/felt
-1/4 yard of flesh/felt colored fabric
(We’re getting more than you need, but most places don’t sell fabric in quantities less than that. If you can get remainders, go for it!!)
-black, flesh thread
-polyester doll stuffing
-bag of cheap-o beads (also for stuffing)
-Orgy beads (hoodie chains/ collar)
-black ink pen
-yellow fabric paint
-pink fabric paint
-toothpicks
-HOT GLUE (the best thing EVER) and hot glue gun
-Iron
-Scissors
-Pins
(Supplies nice to have but not necessary)
-Funnel (for the beads)
-fabric pens (the ones with disappearing ink)
-and, if you’re feeling super-artsy, you can you iron-on transfer paper for the face!
Ok, so first things first. Gather supplies, then WASH EVERYTHING. Well, fabric wise. You need everything shrunk and clean before you cut everything. Plus, it means you probably won’t need to iron. SCORE!
While you’re washing your whities (and your fabrics), print and cut out the pattern. You might want to leave a bit of room around the lines, just for wiggle room. Take the time to think about the face you will give your puppy. Look! Above are just a few ideas for you.(2) X3
Nnnk, get those sheets out of the dryer, and check them for wrinkles. Iron if you deem it necessary.
 (Smile)")
Ok, now lay your patterns out on the fabric. Pin the body and tail to the black, hair pieces to the blue, the blobby face to the flesh, you know the deal. Cut out, and admire your work. Not too long though, ‘cause the work has yet to begin!
We’re going to start with the body first. You can go with the head, if it makes you happy, though. Just be sure to come back to this point later on, or all you’ll have is a head on a stick
Ok! So, first, unpin everything, and recycle the paper, unless you plan on making a litter of these puppies. Lol, pun. XD Ahem. First off, quickly sew the tail together. You can pin it, but it’s a small enough piece that you really don’t need to. If you’re a beginner, though, pin it, just to be on the safe side. When it’s done, put it aside for a bit.
Now, pin the back together, good sides together (meaning, whatever you want on the outside. If it’s a fuzzy fabric, pin the fuzzy sides together, facing each other). Now, see the little moon cut out towards the back? That’s where you’re going to put the tail. Pin the tail inwards, meaning, spike facing into the fuzzy insides.
Now that it’s pinned, sew! Sew like the wind!! ...Actually, sew carefully and take your time. Stitch in time saves nine and all that jazz.
3) Unpin, and unfold. If you lay it flat, good side up, you should have a fuzzy, slightly tented puppy rug with a tail sticking up in the air. Now, bring out the bottom piece (tummy piece).
Lay the two fuzzy sides together, and pin. Pin every curve, and every gap, everything you think that might budge when you start to sew. If the pieces don’t match up 100%, it’s ok, it doesn’t really matter. Just make sure that you get it as close together as possible. NOTE: DO NOT SEW THE NECK AREA CLOSED.
Sew around the edges as *carefully* as possible. When you’re done, go back and check each side to make sure you sewed both pieces together in all places. Double-check the curves and everything, especially.
4) Once you know you’ve sewn everything, turn it inside out. You should now have a deflated puppy shell!!
5) This is where you choose your stuffing. You can fluff it up with polyester to get a poofy, upright puppy. Or you can fill it with beads or plastic pellets to get more of a beanie-baby effect. I went with both- I filled the paws with stuffing, and then filled the body half-way. Then, I put about a quarter of a cup of beads into the body. That way, you get the best of both worlds: a form-keeping body with the weight and slight movement of beads. Choose whatever you want, though. Play around to find your preferred filling. Once that’s done, sew it up. Yes, you heard me.
Tuck the neck into the body, and hand-sew it closed. You should now have a headless body. Onwards to the head!
Pin and sew the flesh-colored ovals. Sew them together, leaving about an inch of open space at the bottom. Flip inside out, stuff with the polyester stuffing. You’re going to need it fairly well packed. Sew it closed, turning the flaps in and doing as tiny a stitch as possible. Now, here’s where you can do two things:
1. You can create a computerized face, print it out on iron-on transfer paper, and iron it on. This is a clean way to get pretty basic colors and lines. Only problem is that it can take a bit of time to clean the lines, resize to fit, and get the colors right.
2. I went ahead and used a regular sharpie/fountain pen and drew my face on. If you don’t trust yourself to immediately get it right the first time, take a normal pencil and LIGHTLY sketch it on your fabric. With some gentle washing, those lines will come out. I sketched the face, and then used the pen to darken the outlines. Fabric paint was used for his eye colors and scar.
(6) Let the face dry/set. In the meantime, plug in the hot-glue gun and assemble the hair pieces. Lay ‘em out and make sure you know how you want to position his hair. Got it? CAREFULLY squeeze out some hotglue and press the hair into place. I recommend practicing to get a feeling for the flow of the glue. You can also sew it, but hotglue=love, so why bother? Quicker and easier, and looks just as good.
Ok, so, now he needs a neck. Get your toothpick, and jab it through his chin. (7) Don’t worry, he’ll be fine. Mark a spot on the stick where about two thirds is still sticking out. Use your scraps to make a rectangle. Apply hotglue on the toothpick up to that line, and roll the fabric around the stick. When you get it to the thickness you want, cut and hotglue. Jab that sucker back into his head. Apply a dab of glue to make it stick, if you need to.
Now... go about an inch up from where you sewed his neck closed. Poke a hole for the neck, and jab it through. Sew the neck to the body, and use glue again if you want to. You should now have a puppy!
Now for the details:
(9) String a chain with the silver beads for his hoodie pulls/collar. Glue to either side of the neck.
Cut out a half circle of black fabric and glue it over the pulls/collar.
If you’re feeling especially daring, you can even sew long stitches into the paws to create toes. I decided to sew the body into a semi-sitting position. Do what you want! Just be sure to have fun!!

Related content


Comments: 28

WHOOT! I have to make one of these! I has to go to the craft store nao!!!!!!!!
👍: 0 ⏩: 1

Thanks for the fave! If you have any questions throughout the process, feel free to drop me a line and I'll do my best to help you out. My tutorials are less than easy to follow sometimes, so just let me know.
👍: 0 ⏩: 1
Yoyr welcome! I'll make sure I'll ask you if I have any questions, ya know! If I master the art of sewing in home and carrers, I can make this.
👍: 0 ⏩: 0

")

I wanna do it but my parents cant afford it and I cant get mygrandma to sew it whenever.Its really cool though and I rly wanna do it.
👍: 0 ⏩: 1

D:
*makes one and mails it to you*
👍: 0 ⏩: 1
Yay!Thank You!Awesome signature!Ninjas!
👍: 0 ⏩: 1
Jesh.
Your Welcome. Enjoyeh yurr virtual Saix Puppeh.
👍: 0 ⏩: 1
I already taught him to fetch!
👍: 0 ⏩: 1
I also gotta get him his shots... 

👍: 0 ⏩: 1
DDDDDD8 Saii-Chan dun likey shot-ses~!
But he must go!

👍: 0 ⏩: 1
Now he iss rabies free!!!!
👍: 0 ⏩: 1
*tries to bite me and I hit his head with a newspaper that fell from the sky* NO!
👍: 0 ⏩: 1
D'awwwww~! Dx
*hugs him* Nuuu T n T Dun Hurty him~!
👍: 0 ⏩: 1
He tried to bite my freaking head off!!!!!!?!
👍: 0 ⏩: 1


*o*~ omg!!
I need to make one now!! XDD Thank you for this tut >w<~~
*-*
👍: 0 ⏩: 0


Oh mi Gawd, izza puppy!\*3*/
👍: 0 ⏩: 0

")
thanks for posting!

👍: 0 ⏩: 0
Wooooo, that was long.... O.o Good luck to those who read it, and thanks!
👍: 0 ⏩: 1

Typo in the title!
(Puppt instead of Puppy)

👍: 0 ⏩: 2

....I thought I fixed that. ^_^;;; Thanks for the help
👍: 0 ⏩: 0