HOME | DD
 Stitchfan — Building Jak - my 1st fursuit

Published: 2009-04-05 08:04:32 +0000 UTC; Views: 4432; Favourites: 18; Downloads: 121
Redirect to original
Description
Download to see details…Originally going to be a polar bear, then an arctic fox, then an alien snow fox... I've decided to stick with calling it an "Arctic Canid" (fox/wolf)... Mainly because people called it a "Dog" alot, and the snout and jaw suggest less vulpine and more canine attributes. I named him: adventurer Jak Arktik (Lame, I know
") ).
).This was one heck of a long and busy experience. I have to really hand it to the talented people of “Mixed Candy”, “Don’t Hug Cacti”, and the other amazing artists who make fursuits on a regular basis. I will admit, after all the hard work, I was fairly pleased with the outcome of my first attempt at this… And yes, I will do this again some day.
The teeth and tongue were sculpted from "DeLight", a white, air-dry, light-weight modeling substance.
It was supposed to have a moving/talking jaw, but that didn't work out. It hung down too low after putting on the fur/teeth/tongue, so I had to reinforce it, thus making it stationary.
I have pictures of myself attending last evening’s event as well, but I’ll post that separately.
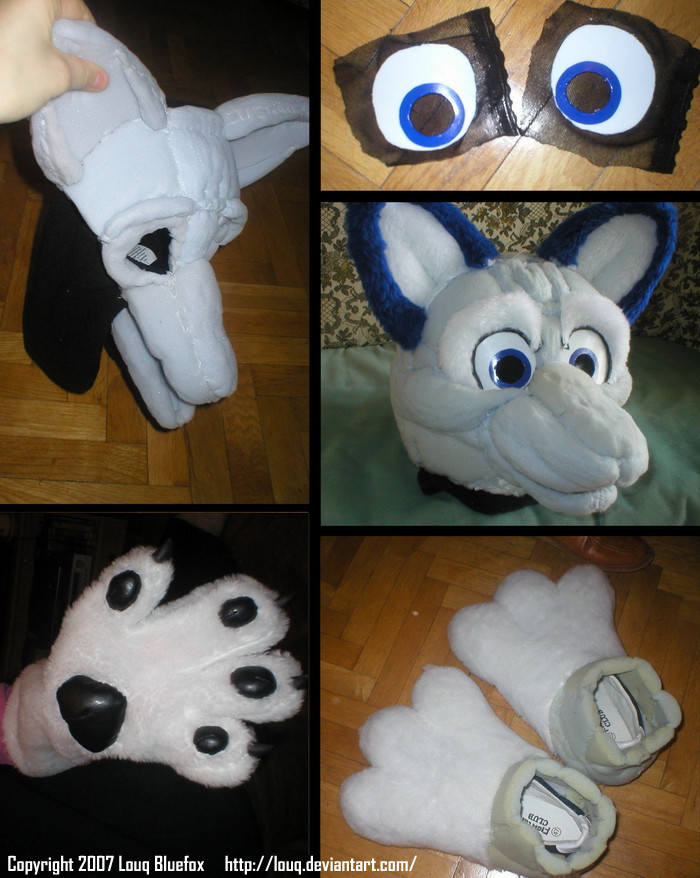
1- These 4 Polar bears only cost me $30 for the lot. Their fur was converted into my suit. Almost a shame not to keep one.
2,3,4 – Plastic mesh head frame
5 - painting the eyes
5, 6, 9, 11, 12 – Unfinished head with foam padding and plastic eyes
7, 8, 10, 13, 14 – Finished paw hands/feet and tail
15 – Finished head
It cost me less than $75 dollars and about 25 work hours total.
See more of the finished fursuit here: [link]
Learn how to make your own fursuit here: [link]
Jak Arktik © Mikey Silva
Related content


Comments: 20


Cool! I didn't know you had to go through all that!

👍: 0 ⏩: 1

No big deal really.
👍: 0 ⏩: 0

yay a foxie hug 8D 
👍: 0 ⏩: 1
I learned how to make this fursuit here: [link]
The website also tells how to make a foam head. Good Luck.
👍: 0 ⏩: 1
Oh thanks for the link! I have taken som advices from Tanidareals tutorials on her homepage too, have you seen them? can send you the link if you havent
Oh wow perfect! because that's what i gonna do
hey how do you do the fox smileys?
👍: 0 ⏩: 1
I love TaniDaReal's fursuits.
Here is the link to all the fox smileys: [link]
Just type the word "icon" in front of the name of the smiley and put it between 2 ":" . put your mouse over the fox smiley so see its name.
Example:
You want to do " " , so you type ":" then "icon" then the name "furrydanceplz", and then ":" again.
They'll look like this :#conNameGoesHere: (but spelled "icon" not "#con")
If you're not sure if you did it correctly, hit the "Preview" button. If you did it right you'll see " "
👍: 0 ⏩: 1
waah thanks for the tips!
👍: 0 ⏩: 1

Well done! It looks amazing  (Smile)")
The poor polar bears, they didn't see it coming!

")
👍: 0 ⏩: 1
Thanks.
Don't worry, the polar bears didn't mind.
Actually, I probably gave them more attention than a kid gives a plushie in its lifetime. Brushed them thuroughly, took care not to ruin their fur, lavished them with hot glue... and then took all four of them to a party! They must have had as much fun as me, they were there the whole time.

👍: 0 ⏩: 1

You've done a great job...wow, I love those paws. =3
*hugs the bears* Imma sorry, but you went to a good cause...

👍: 0 ⏩: 1
Thanks
I did get to cuddle/hug the bears a bit before I transfurred their cuddleyness over to me.
👍: 0 ⏩: 0

Whoa! That is so incredible! I've always wanted to create a fursuit and I've never known how! Your's looks fantastic! What did you create the shape of the head with?
👍: 0 ⏩: 1
Thanks.
I just curved that flat plastic mesh over my own head, and stitched it together with yarn to form a 3D frame. I built the frame (seen in 2, 3, & 4) for less than $6 (including the stitching needles and alastic for the jaw). It took about 7 hours to make like this though. It's cheaper than making a full foam head, but takes longer and isn't as sturdy. Full tutorials on how to make your ow here: [link]
👍: 0 ⏩: 0