HOME | DD
 Su-Zhe-ou — SuZheOu's tutorial
by-nc-nd

Published: 2007-08-08 22:56:52 +0000 UTC; Views: 9385; Favourites: 70; Downloads: 151
Redirect to original
Description
BIGGG WIDE FILE (sorry to all dial-uppers)this is a tutorial on how i do almost all my pictures since....since i got my first tablet actually.
i use photoshop elements 4 and a wacom graphire 4 tablet
and without further ado....
here we go >>>> ^_*
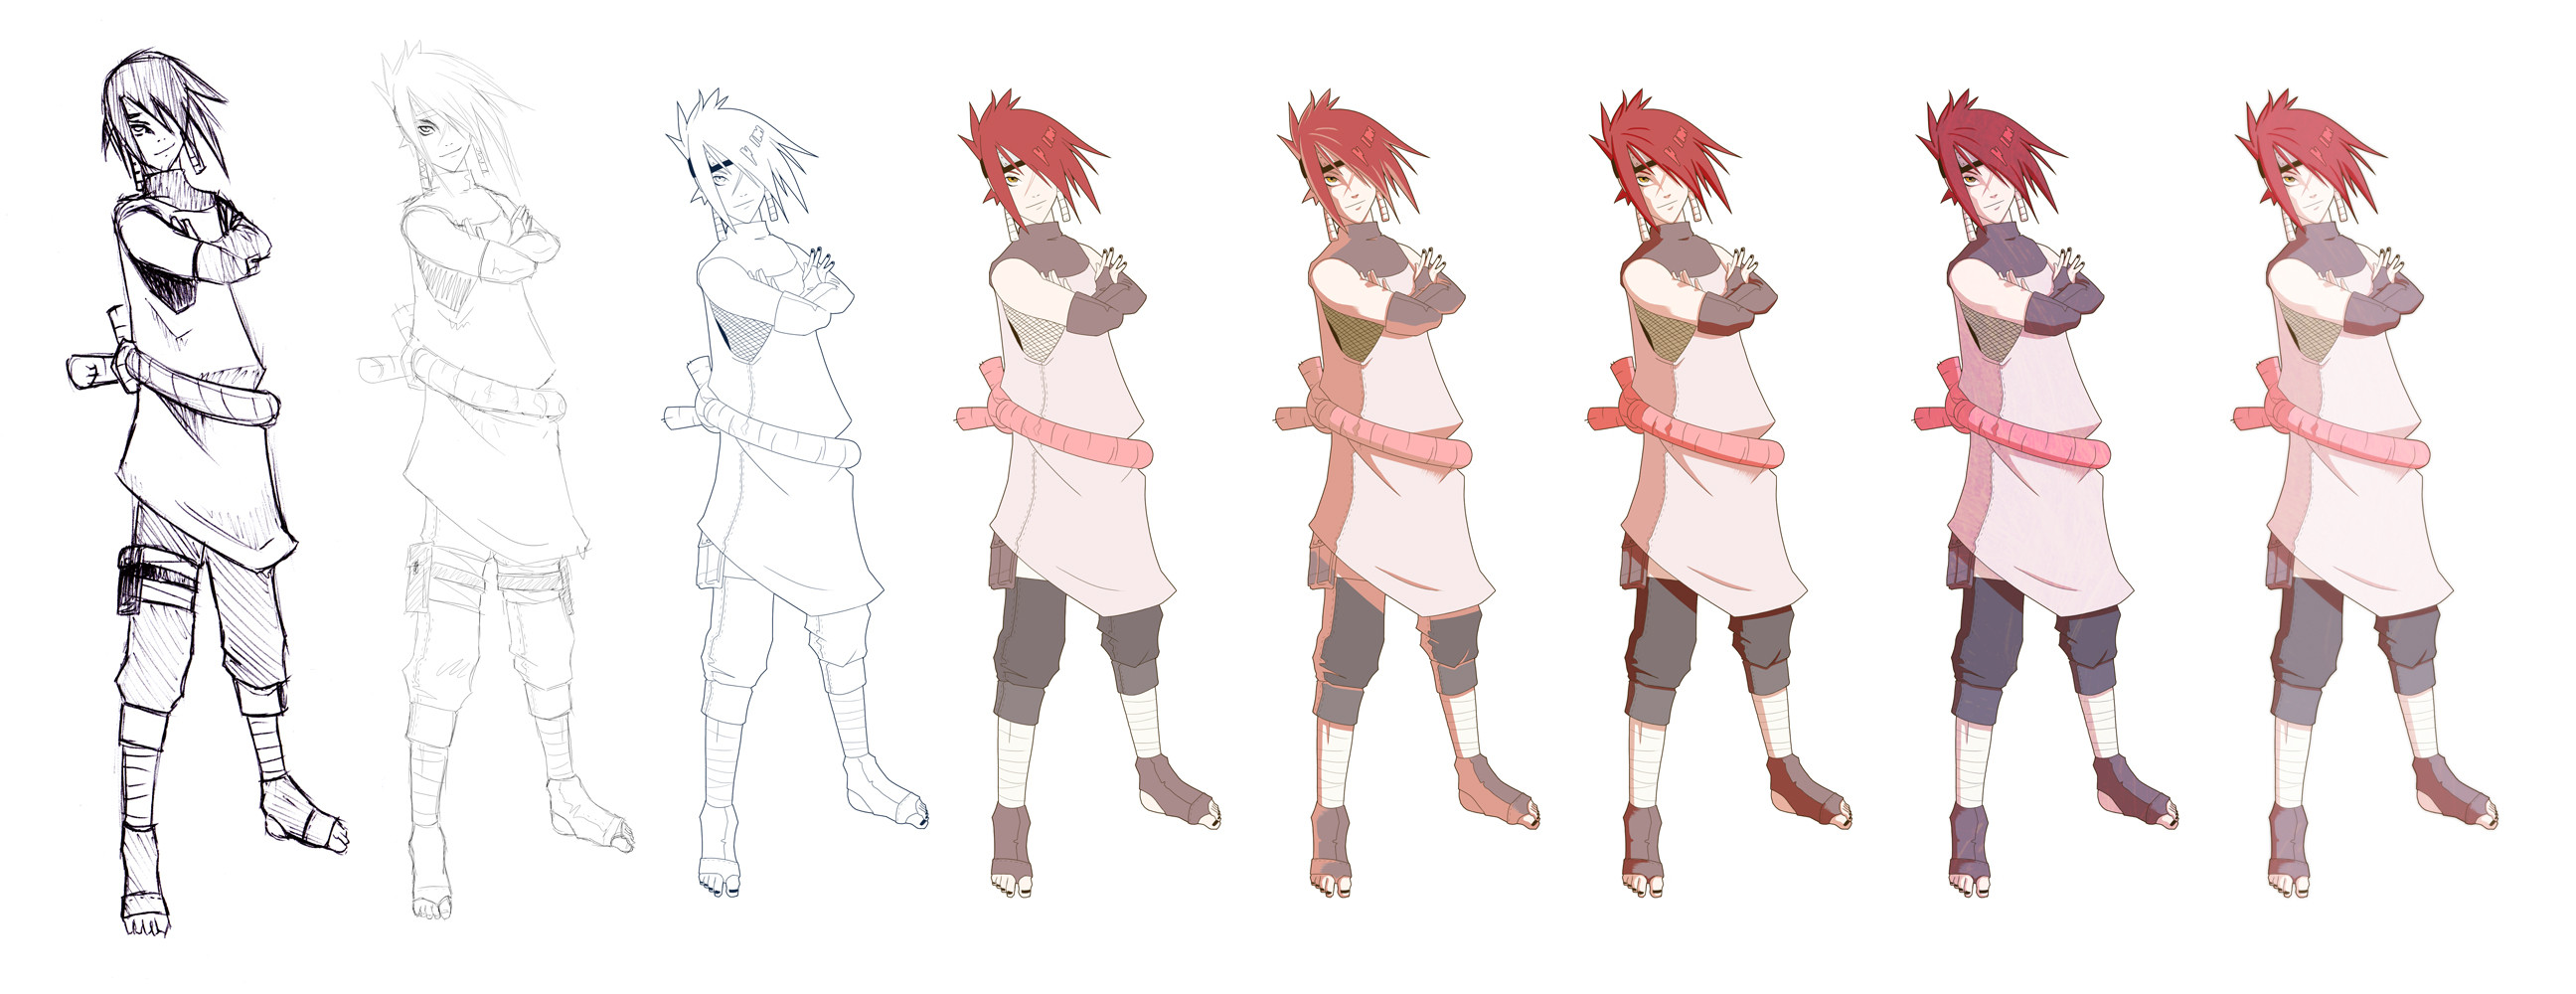
1. this is where it all starts... i usually do a reallly messy sketch of the final piece on paper with a plain old biro, this isn't to say you can't do it on the comp but don't try to make it perfect first time round =] (be sure to work big. it helps). my scanner is a bit arsey in that it screws the lineart when i scan nice stuff in... so i hardly do clean linearts ever. scan your sketch in at a biiig resolution, think 300/400.
2. this is where the fun really starts. grab the old tablet out and go to work. i tend to keep things a little messy still but start defining edges and structure. interms of this picture somethings up =S. i use a reeeaaally small brush here like 1 px. as you can see my whole idea can change sometimes (the hair!)
3. this is when you have to zooom right in and use a smallish 2/3 px brush and start to go over the previous sketch. oh and btw these are all on different layers and throughout the entire process its all on different llayers (unless specified otherwise). seen here you can see i realised that he is too tall. sort that out by using a polygonal lasso and dropping the torso a bit =]. its blue because... well i'll explain later..
4. slap some base colours down. there isn't a specific way to do this so slap on and erase or do it finely, your choice! be sure to keep the different colours on different levels and name that layer accordingly like 'hair' or 'rope', otherwise it's gonna get crazy confusing! use a bigger brush and the eraser at about 6/7px (or smaller) her
5. this is where your own skill comes into play. the shading can make or break a picture. choose your light source carefully. on this one it's kinda top right but back a bit =S. ona new layer apply any colour, i use an orange instead of low opacity black cos of a trick i learnt recently. (it's comin up i swear)
6. set this layer to 'linear burn' and play with the opacity. if the colours dont seem right go to hue/saturation' and mess with the settings to get the desired effect. simple but effective trick eh?)
7. this step can be skipped if you want. slow computers would literally explode here. i grab a massive sized texture off the internet (sweet, sweet google!) then apply on a layer above ALL of the colours but not the lineart. again play with hue/saturation, opacity and layer settings to gain the desired effect. here its like 69% opacity, colour burn and a bluey colour. lookin good now =] !
8. final and most tricky trick. merge the line, colour, shading and texture layers. and copy the resulting image. pres ctrl+z (or apple+z for us mac users) until you reach the end of stage 7. then paste the copied image on top of everything, be it colour, texture, lines, whatever. then set this layer to 'screen'. SHAZAM the image will be very bright. to fix this set you opacity lower. for the little glowey effect i got goin on got to 'guassian blur' and blur it a little. too much and the effect will be lost. so be careful >=].
I DO NOT DO BACKGROUNDS. the closest you'll see to a background from me is a gradient plus texture. that or another person. woop!
and that my chums is how i do my pics!
Related content
Comments: 14

I'm stuned by your lineart, it looks amazing. I've been working on it but I can't manage make it so thin! I don't use a tablet and I usually draw in paper with a 0.2mm pen. The problem is that the stroke is too thick when compared to this, and the effect is not that good 
👍: 0 ⏩: 0

It's impossible for me to make straight lines xD
Yours look so perfect! I'm blinded!
👍: 0 ⏩: 0

did you ink it on photoshop elements just by using your pen on your tablet or did you use something like the pen tool? i dont think elements has that but still
it looks so clean, i get all messy when i use my tablet
👍: 0 ⏩: 0

Oh wow this picture pwns 
👍: 0 ⏩: 0

as awesome as a summer can be
been painting my house which is...random
yours?
👍: 0 ⏩: 1

purty good. not done any art yet though!!!!!!!!!!!!!!!!!BUM. ive been feelin like b ballin to loud music a lot.
👍: 0 ⏩: 1

i wanna get back into it BUT the park is now overun with chavs
is well ghey
👍: 0 ⏩: 0

nice tutorial. At the moment i'm using fireworks, and i've been holding off using photoshop because i'm more confident with fireworks... Would you say it's worth switching? It would definetely make following tutorials a lot easier as it seems most people use photoshop.
👍: 0 ⏩: 1

well it all a matter of confidence
i personaaly use photoshop coss i do really elaborate pics
awesome
👍: 0 ⏩: 0

OOH I LOVE IT!
I have crappy PSP, do you reckon it'd be the same? :/
👍: 0 ⏩: 1

most probably
they are very similar
x
👍: 0 ⏩: 0


