HOME | DD
 thrwm — Thrwms DIY 8K detailed Genesis 9 (G9) diffuse maps
#3d #tutorial #daz3dstudio #genesis9 #irayrender #genesis9female
Published: 2022-12-31 21:48:18 +0000 UTC; Views: 1280; Favourites: 3; Downloads: 9
Redirect to original
Description
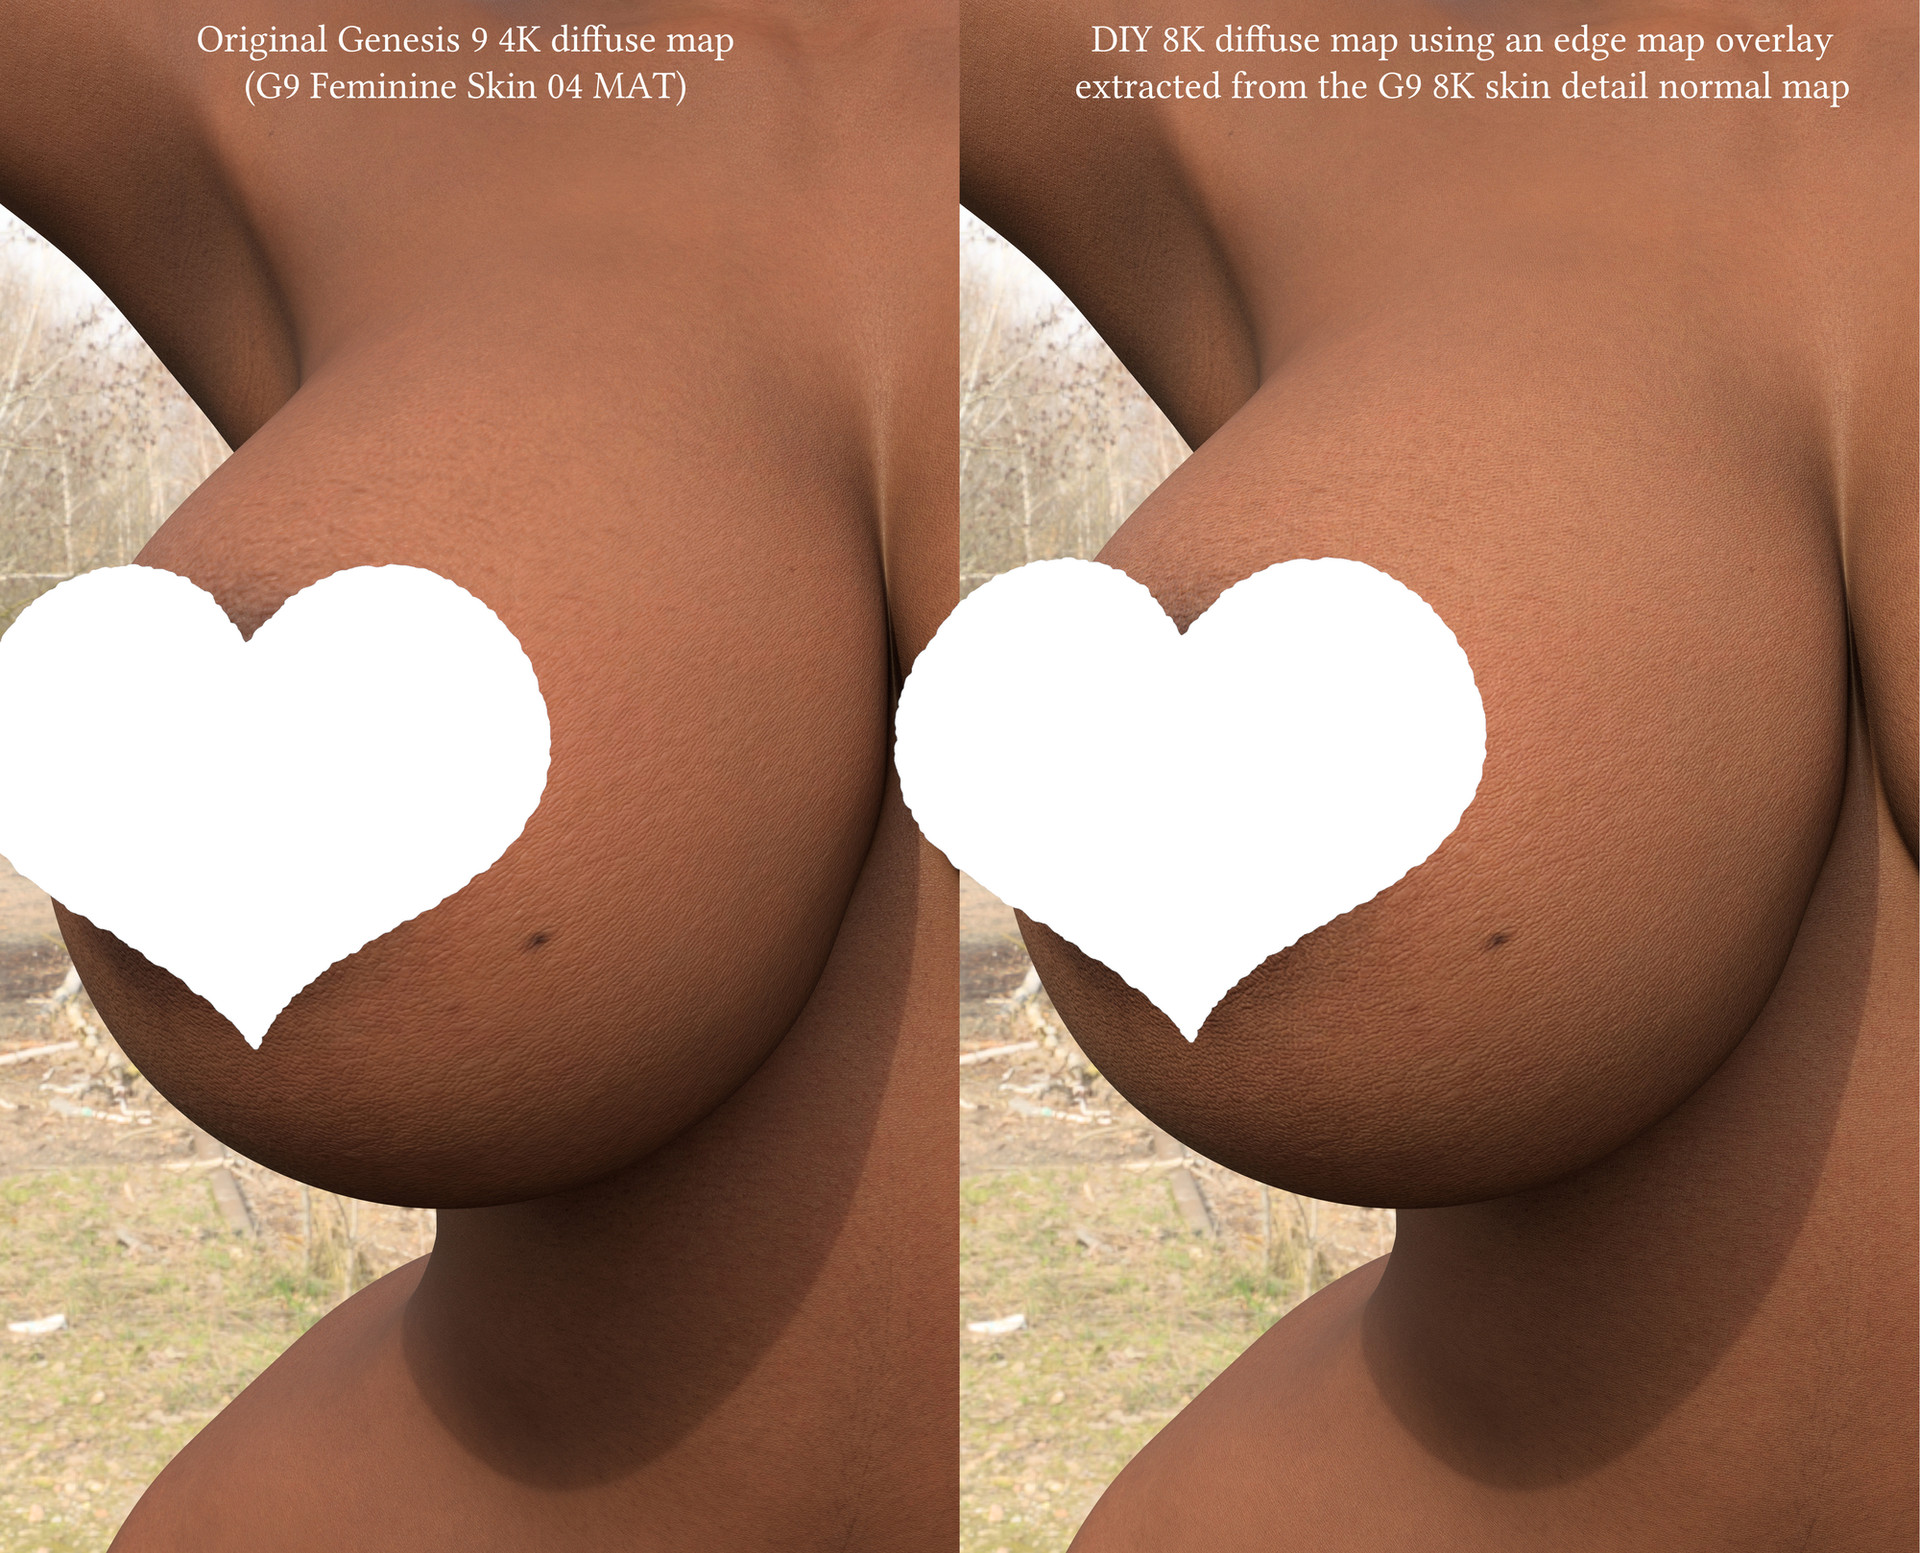
Thrwm's experiment at making DIY 8K high detail diffuse maps for Genesis 9 (G9)===================================================
The following is a DIY method for making high detail 8K diffuse maps using the existing free image resources and the free app Materialize.
The Genesis 9 figure comes with a set of highly detailed 8K normal maps. These normal maps are very nice... although not perfect as you might discover (crude blotches become apparent when processing them in Materialize at certain settings). We are going to take the 8K normal maps and convert them into greyscale edge maps which emphasize the detailed lines and pores in the skin. We will then overlay these edge maps on top of your diffuse map of choice, i.e. the one your character is wearing right now. This adds a nice bit of diffuse detail - which might suit your taste for certain renders.
1) Download and install Materialize (boundingboxsoftware.com/materi… ).
2) Run Materialize.
3) Locate your Genesis 9 skin details folder. Mine is in ...My DAZ 3D Library\Runtime\Textures\DAZ\Characters\Genesis9\Base\Skin_Details. This folder contains the 8K normal maps for Genesis 9 (genitals are 4K and nails are 1K).
For each of the skin normal maps, eg. for the feminine skin:
Genesis9_Arms_NM_1004.jpg,
Genesis9_BodyF_NM_1002.jpg,
Genesis9_GensF_NM_1001.jpg (if you intend to use the Daz female anatomy geograft),
Genesis9_Head_NM_1001.jpg,
Genesis9_Legs_NM_1003.jpg,
do the following:
4) Open the normal map in Materialize (press the "O" button in the Normal Map pane, navigate to your skin details folder)
5) In the Materialize Edge Map pane click on Create. This opens another pane called "Edge from Normal". I used the default settings, although you could try tweaking these a bit. In this pane click on "Set as Edge Map". In the Saving Options pane click on BMP or PNG (we don't want to compress our maps to nasty jpegs, even though Daz has only supplied us with nasty jpegs to start with). In the Edge Map pane click on the "S" button. Save your edge map to a suitable location
6) Open up GIMP or Photoshop or whatever 2D image editing software you use.
7) Open your Genesis 9 diffuse skin. e.g. in the promo shot I am using the South Asian looking skin set located in ...My DAZ 3D Library\Runtime\Textures\DAZ\Characters\Genesis9\Base\Feminine_04, so I now open G9Feminine04_Arms_D_1004.jpg etc., which is a 4K map.
8) Enlarge your diffuse map to 8K. e.g. in Photoshop do Image > Image Size > set Width/Height to 8192 > select Bicubic Smoother (best for enlargement) > hit OK
9) Open your 8K edge map which you burned off in Materialize. Invert it (you can try non inverted, but I feel the inverted map looks nicer). Optional: apply tweaks to levels or contrast etc. to suit your taste.
10) Copy and paste the edge map over your diffuse map, so that it sits in the layer above it. Set the layer combination style to Overlay (as it is known in Photoshop). Dial back the layer opacity to suit (I used opacity 50% in the promo render).
11) Save out the new image as BMP or PNG. You could place them in a subfolder - MAKE SURE NOT TO OVERWRITE YOUR ORIGINAL DIFFUSE TEXTURES! We now have a 4K diffuse skin texture, enlarged to 8K, with an overlay of 8K detail extracted from the Daz skin detail normal map.
optional:
12) You could repeat this process (4 to 11) for the SSS (subsurface scattering) maps, and you will probably get nicer looking results than the promo shot. I did not do this step yet because my rig will probably not be able to handle so many 8K maps.
Back in Daz...
1) Make sure you have loaded the 8K normal maps onto your character in the Detail section of the PBR Skin shader > Detail Normal Map slot (you can use the preset in Content Library > My DAZ 3D Library > People > Genesis 9 > Materials > Daz Originals > SKin Details > G9 Feminine Detail Normal Maps). (In the promo shot I also REMOVED the 4K normal maps that originally loaded with the skin set in the Normal Map slot - no need to have clashing normals!).
2) Load your new detailed 8K diffuse maps into the Base Color slot. (and the detailed 8K SSS maps into the Translucency Color slot, if you made these too).
3) Render! Yay!
=================================================
The bad news...
I found that the edge maps produced by Materialize end up with slight seams at the spine, neck etc at the edges of the G9 surfaces. I also tried Normal to Height map baking in Materialize, and these also end up with slight seams. This will probably annoy you if you manage to get your camera looking close up at a seam area on Genesis 9.
The next step for me will be to use Blender to burn the 8K normal maps (placed in-situ on a vanilla Genesis 9 mesh) off to something useable, which will undoubtedly result in perfectly SEAMLESS textures... But I'm not sure yet how to get the look of the Materialize edge map
")
Happy rendering,
Thrwm
Feedback is welcome! I'd love to hear/see what you are doing along these lines!


