HOME | DD
 WarmSummerSun — Yarn Tail Tutorial (Feline)
Published: 2012-08-16 06:02:54 +0000 UTC; Views: 197000; Favourites: 2135; Downloads: 743
Redirect to original
Description
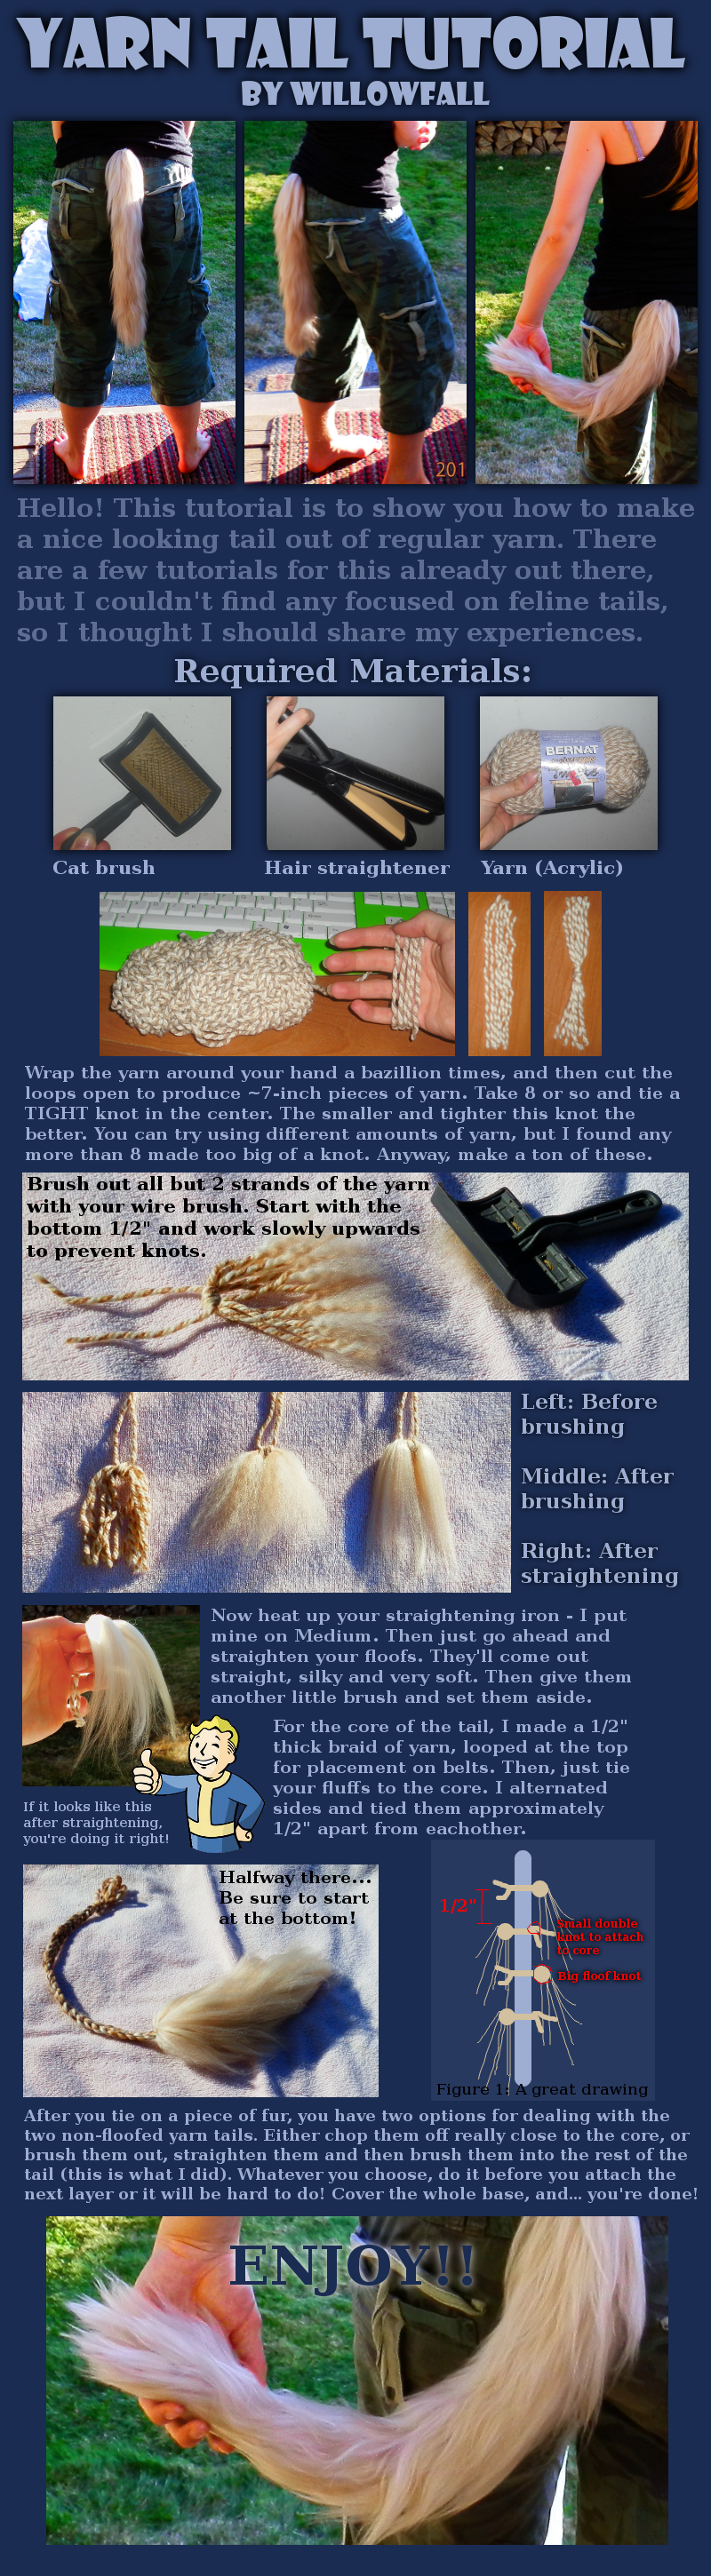
 Yarn tails are becoming really popular, I'm seeing them everywhere now! I found the perfect yarn at my local craft store, so I had to try it out. Here's a tutorial showing exactly how I made my cat tail. Let me know if you have any questions! Using the fur brush pulls out a lot of extra fluff. This is totally normal, and you can always save it to use as stuffing for plushies or what have you. It helps to have a plastic bag handy to stuff it all in. EDIT: After a lot of wearing and brushing, I realized that despite how tight my knots were, the floofs can start to slide on the base. I went through and stitched them on by laying the tail flat and separating the floofs, revealing all the big knots. Then just go through with a long threaded needle and tack them to the base. Alternatively, tie your fluffs INTO the weave of the braid instead of AROUND it to stop them from sliding down! EDIT Apr 2014: I recently made a great fluffy tail with "Loops & Threads" brand "Cozy Wool". It is 50% wool, 50% acrylic super bulky wool that I didn't straighten. I used longer strands to make a floofier tail (Instead of wrapping around your hand, wrap around a piece of cardboard or something that is wider than the span of your fingers) and only tied 4 strands together at a time. The tail has a cute wavy look as the fibres have not been straightened, just brushed out. I highly recommend this yarn!
 Here's some great tips from friends and fellow users:
1. Try a really soft, chunky wool - you might not even have to straighten it and you need to use less wool!
2. Tie your fluffs into the braid instead of around it to stop them from sliding down the base!
3. Try separating the wool strands before brushing to prevent knots.
Total time: ~5 hours+ depending on length
Related content


Comments: 383

Edit: I ended up figuring how to style my mustache! If anyone is interested in making a mustache please read below!
In my version my stache will be sort of like this  (Smile)")
Follow all original steps as followed until you reach the tying an extra string in the center step, before you do that I'd advise laying a small/elastic string going the same direction as the other strings on top in the center, THEN tie your knot around all the strings including the elastic. This will give you the chance to actually wear the stache, but if you didn't think about that at first or forgot (like me) you could always go back with a needle and thread or whatever string you want to use to tie it to your face, and put your needle through under the knot and pull it through! Continue original steps until you reach the brushing part, make sure to brush everything including the two strings as mentioned. Once finished brushing, use a straight iron to straighten out each end of your stache. Take a marker or something similar and wrap it from the end tip of one side of your stache around it, carefully hold it there and use hairspray to keep it in place. This may be a bit of a trial and error process so have some patience! Do this to both sides and you should be done! Press it, fluff it, etc. to get it the way you like! You could always go back and trim the ends if they're too long, these are washable! I hope this helped some people <3
(WarmSummerSun Not trying to be an attention hog, but it would be great if this comment could get a feature to help others out! Hope you liked it <3)
👍: 1 ⏩: 1

Haha!! This is wonderful! I'm glad you said that, because I didn't even know you could feature comments LOL <3 Cheers :3
👍: 0 ⏩: 1
Awesome thanks so much! And glad you know now lol ")
👍: 0 ⏩: 0

Try a fine-toothed comb, instead! You'd be better off buying a catbrush though, it will speed up the process.
👍: 0 ⏩: 1

im only having difficulty on dat long part of the tail
👍: 0 ⏩: 0

I was wondering if you know a way to tie the fluffs to the core good enough so they won't come off because I want to start making yarn tails and I want to make one for a friend that lives really far away and I'd feel horrible if it fell apart after a few times of using it. And I don't know how to thread the fluffs through and was wondering if you knew another way.
👍: 0 ⏩: 0

Hey, do you know what I should do if I don't have access to a straightener? My tails look really weird ;w;
👍: 0 ⏩: 1
Not much you can do without a straightener, unfortunately! You could try crazy stuff like getting it wet and hanging it to dry, or using hair products. Better option would be to check a local thrift store for a straightener :3
👍: 0 ⏩: 1

I finished making a yarn tail of my own, yet I'm struggling to figure out how to attach a belt loop of some sort. What method did you use?
👍: 0 ⏩: 1
Hello! Wonderful, I'd love to see it
👍: 0 ⏩: 1
It helped! What I ended up doing was adding a little extra yarn to the base and attaching an elastic. I'll post pictures of just the tail soon!
👍: 0 ⏩: 0


I'd suggest tying the knots of the same color a bit closer to each other and maybe shortening some strands to get even layers.
👍: 0 ⏩: 0


www.youtube.com/watch?v=qxJY4l…
👍: 0 ⏩: 0

The core is braided c:
👍: 0 ⏩: 0

I was wondering if you know of a alternative to a hair straightener? I currently don't have one or the money to get one.
Thanks for the tutorial ^^
👍: 0 ⏩: 2

I used detangler spray. You have to brush again when dry, but works for a person on a budget.
👍: 0 ⏩: 0
Buy one secondhand. I use one I bought at a thrift store for $4. The only alternative would be straightening it using hot water like one would for a synthetic wig, but I've never tested this method personally and would not recommend it for the risk of burning yourself.
👍: 0 ⏩: 0

THIS IS SO FLUFFYYYYYY!!!!
waaa!! Thank you for the tutorial... Mmmh!! I think I'm gonna try it, it looks so great but seems more difficult than just buying fabrik and making it :/
👍: 0 ⏩: 1
It definitely takes longer than sewing from fake fur, but lets you do some cool things with colours and patterns that would be difficult with fabric! Did you get a chance to try it out?
👍: 0 ⏩: 0

I've been searching for a nice looking cat tail all over the place, but most of them are just ugly.
This tutorial saved me! It was so helpful! Thank you very much!
It really took about 5h (I didn't think it would, looked so easy xD) and I hurt my fingers with the sharp endings of the cat brush. But the result looks awesome!
(For people not owning such awesome things like a crochet needle: I used the stiff endings of the cord in my hoodie, worked fine as well
")

👍: 0 ⏩: 1
No problem, really glad it worked out for you
👍: 0 ⏩: 0

Just one for this tail!
👍: 0 ⏩: 0

nice idea. Looks like it could work with doll wigs too
👍: 0 ⏩: 1
Definitely. You could do wavy hair too if you skipped the straightening step.
👍: 0 ⏩: 0

Instead of making a bunch of floofs I am experimenting with crocheting individual stands to the braided base and then brushing them out
👍: 0 ⏩: 3
I've done that too, that style takes waaay longer and ends up with thinner looking tails.
👍: 0 ⏩: 1
yea i've switched to hot gluing the fluffs lol
👍: 0 ⏩: 1
")
👍: 0 ⏩: 1
I've gotten a great result so far
👍: 0 ⏩: 1
I would never do it. It's lazy and your overall quality will be poor. If it's a time saving technique for a personal project then it's fine, but never, ever, ever sell a yarn tail who's floofs have been glued to the core.
👍: 0 ⏩: 0
This is an awesome idea! Thanks for sharing! Did you finish your tail?
👍: 0 ⏩: 1
Ah no not yet! Working on it though!!
👍: 0 ⏩: 0

may i ask how that went? since im a bit curious XD
👍: 0 ⏩: 1
It's going really well actually it makes so that the yarn can't be pulled loose and fall apart
👍: 0 ⏩: 1
would it be possible to make a small tutorial? i would love to try it out XD , right now im just sitting in my room for a few hours together with a friend making tails
👍: 0 ⏩: 1
It's pretty easy. All you need to do is wrap the yarn around your hand and cut one side and cut it free from the ball of yarn and separate them from each other. Then with the braid you made for your base use a crochet hook to help you and fold one strand of yarn in half, stick your hook through a part of the braid (preferably near the bottom) and grab the yarn pull it half way through where you have a loop and pull the other half of the yarn through and pull. You can either continue adding more and then brush it out and straighten it or do it strand by strand. But continue that until your done basically. I haven't fully completed mine yet but am still working on it because school has started back and junior year of high school is really hard so far. And I'm only in the first few weeks!
👍: 0 ⏩: 1
thanks! i'll probably try this sometime! also good luck with school ^^
👍: 0 ⏩: 1

If you used fox colors (e.g.: red with a black tip), this should make a nice tail. Check out EvoRo-KaSu, who posted this two-color tail photo in a comment upstream: instagram.com/p/0sZvQyMDwd/
That one, being white with a black tip, looks like an ermine tail to me, but if the white part was red it'd be very foxy! 😺
👍: 0 ⏩: 1

Out if red foxes, the tail tip is not unique. There are white (common) black (rarer) and silver being the rarest.
Beyond that, there are white (snow) foxes, black foxes, silver foxes, gold (sand) foxes, and kennek foxes, to name a few.
I find it best to make the tail bulk in your own hair color or the wig colour as it will look more natural. But the tip should be white to relate as a fox.
👍: 0 ⏩: 0

I would make the base braid a lot thicker, but I imagine it would also add a fair bit of weight.
👍: 0 ⏩: 1

Yeah, there is a bit of weight, but it barely makes a difference!
👍: 0 ⏩: 0
| Next =>