HOME | DD
 watersmann — Bad Genius, Aokbab, step 4C-SECRET OF MY PAINTING
#tutorial
Published: 2021-03-19 12:53:32 +0000 UTC; Views: 4648; Favourites: 18; Downloads: 3
Redirect to original
Description
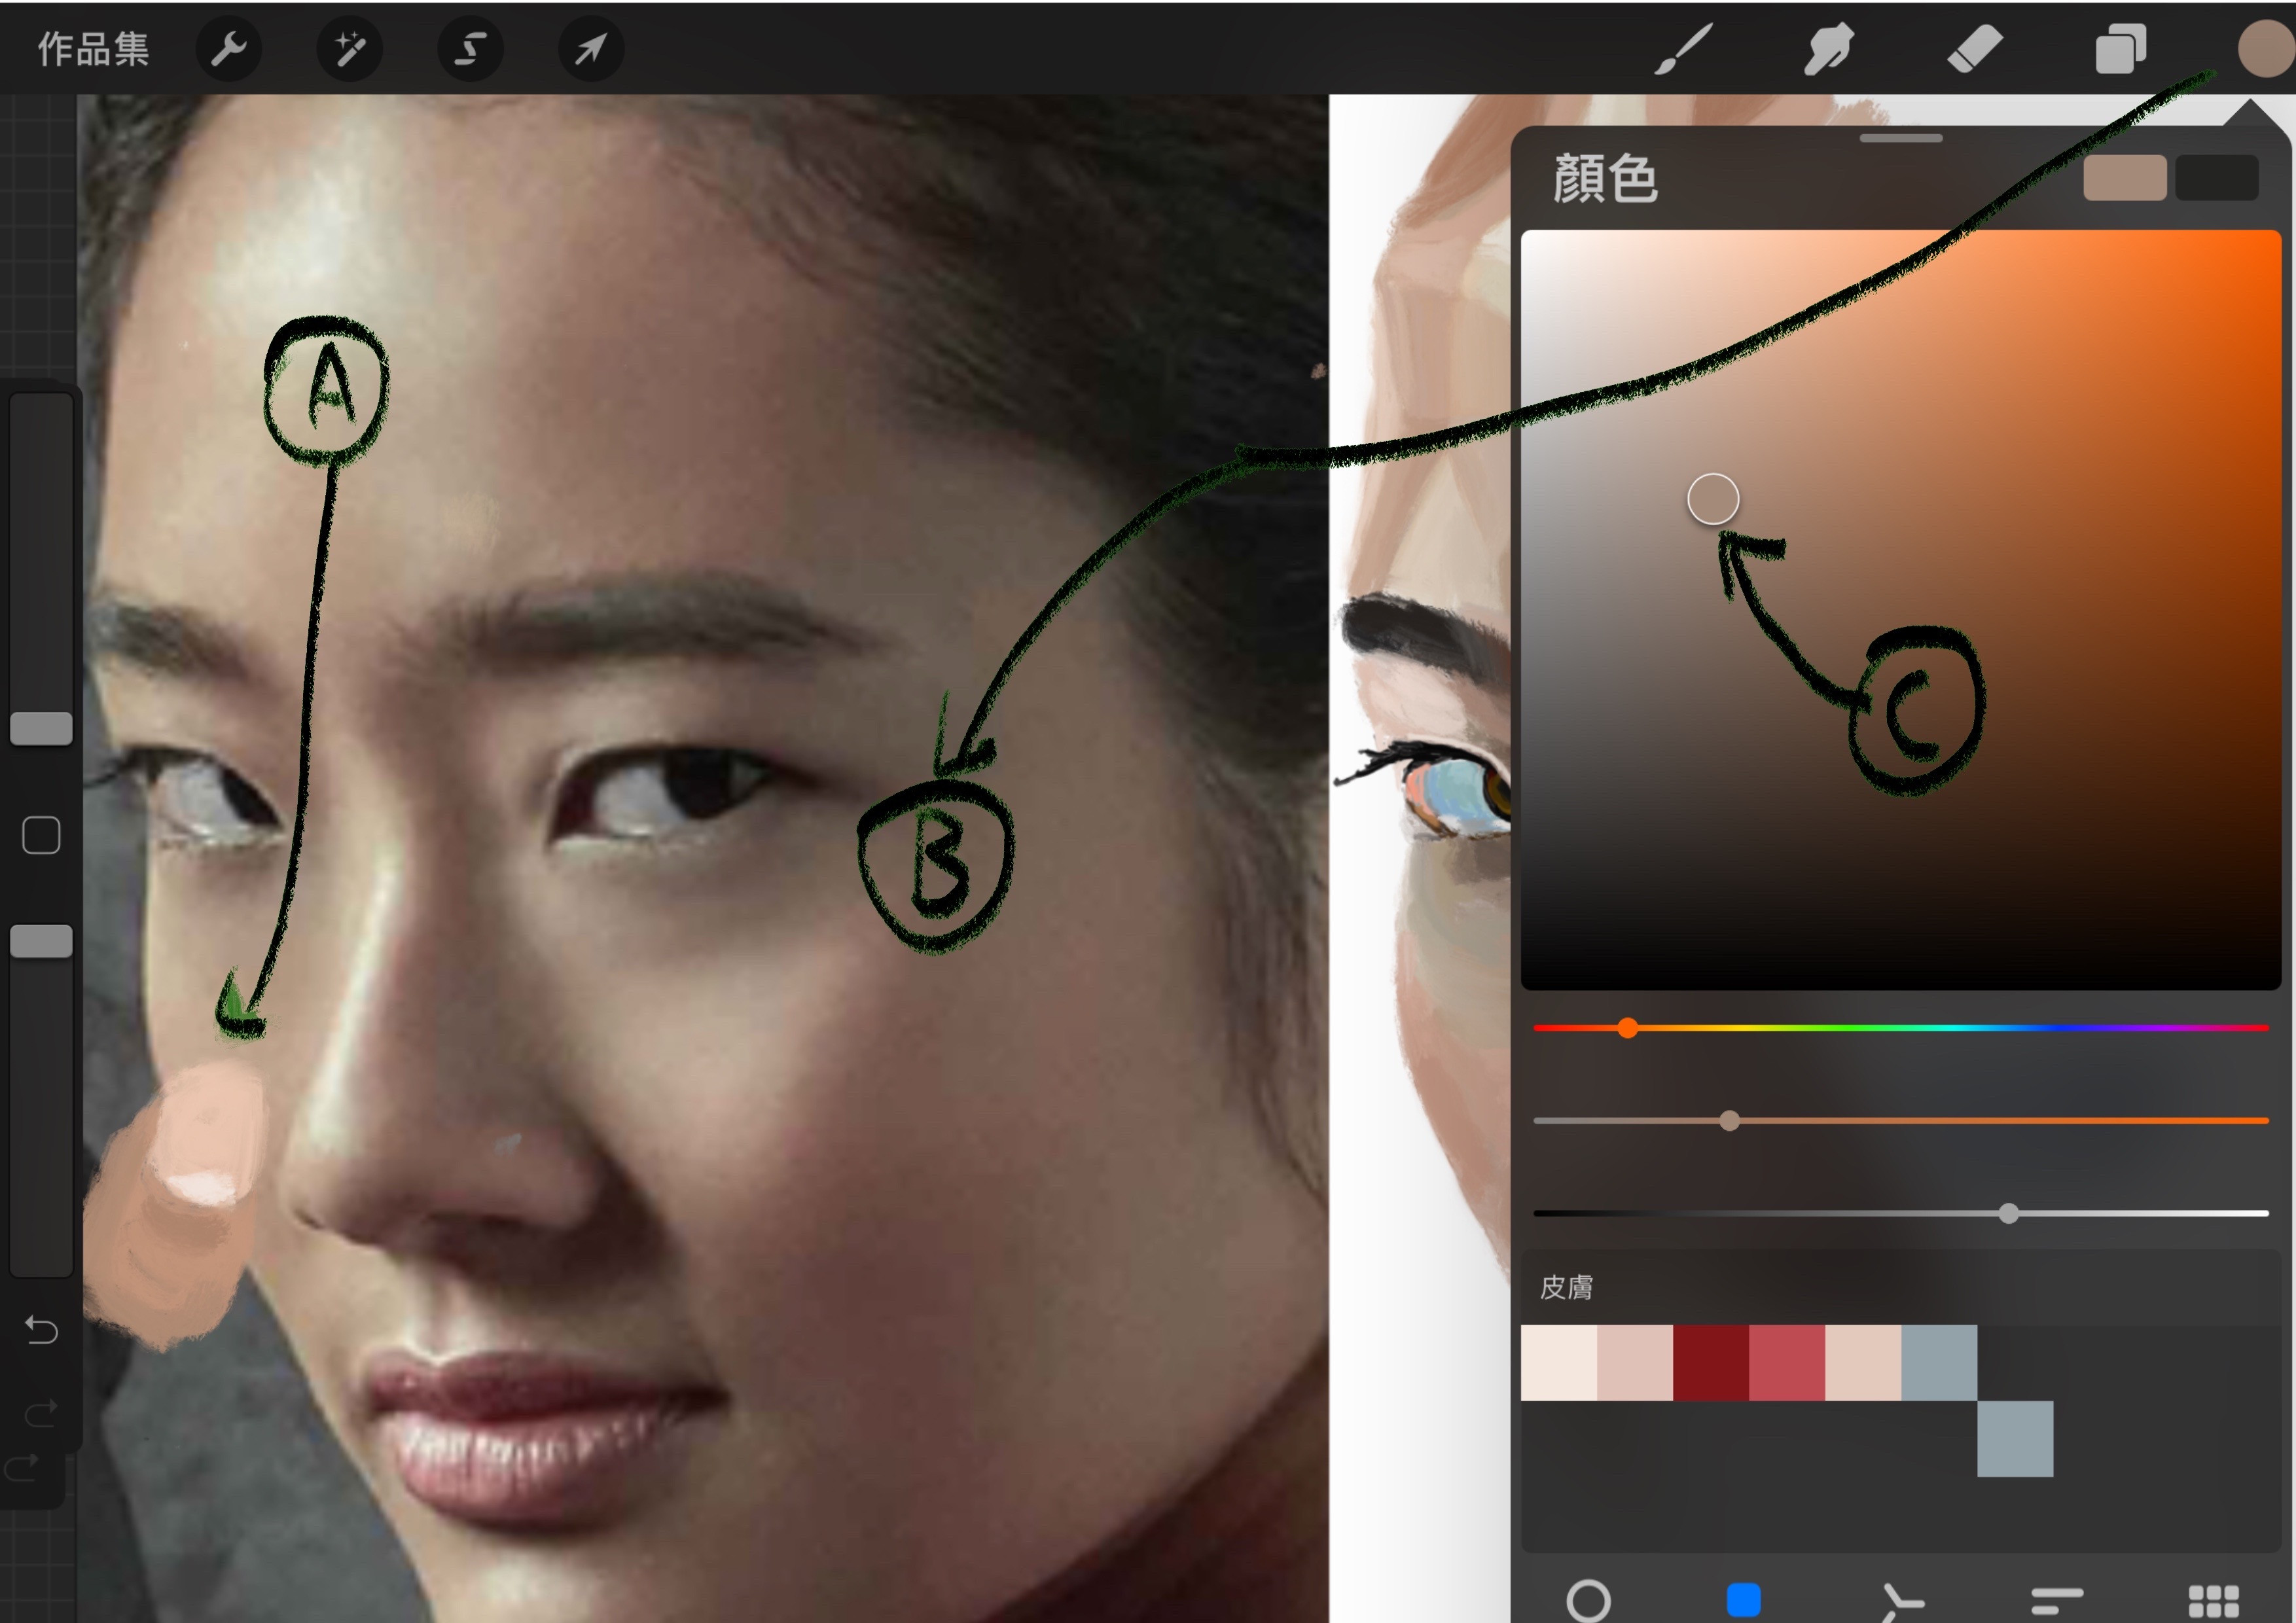
As recited in my bio and the Face100 description, instead of painting with real oil painting tools, I use iPAD, Apple pencil and procreate App to create all these paintings. In procreate, I use only three free brushes and two of the brushes are used for 95% of time. You can find the free brush information from Face100 gallery description (p.s. I just thank them for providing this free tool, not to advertise for them).I said I am new to painting, which is not kidding. I don’t know anything at all to mix real oil paints, e..g. mixing five colors of oil paints into any colors you need. I use Procreate’s color sampling function to ‘get’ color directly from the reference image. Specifically, you press your thumb over a position of the reference image, the color at the position is “assigned” as the active color your brush will immediately apply.
Like what I illustrate above, you can press your left thumb on a position (A) where you would like to paint for 1 second, and then the color of that position is “assigned” as the active color (B). In addition, the palette (C) is immediately moved to a color palette relative to the active color correspondingly.
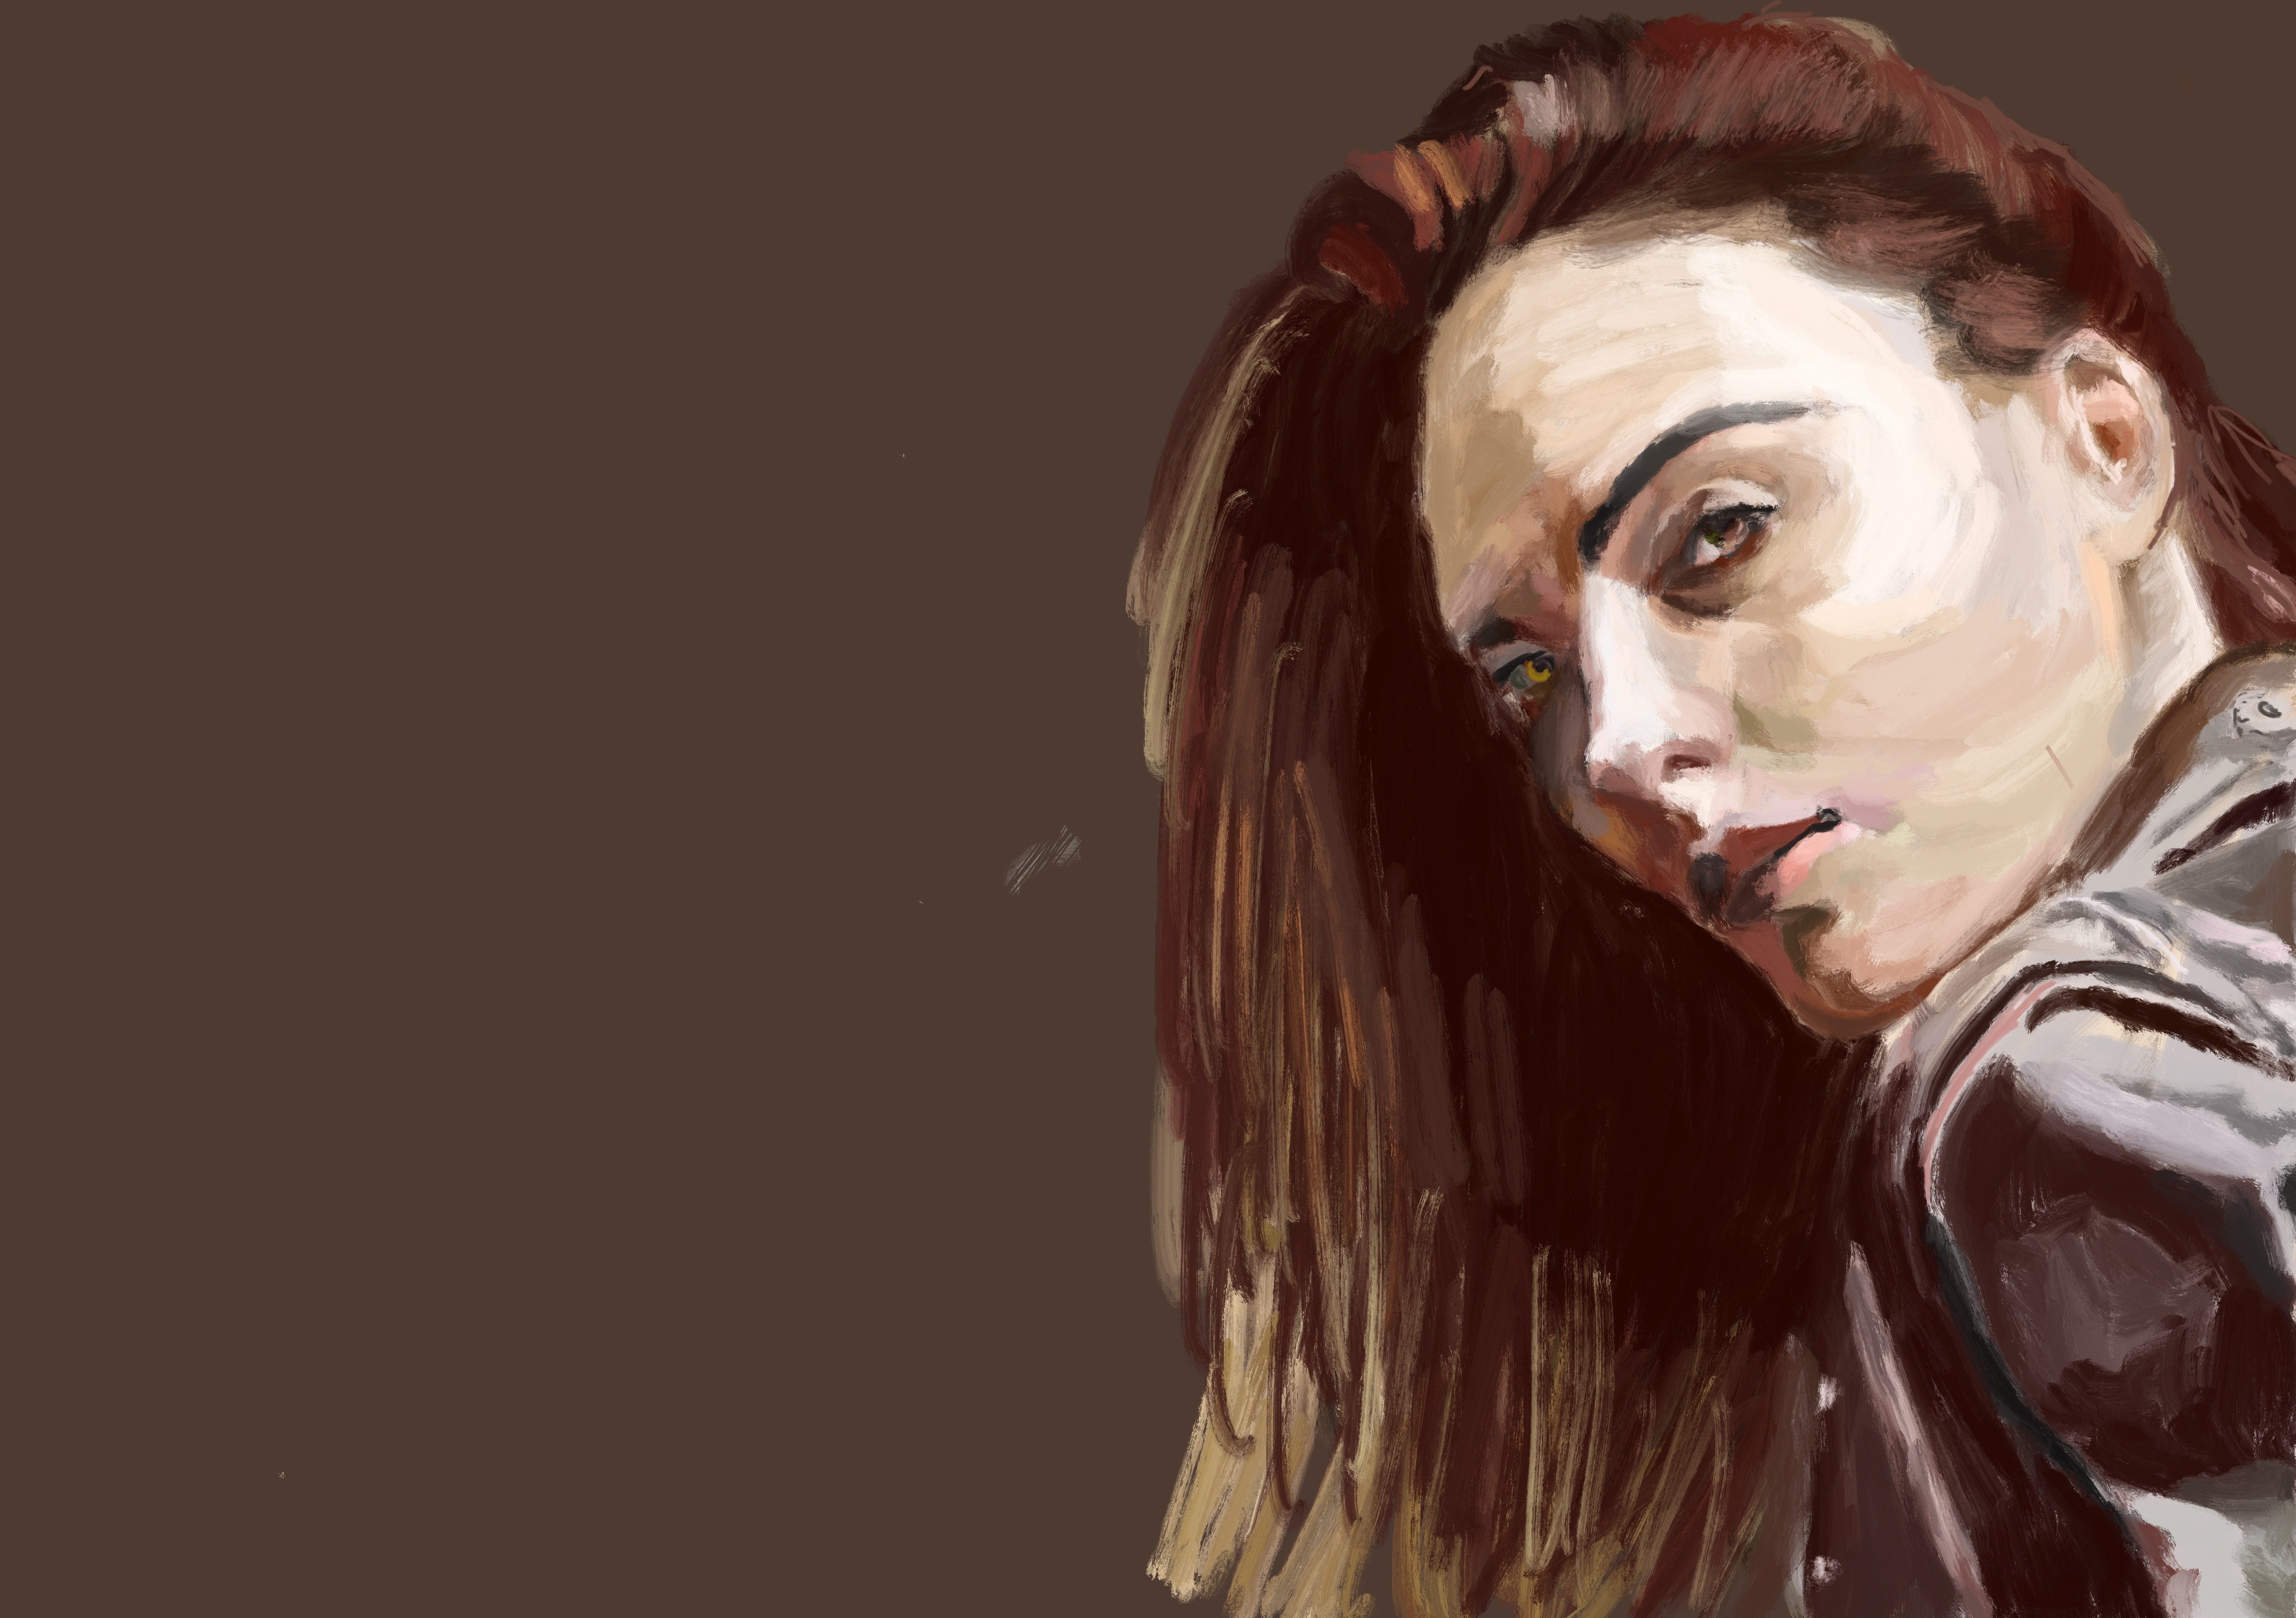
As mentioned in step 4B, any face, including this one, is just a combination of multiple color areas. Each time you only need to focus and paint that area, instead of the face. You will surprisingly find that each area is just a simple geometrical area, not difficult to paint at all.
This is what I read from a GREAT BOOK "The New Drawing on the Right Side of the Brain". It is your left side of brain trying to "understand" the subject, which disturbs you to find the SIMPLE SECRET that you only need to paint a lot of simple geometrical shapes one after another, no matter whether you're painting a fox or a lady.
Once you put that in your mind, you can be a "copy machine" almost immediately. That does not bring you to be an artist, since copying is not creating. However, that would save you from frustration and opens unlimited possibilities.
Areas are related, as you might say. I agree, but in oil painting world, you can modify and correct any deviation any time easily.
Let me summarize the simple but practical findings during my previous 40 paintings as follows:
Each time you start handling an area, just press your thumb on a point of the area, the color of that point is “selected”. Most time, colors of adjacent points to that point may be found in the palette (C). Try filling the whole area with the color you “pressed” or try to fill the area with multiple adjacent colors to bring better effect.
I am not a professional painter, not even do any real oil painting, e.g. I don’t hold any real world oil paint brush yet. I would not be surprised if you are surprised with that. These paintings are neither professional nor creative. One reason for me to place these paintings all together here to attract your attention is:
if you like these paintings, in fact you can create them like me who has no real experience on oil painting by yourself, not even need to go to any art school. Just get an iPAD and start doing it.
These are tips I collect during previous 40 paintings. If you have no experience on oil painting but like to create something like you see on my gallery with iPAD and apple pencil, I hope these tips help you create something you like to and enjoy it.
To be a copy machine is not the end. It’s a beginning. Hope these tips help you pass through frustrations and get in love with painting whatever you would like to express to the world. If you succeed doing so, I am very happy to know that.
I have started my journey, and welcome to join me.
If I have more interesting findings, I will post them here. Also appreciate if you share this tutorial with your friend, if you find it helpful.
==
如同我在我的簡介跟Face100 Gallery的介紹,我是使用iPAD, Apple Pencil跟procreate來畫這裏展示的所有練習作品。其中,在procreate裡頭,我只用三個免費下載的筆刷,且95%的時間只用到其中兩個。這個免費筆刷可以在我的Face100簡介中找到。註明:我很感謝提供免費筆刷的公司,但我沒有收取他們的廣告費。
我有在我的簡介中提到,我並非專業畫家,沒上過藝術學校,這並不是開玩笑。實際上,我連油畫顏料都沒有用過,更不用說用幾種油畫顏料來混搭出各種所需的顏色。在procreate這個app裡頭有個取色功能。你只要把你的手指按壓在一個位置超過一秒,那個位置的顏色就會被選取,作為你接下來筆刷會呈現的顏色。
具體來說,用上面的圖示說明。你把你的手指放在參考圖片的某個位置(A)超過一秒,這個位置(A)的顏色就會被選取,設定在(B)位置。同時,調色盤(C)也會標示這個選取顏色在色版中對應的位置。
如我在上一張說明圖示,步驟4B,提到的,包括你現在看到以及其他的任何一張臉,其實都只是一堆色塊區域的組合。每次你只集中注意力處理一個色塊,而不是去處理一整張臉。你會驚訝地發現,其實每個區域只是一個簡單的幾何區域。只要你會畫三角形、圓形,你就會畫幾乎任何一個色塊區域。葉問一次打十個,不是有十隻手,他每次只對付一個人,直到所有對手一一倒下。
這是我從一本很棒的畫畫教學書【像藝術家一樣思考】,學到的最重要的一堂課。這本書的核心概念只有一個,你的左腦在你畫畫的時候會本能試圖去理解,導致你無法發現一個簡單的事實,就是你真正要對付的只不過是一些幾何圖形、線段跟色塊的組合而已。你要作的事情就是壓抑你的左腦不要去理解,而是放任你的右腦去觀察最基本的幾何圖形跟色塊。簡言之,你要做的事情就是去觀察參考圖裡頭的色塊,然後一個個把這些簡單的色塊畫出來,不管你畫的是下雪天的狐狸還是可愛的女孩。
一旦你記得這件事,你幾乎就能立刻成為一個畫畫影印機。這不意味著你就能立刻成為一個藝術家,畢竟複製並不是創作。然而,這些概念跟技巧能協助你穿過阻擋無數人畫畫的沮喪感,進而展開無限的可能性。
是的,我知道你也許會說,這些色塊都是相關聯的。然而,在油畫世界裡頭,你可以輕鬆地修改任何的偏差。
讓我總結一下我在前面四十張圖歸納的簡單但實用的發現如下:
你要做的事情就是每次處理一個色塊區域時,在參考圖的其中一個位置按下手指一秒,顏色就會被設定成選定顏色(B),並在你接下來的筆刷直接使用。並且,調色盤(C)也會根據這個選取的顏色作對應的調整。你可以直接把整個色塊區域直接填上選取顏色,或是在這個色塊區域裡頭填入多個跟選取顏色相鄰的顏色取得更好的視覺效果。
我並不是一個職業畫家,沒有任何油畫經驗,甚至連真實世界的油畫筆也沒拿過。如果你看了我的畫覺得很驚訝,我不會覺得奇怪。我只是想告訴你,這些畫並非職業畫作也沒有創意成分。我把這些畫作集中放在這裏的其中一個理由,是想讓你在看過我的畫畫之後,傳達下面這個信息:
如果你喜歡我的這些練習作品,就算你跟我一樣,沒有任何油畫的經驗,你自己也可以做到。你甚至不用去參加畫畫課,你只需要弄到一台iPAD並且開始畫。
這些概念跟技巧是我在練習了前面40幅練習作品後歸納的心得,希望這些練習作能建立你的信心,並且這些技巧能在你探索的過程中節省你的時間。
當一個畫畫影印機並不是終點,那只是起點。希望這些概念跟技巧可以幫助你度過最開始困難的時間,並且愛上畫畫這件事。然後你可以用這個技能,把你的想法跟創意,透過畫畫傳達給這個世界。
如果你做到了,並且跟我說一聲,我會非常開心知道這件事情。
我已經開始了我的畫畫之旅,也歡迎加入這個行列。
如果我接著還有其他的心得,我會在這個地方發表。如果你覺得這些內容有幫助,也歡迎你轉介紹給你的朋友。
---
如同我在我的简介跟Face100 Gallery的介绍,我是使用iPAD, Apple Pencil跟procreate来画这裏展示的所有练习作品。其中,在procreate裡头,我只用三个免费下载的笔刷,且95%的时间只用到其中两个。这个免费笔刷可以在我的Face100简介中找到。註明:我很感谢提供免费笔刷的公司,但我没有收取他们的广告费。
我有在我的简介中提到,我并非专业画家,没上过艺术学校,这并不是开玩笑。实际上,我连油画颜料都没有用过,更不用说用几种油画颜料来溷搭出各种所需的颜色。在procreate这个app裡头有个取色功能。你只要把你的手指按压在一个位置超过一秒,那个位置的颜色就会被选取,作为你接下来笔刷会呈现的颜色。
具体来说,用上面的图示说明。你把你的手指放在参考图片的某个位置(A)超过一秒,这个位置(A)的颜色就会被选取,设定在(B)位置。同时,调色盘(C)也会标示这个选取颜色在色版中对应的位置。
如我在上一张说明图示,步骤4B,提到的,包括你现在看到以及其他的任何一张脸,其实都只是一堆色块区域的组合。每次你只集中注意力处理一个色块,而不是去处理一整张脸。你会惊讶地發现,其实每个区域只是一个简单的几何区域。只要你会画三角形、圆形,你就会画几乎任何一个色块区域。叶问一次打十个,不是有十隻手,他每次只对付一个人,直到所有对手一一倒下。
这是我从一本很棒的画画教学书【像艺术家一样思考】,学到的最重要的一堂课。这本书的核心概念只有一个,你的左脑在你画画的时候会本能试图去理解,导致你无法發现一个简单的事实,就是你真正要对付的只不过是一些几何图形、线段跟色块的组合而已。你要作的事情就是压抑你的左脑不要去理解,而是放任你的右脑去观察最基本的几何图形跟色块。简言之,你要做的事情就是去观察参考图裡头的色块,然后一个个把这些简单的色块画出来,不管你画的是下雪天的狐狸还是可爱的女孩。
一旦你记得这件事,你几乎就能立刻成为一个画画影印机。这不意味着你就能立刻成为一个艺术家,毕竟複製并不是创作。然而,这些概念跟技巧能协助你穿过阻挡无数人画画的沮丧感,进而展开无限的可能性。
是的,我知道你也许会说,这些色块都是相关联的。然而,在油画世界裡头,你可以轻鬆地修改任何的偏差。
让我总结一下我在前面四十张图归纳的简单但实用的發现如下:
你要做的事情就是每次处理一个色块区域时,在参考图的其中一个位置按下手指一秒,颜色就会被设定成选定颜色(B),并在你接下来的笔刷直接使用。并且,调色盘(C)也会根据这个选取的颜色作对应的调整。你可以直接把整个色块区域直接填上选取颜色,或是在这个色块区域裡头填入多个跟选取颜色相邻的颜色取得更好的视觉效果。
我并不是一个职业画家,没有任何油画经验,甚至连真实世界的油画笔也没拿过。如果你看了我的画觉得很惊讶,我不会觉得奇怪。我只是想告诉你,这些画并非职业画作也没有创意成分。我把这些画作集中放在这裏的其中一个理由,是想让你在看过我的画画之后,传达下面这个信息:
如果你喜欢我的这些练习作品,就算你跟我一样,没有任何油画的经验,你自己也可以做到。你甚至不用去参加画画课,你只需要弄到一台iPAD并且开始画。
这些概念跟技巧是我在练习了前面40幅练习作品后归纳的心得,希望这些练习作能建立你的信心,并且这些技巧能在你探索的过程中节省你的时间。
当一个画画影印机并不是终点,那只是起点。希望这些概念跟技巧可以帮助你度过最开始困难的时间,并且爱上画画这件事。然后你可以用这个技能,把你的想法跟创意,透过画画传达给这个世界。
如果你做到了,并且跟我说一声,我会非常开心知道这件事情。
我已经开始了我的画画之旅,也欢迎加入这个行列。
如果我接着还有其他的心得,我会在这个地方發表。如果你觉得这些内容有帮助,也欢迎你转介绍给你的朋友。
---
*** Welcome to provide translation of this article to any other language ***