HOME | DD
 Whimsical-Dreams — .::Tutorial: 'Ideas'::.

Published: 2009-04-29 07:06:14 +0000 UTC; Views: 14017; Favourites: 247; Downloads: 497
Redirect to original
Description
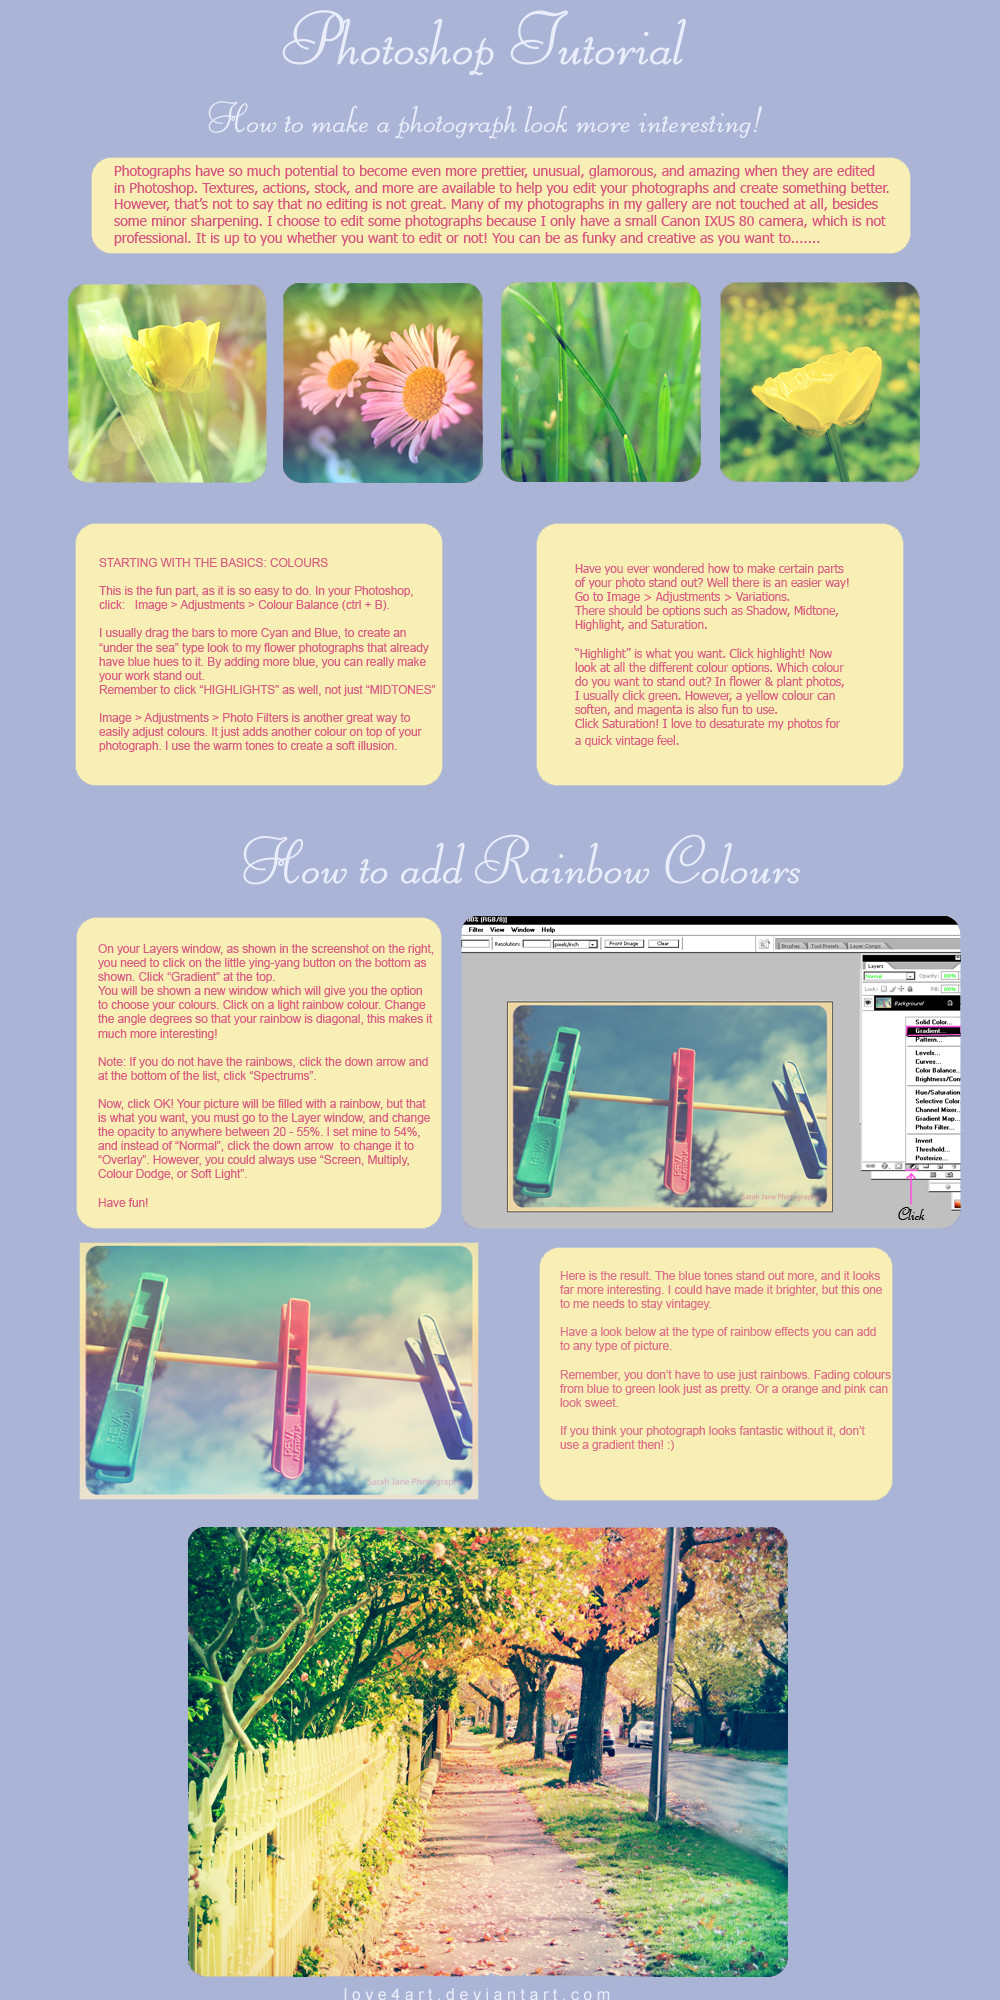
-For people who are beginners in Photoshop, or want to learn simple steps-
The original photograph is found here: [link] Now you've seen it, can you not see the overbearing pink and the purple path? That's why I clicked "Auto colours" in the beginning of my tutorial, to get it back to what it should look like.
This is merely ideas for people. The last step in particular is to show people HOW to use textures really easily. 95% of my gallery is without textures but that doesn't mean it's something useful to know.
I've gotten a couple of really crappy comments all because I am trying to help people with photoshop. I even typed the tutorial while I had a virus. So please, have some sensitivity :\
I have other tutorials:
+"Quick Tutorial; Vintage Style"
+Tutorial: Creative Editing 
The size of the tutorial is quite large, you can full view or download though!
A lot of people constantly ask me how to edit photographs and not go too overboard. I have created this tutorial for people who have Photoshop and want to learn how they can enhance, change or fix colours in photographs.
Please note that not ALL photographs need much editing, just the photographs you personally feel could be better. I find that if I'm too tired to go and re-take a photo, I will try and enhance the photo I already have!
Remember; if you have used one texture, you can still put your photograph in "Photography > Darkroom > Digital". It's still classified as photography.
Photograph in tutorial is a stock photo from sxc.hu 
Texture 07 by ~oleo-kun
Texture 04 by ~oleo-kun
10 old paper textures by `bleeding-dragon
Feel free to comment and tell me anyway I can improve!
(c) `love4art 2010
Related content


Comments: 103

Lovely, the lens correction bit is really interesting!
👍: 0 ⏩: 0


You are sharing good secrets that can make a photo get better...
Of course they are mad with you! x3
Thank you so much for the lovely resources and help <3
👍: 0 ⏩: 1

Thank you so much, I really hope they are helpful to you. Also remember I'm happy to help in anyway if you need it, just note me.
👍: 0 ⏩: 0


I understand colour and can post process well in that area, with both Lightroom and Photoshop. Textures though, that's a whole new thing for me, so thanks for the tips!
👍: 0 ⏩: 1
You're welcome. 
👍: 0 ⏩: 0

oh this is a wonderful tutorial! exactly what a beginner like me needs
thanks!
👍: 0 ⏩: 0


It looks so cool. I love you did that. Great picture by the way. The outcome is so cool.
👍: 0 ⏩: 0


Aw no worries, I'm thrilled you like it <3
👍: 0 ⏩: 1

I love your tutorials, they are always so useful  (Smile) - :)")
👍: 0 ⏩: 1
👍: 0 ⏩: 0


I would say that this should be a very helpful tutorial for many people!


👍: 0 ⏩: 0

This beautiful piece is featured in my journal. 
👍: 0 ⏩: 0


thank you so much ... i saved it into my tutos directory
👍: 0 ⏩: 0


Hey these steps are easier than what I do! Thansk Sarah! This one is definitely a keeper.
👍: 0 ⏩: 0

Sure is helpful, now I've learned things I didn't knew before ")
👍: 0 ⏩: 0

you're a sweetie, Jurgen 
👍: 0 ⏩: 1
")


but but you don't eat or drink me ... don't you
👍: 0 ⏩: 1
You'll only bite very carefully will you

👍: 0 ⏩: 0

One major thing I'd suggest, is to use adjustment layers, rather simply applying adjustments. This is done through the layers palette.
The advantage to using this is that any adjustment you make will always be editable later, and you can turn adjustments on and off. They're saved with the file as well.
I'd recommend always doing this instead of applying adjustments through the menu system. You can also group adjustment layers to specific layers, so they only affect what you want them to affect, and not the entire image. This means you have absolute control over colour at all times, and can work in a faster and more efficient way.
Also, although it's not really noticeable here, I wouldn't recommend using the lasso tool for colour corrections, unless you feather the selection. For really accurate selections it's best to use a combination of tools. One that I would definitely recommend however, is quick mask. With a selection active, just hit 'q' and you'll see your selection as a mask, which you can then manually blur and smudge in parts as you need it. You'll get much more accurate masking then, as you can blur as you need it (depending on DOF for example) AND have a preview of exactly how much is blurred.
I've got a ton of tips like this, as I learned a lot of photoshop at uni and tafe over the years.
👍: 0 ⏩: 1
If you've got so many tips, feel free to make up your own tutorial
I've had notes from people who wanted some simple steps, I can't get much simpler than my tutorial, and I'd rather not have advice given to me on my tutorial when I've learnt from age 14 
I hope you understand what I'm saying
👍: 0 ⏩: 1
I understand what you mean. I didn't mean to have a go at your methods, so I apologise if it came across that way. I should have taken the time to elaborate a little further. The tips I was giving were tips I thought you might be interested in trying out yourself.
Learning adjustment layers changed my way of thinking about photoshop, and it can save a lot of headaches. I just thought it would be something worth sharing.
Again, I'm sorry if you took offense at my comments. They certainly weren't intended that way.
👍: 0 ⏩: 1
Oh, no no I wasn't offended!
I've had a few... well, offensive comments on my tutorial because I haven't done things 'their way', so I do tend to get defensive sometimes 
I understand what you were aiming at, it is fantastic tips to know, I hope I didn't come across as rude. :S If you scroll to some other comments, you might understand my frustration

👍: 0 ⏩: 1
Thanks for your understanding. You didn't come across rude at all - to tell the truth, I was actually very impressed by your response then
I should have been a bit more careful in the way I commented though. Just really stressed out at work right now, so I'm not always thinking so clearly first thing in the morning
No hard feelings I hope.
")
👍: 0 ⏩: 1
Haha, well I'm glad we're both on the same page here, cos I'm rather tired and stressed too 

👍: 0 ⏩: 1
Yeah, last journal you were mentioning more work, so I guess you've been running around a lot. Seems it's what you're passionate about though, so I hope you're enjoying it and learning a lot. Best of luck with it all!
👍: 0 ⏩: 0


I'm not sure you are aware, but there are no 'steps'. It's just ideas. The last thing is something that would look interesting to do, i'm not endorsing people to just outright texture their photographs. 95% of my gallery is without textures.
I'm giving people the creative ideas they may NOT know of. Not everyone knows how to use textures, etc. I don't think I should be blasted for trying to help people with photoshop.
If you personally don't like me helping people, then you probably shouldn't comment at all, this is no "helpful" comment.
👍: 0 ⏩: 1
| Next =>