HOME | DD
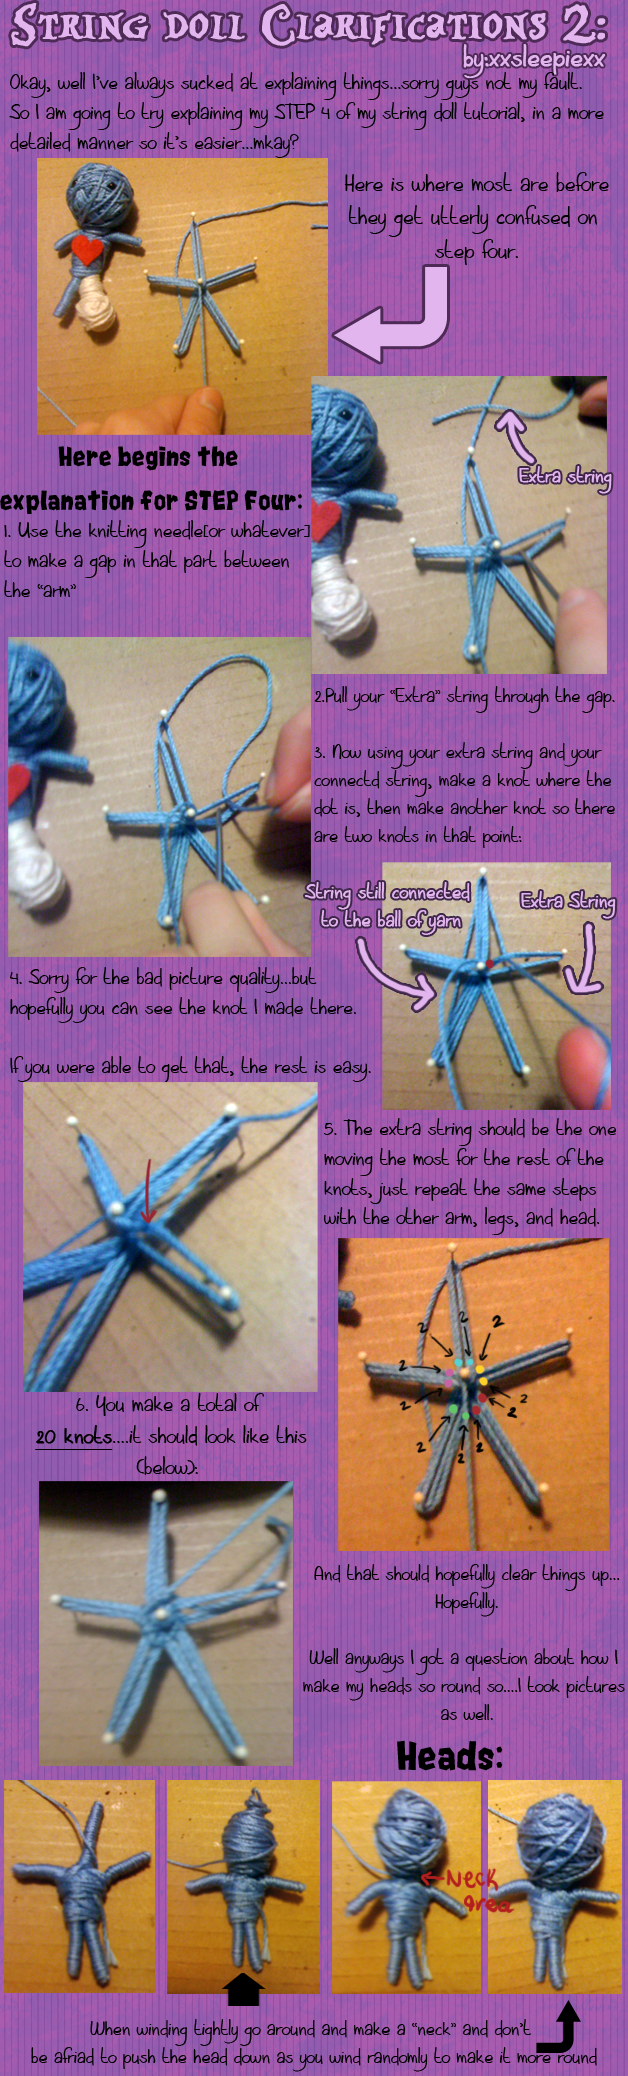
 xXSleepieXx — String Doll Clarifications 2.0
Published: 2011-02-19 00:20:43 +0000 UTC; Views: 17495; Favourites: 147; Downloads: 792
Redirect to original
Description
ORIGINAL TUTORIAL:[link][link] <-----LINK TO VIDEO IF IT STILL MAKES NO SENSE

Because alot of people didn't get it......I suck at explaining sorry....

Well that strikes "teacher" off of my future career paths

If you STILL don't get it please tell me, ask questions, or tell if it was alot more helpful that my old clarification.....

Related content


Comments: 29


crochet yarn, any kind that isn't very "fuzzy" kind of rope-ish.
The authentic ones use cotton hemp string but I haven't found that in the store as of yet...
👍: 0 ⏩: 0

Do you know when you are going to be able to make the video?[link]
👍: 0 ⏩: 2
perhaps when I get a camera, right now with Advanced Placement US History and SAT test prep...I'm not really open.
Perhaps summer most likely, if you would like a less tradditional tutorial but have similiar results try this one:[link]
She's a fellow member in the group, and her dolls are really pretty.
👍: 0 ⏩: 0
The fact that I cannot see the knot(cause its so blurry) is whats messing me up. I don't understand how to tie the first knot. Am I just trying to attach the attached string to the body or is it actually used to tie the knot(s)?
👍: 0 ⏩: 1
Whoops, I thought you replied at the actual tutorial.
AGH...I'm sorry 
It's just used to tie the knots. The goal here is just to secure the whole body so that the arms and everything don't fall apart.
Please let me know if I can help you in any other way, until then I'll be happy to note you when I make a video.
I'm planning to make a video on youtube once I get a new camera, since my Flip Camera broke.
I'm kind of poor, my camera right now is my phone.
👍: 0 ⏩: 1
ok so can you try to explain how to tie the knot with just words?
👍: 0 ⏩: 0

Hey! This tutorial is aweeeesomeeee! I was wondering if you knew how to add hair? Do you just glue it on ooooorrrrrr......?
👍: 0 ⏩: 1
You can glue it on....or you can do it this way
[link] <--this tutorial explains some stuff, it's not mine, but I find it very helpful
👍: 0 ⏩: 1
thanks 
👍: 0 ⏩: 1


I still don't get it.
How am I supposed to make a knot with a string that is still attached to my ball of yarn?! Am I supposed to pull the yarn through the knot or what? Or just cut a really long piece from what's on the knot? (sorry if that sounds dumb, but I really don't get it)

👍: 0 ⏩: 1
Okay firstly you may want to go back and check the clarifications.
There are 2 strings. One that is attached to the ball of yarn, and one that you were supposed to leave out in the beginning of the tutorial (the extra 8in. of string) [link] <----should be the 2ND STEP picture.
None of them are cut off...none. 
If you go back and re-read everything it should make sense.

👍: 0 ⏩: 1
I know it doesn't say cut this off, I just didn't know if you were supposed to and it was implied.
But my question is, I tried to tie the knot, but the one string is connected to the ball of yarn-how am I supposed to tie a knot like that?
Again, sorry if I sound like a complete idiot ( .///. ) I'm not too good at understanding tutorials. @_@
👍: 0 ⏩: 1
You use the free string to tie the knot.
That's why it says "the free string should be the one moving the most"
Loop the free string around the connected string....knot it. There's your knot.
👍: 0 ⏩: 1
Oh, alright! It took me awhile, but I got it.  (Wink)")
👍: 0 ⏩: 0

m having trouble wid d head thing it seems loose and ovaly shape i dont know wat m doing wrong can u tell me?
👍: 0 ⏩: 2
thx one more thing how can i make it into a charm?wat do u use?
👍: 0 ⏩: 1
sorry for the late reply aaaahhh
Anyways to make it into a keychain or cell phone charm you can buy the chain and stuff along in the craft store if you hunt around.
You can also attach a mini bell to make it more like the charms they sell.
Just attach it to the "head" part before you start winding around the legs/arms, or you can do it after you're done with everything.


👍: 0 ⏩: 0
When you wind, your suppose to "push" the head down so it doesn't look so oval-ish. Anyways when you wind, wind tightly, some strings might unwravel, and you might have to go back to wind them again.
When you are happy with your head, put dab of glue around the head strings so it doesn't unwind.
Remember to wind all over, not in one direction....hopefully that helps with the shape

")
👍: 0 ⏩: 0

Thanks for putting a tutorial for step 4! I didn't really get it,but now I do! I was trying to learn how to make them so I can sell them at a school fair on June 18th,Thanks!
👍: 0 ⏩: 1
A school fair?
Tell me how it turns out
You are very welcome and good luck.
👍: 0 ⏩: 0

i have one more question. where do you get the beads? the only one i can find that are the right size are the black pins, but its too much to cut them shorter, so i just stick them in to see how it looks and take it out
")
👍: 0 ⏩: 1
The beads don't have to be completely round like a sphere. Mine are "O" shaped and I just turn them sideways so they don't show the hole.
Try looking where the smaller beads are in the craft store.
Pins are kinda dangerous. 0.o
👍: 0 ⏩: 0
thanks  (Smile)")
👍: 0 ⏩: 0

Great that you shared this with us in the Popkes group! I make my Popkes in a different way but I know now how you made yours and its inspiring to see a different technieques. I don't have any further questions but then again I'm used to making these dolls
👍: 0 ⏩: 0