HOME | DD
 Zedrin — Tutorial - How to separate lineart
Published: 2013-07-14 23:18:24 +0000 UTC; Views: 7970; Favourites: 153; Downloads: 95
Redirect to original
Description
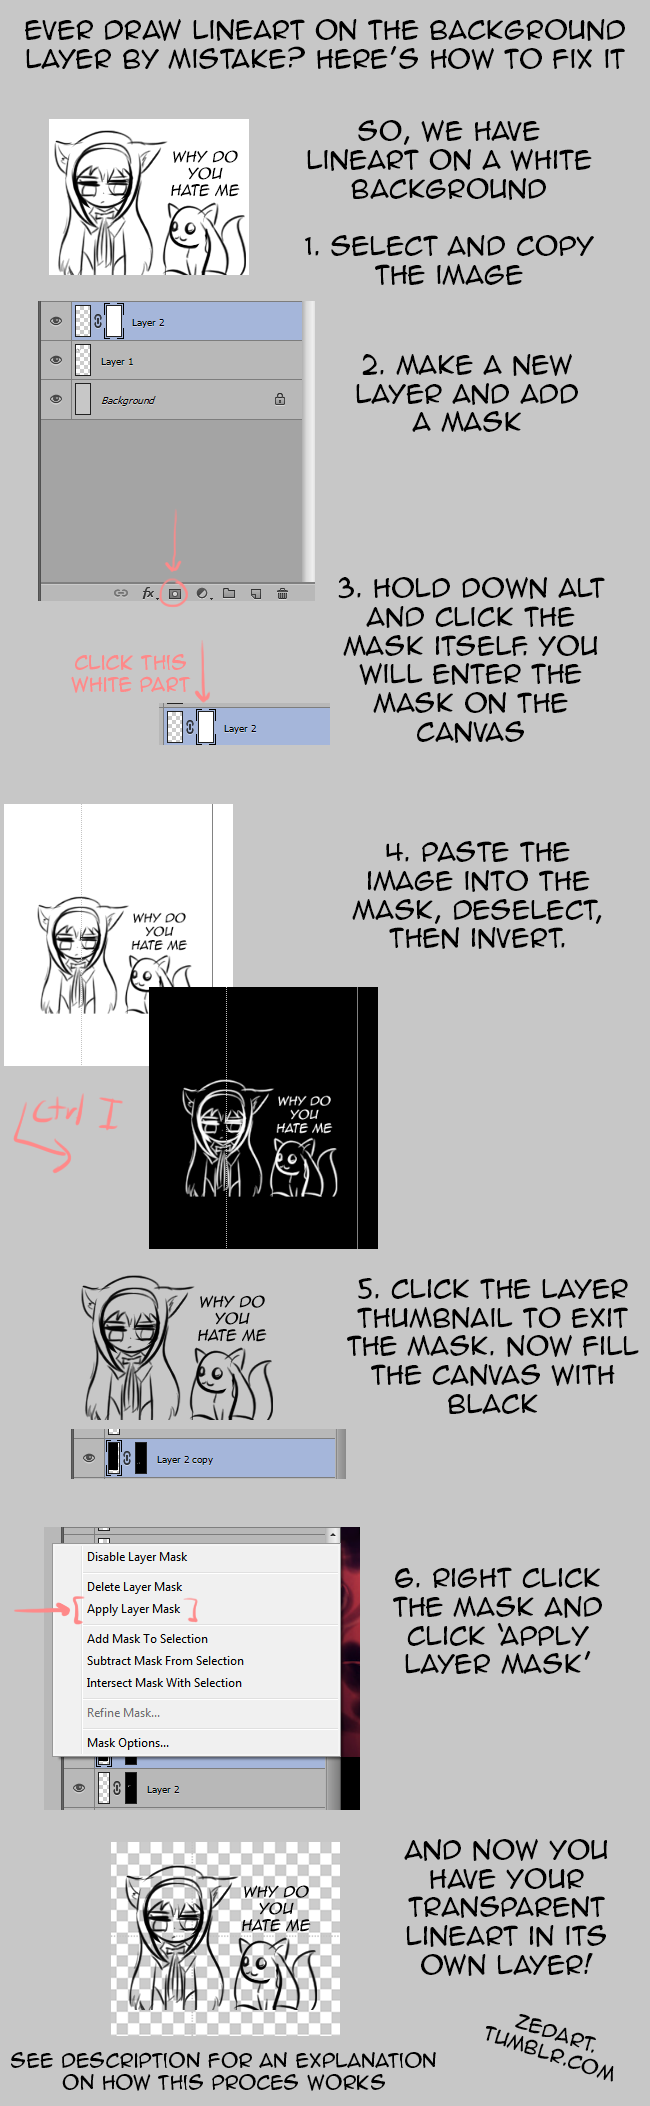
Say you draw your lineart and save it as a B+W image, or you draw your lineart on a white background layer. Either way, at one time it was just a sketch, but now you want to go back and color it, and do some stuff with tinting, etc--so you want it on a transparent layer again.This is how you do.
This is a relatively straightforward process once you understand how masks work. Though I wrote this for Photoshop, you can do the same thing in Sai (if hotkeys are different, understanding the process will allow you to figure it out for yourself).
A mask converts the VALUE of a pixel into an amount of opacity (with 0 0 0 black = 0% opacity and 255 255 255 white = 100% opacity). As a result, they’re always grayscaled.
Essentially, the layer is totally filled with black. The mask makes it so anything that contains white (which, once inverted, is your lineart) will be the only thing that actually shows up on the canvas. Applying the mask simply erases anything that doesn’t show up, giving you the original lineart.
Naturally another option is to set your lineart layer to ‘multiply’, but alpha lineart is still pretty important for other applications.
Related content


Comments: 27

Tbf this look helpful but i have some questions about it
(Gonna clarify want to be a manga artist in the future)
👍: 0 ⏩: 0


Are you on Photoshop?
What you can do is once you have the image copied, you can hold ALT and click the mask's image in the thumbnail in the layers panel. It should bring you inside the mask.
Another option is to do it through the channels after creating a mask, and view just the 'Alpha' channel. From there you can just ctrl V.
👍: 0 ⏩: 0

or you can simply click the layer tab, then go to 'luminance to transparency' and WOP done.
👍: 0 ⏩: 1
Don't see any option for that. You talking about Sai or Photoshop? (Essentially that's the exact process going on here, just automated if such an option exists)
👍: 0 ⏩: 1
i'm talking about sai.....
are you sure? there should be an option for that. You're looking at the layer tab right? up top? but my sai has it, i dunno. I haven't added any add ons to it so i was pretty sure it came with it.
👍: 0 ⏩: 1
This is a tutorial for Photoshop, not Sai. That function isn't built in. Specifically this tutorial is just how to turn a raster layer into a mask itself.
👍: 0 ⏩: 1
oh oAo well i was looking for how to use masking i guess this helps for sai too welp! -shot- haha gomen.
👍: 0 ⏩: 1

This will be very useful. What drawing techniques can this be applied to?
👍: 0 ⏩: 1
It's meant for two things:
1. you accidentally draw on the background layer instead of a new one
2. You are given a black and white sketch and you want to turn it back into original lineart, for purposes of layer control (e.g., tinting, filters, etc.)
👍: 0 ⏩: 0

I hope it does. I've encountered this problem before.
But, it was with colors.
Would this work with colors too?
Or just black and white?
👍: 0 ⏩: 1
predominately just black and white. You can use a similar process but with channels instead to get the same effect, but that's more complicated.
👍: 0 ⏩: 1
 (Smile)")


white is 255 255 255 (0-255 are 256 numbers which is the amount of numbers 8bits can hold 255 is the highest just sayin ;3) thanks for the tip btw :3
👍: 0 ⏩: 1

Oh, cool, I didn't know that alt+click allows you to copy pictures into masks like that o.o That's pretty helpful to know
👍: 0 ⏩: 0


I was curious if this other method is more effective than what I usually do. This way will give you slightly thinner lines. The way I do it will make them a little thicker. Neither is a perfect copy of the original.
My normal route is switch to the channels tab, hit the dotted circle (load selection), invert the selection, new layer, fill with black, done.
Anyway, the tutorial is especially useful if you want to draw your lineart, scan it, and turn that into digital lines on a transparent layer. Thumbs up.
👍: 0 ⏩: 1
The thickness here just depends on how you draw them. This restores the lineart to the exact state it was before you flattened it to the background. If your method comes out different, it's not a 1:1 restoration.
👍: 0 ⏩: 0

Wow, thats useful!! I never understood what masks where for but this is good. Thank you.
👍: 0 ⏩: 1
Hopefully the description describes them enough for further applications as well.
👍: 0 ⏩: 0
