HOME | DD
 Zubby — Line Art Prep Tutorial
Published: 2009-04-12 16:00:45 +0000 UTC; Views: 68847; Favourites: 1330; Downloads: 1325
Redirect to original
Description
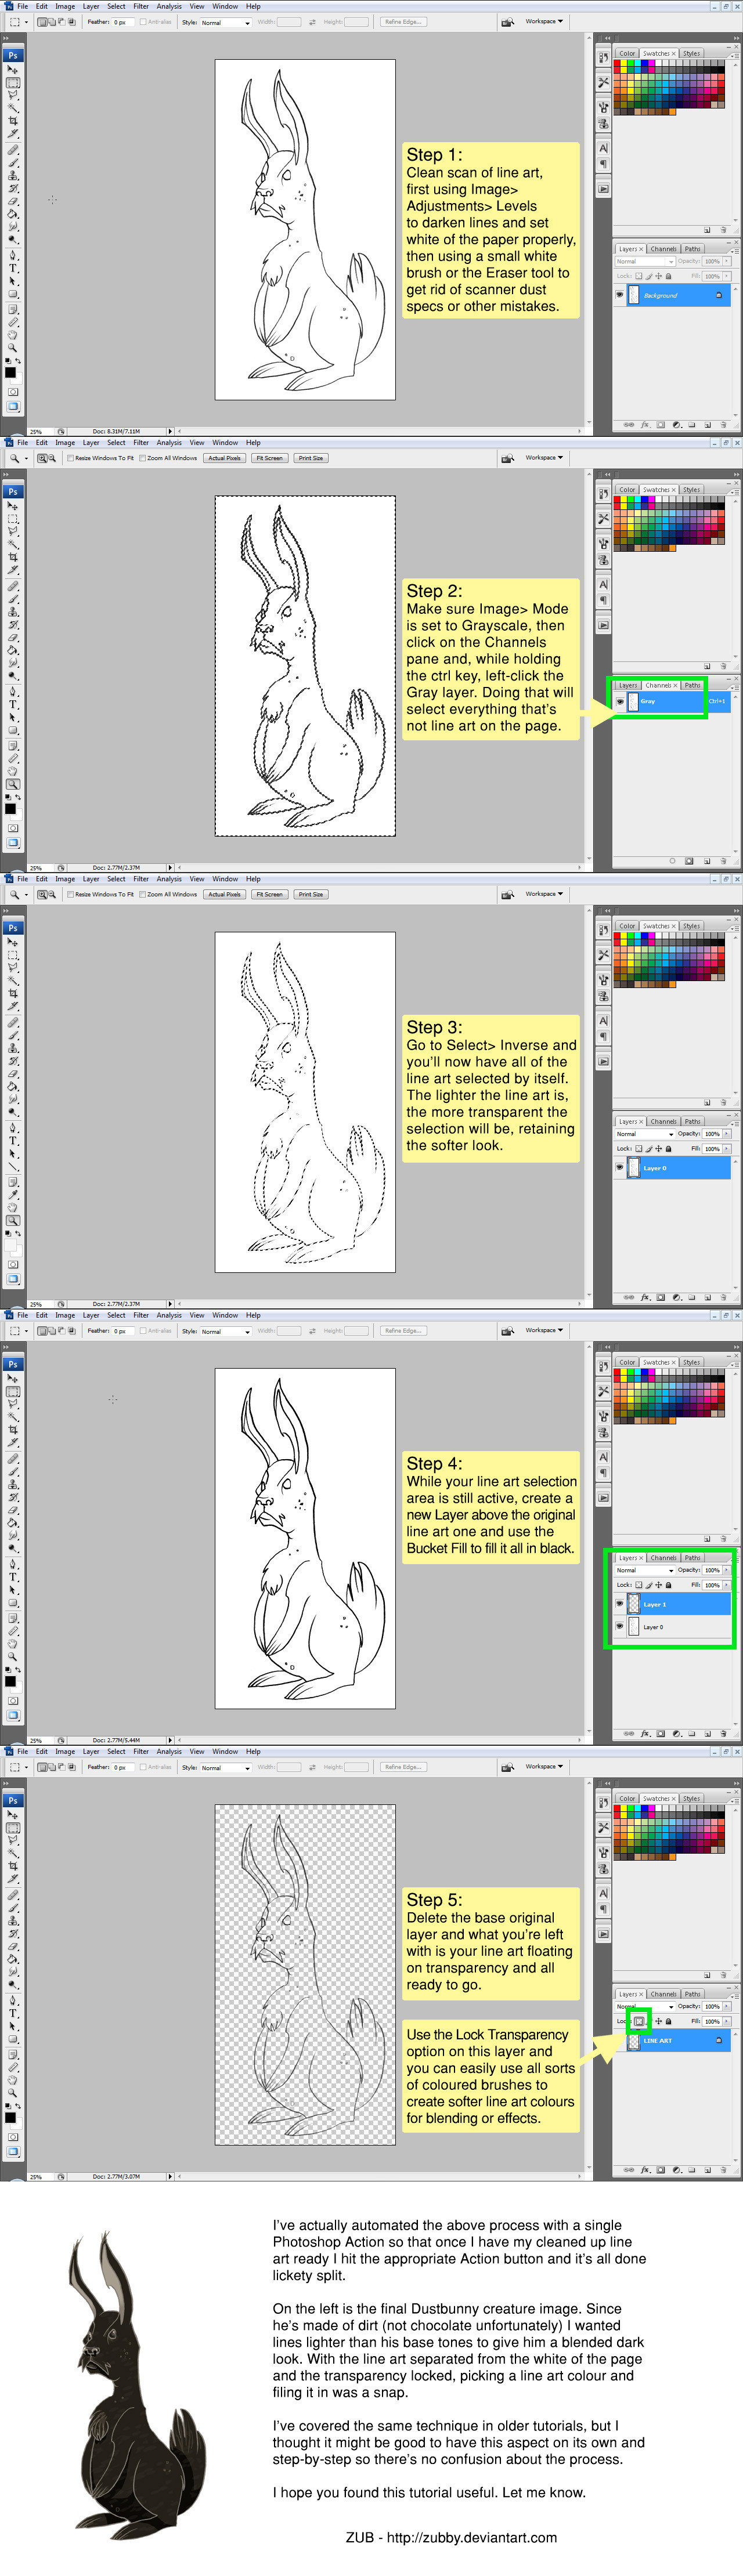
Happy Easter. As a special Easter treat I thought I'd put up a quick little tutorial to explain how I prep my line art for the animation look with softly coloured lines.Step 1: Here's the Dustbunny creature line art from Zork. I take that scan of the line art and use Image> Adjustments> Levels to set the white and black levels of the piece. Then I'll use a small white brush or the Eraser tool to remove any extraneous specs from the scan or touch up any line art mistakes.
Step 2: If you haven't already, use Image> Mode> Grayscale to set the image to varying tones of greys. From there, click on the Channels pane and, while holding the Ctrl key, click on the Gray layer. Doing that will select everything that's not line art on the page.
Step 3: Go to Select> Inverse and you'll now have all of the line art selected by itself. The lighter your line art is, the more transparent the selection will be, retaining that softer look. Since I usually do my line art in pencil, this jives really well with how I work.
Step 4: While your line art selection area is still active, create a new Layer above the original line art one and use the Bucket Fill to fill it all in solid black.
If this is for print, you can switch your file mode to CMYK and make this a 100% K black layer so the printer heads will only hit it once - making it nice and sharp.
Step 5: Delete the original base layer and what you're left with is your line art floating on transparency and all ready to go.
Use the Lock Transparency option on this layer and you can now easily use all sorts of coloured brushes for softer line art colours that blend it all together or help create cool effects like smoke or fire.
I've actually automated the above process with a single Photoshop Action so that once I have my cleaned up line art ready I hit the appropriate Action button and it's all done lickety split.
At the bottom is the final Dustbunny creature image. Since he's made of dirt (not chocolate unfortunately) I wanted lines lighter than his base tones to give him a blended dark look. With the line art separated from the white of the page and the transparency locked, picking a line art colour and filling it in was a snap.
I've covered the same technique in older tutorials, but I thought it might be good to have this aspect on its own and step-by-step so there's no confusion about the process.
I hope you found this tutorial useful. Let me know.
Related content


Comments: 100

Great! Simple clear instructions. I am a beginner and this is exactly what I was searching for. I hope u have more for beginners .I 'm looking for gradients within the line art. Any advise?
Thanks !
👍: 0 ⏩: 1

Once you have the line art on its own floating transparency all you have to do for a gradient is just 'lock transparency' on that layer and then use the gradient fill or a soft brush to create a gradient on that layer.
👍: 0 ⏩: 1

Very effective, especially for conventional scanned linearts
U're a real life saver dude
👍: 0 ⏩: 0

*really
👍: 0 ⏩: 0

YEAH i've been trying to learn how to do this proply for so long i gave up. Then i found this and i can't stop cleaning and colouring Thank you Thank you
👍: 0 ⏩: 1

I was having a lot of trouble with line art until I saw this. Thanks.
👍: 0 ⏩: 0


lol, that's funny, I do the same exact thing when prepping my line art
Though a bit mixed around. I'll select the line art, (make sure all the black pixels I want are selected with it) then invert the selection to delete all the 'particles' around the line art. Then I invert it back to the line art, delete that, then fill it in again to have it all uniform while the ant lines are still on.
After that I make a new background (usually white, and if I want to change it I'll just make another layer while coloring). And then I'll use the color select tool to select the line art and color it different colors and such.
It turns out alright, but it's just exactly how the line art is that you've scanned unless you've cleaned it up more. The one thing I've yet to figure out is how people get their line art so smooth! You know, without all that work - which for me, it would take a while :/ I just kinda wonder if there's an easier way to do it than I do, like I might be doing it in a way that's harder than it needs to be XD
👍: 0 ⏩: 0

Great tutorial! I'd completely forgotten the Adjustments > Levels part =/
👍: 0 ⏩: 1

Wish I had my scanner working... this looks great.
👍: 0 ⏩: 0

 (Smile) - :-)")


Man, thanks a lot for sharing this, you just saved me lots of time!!
👍: 0 ⏩: 1


really nice!!!
instead of bucket, try: Alt+Backspace (fill with foreground)
👍: 0 ⏩: 0

Definately helpful. I'm always looking for better and more efficient ways to do my work.  - :D")
👍: 0 ⏩: 1

oh... DUH!! hahaha...
i do this, but i've never SAVED an ACTION for it. super smart.
thanks, bro!
👍: 0 ⏩: 1

Very helpful and clearly written and illustrated. I think your name should be honored in the script title.
👍: 0 ⏩: 1

IT'S FANTASTIC!
it works not only for linearts but also for gray stains of all kind too!
I've used a similar action previously, but it made my pictures about 20% darker than oryginal...but knowing how it can be done is really helpfull....hm. wait. when I changed pic from Grayscale to RGB it became darker by itself...oh my. XD nwm. Anywayz it's really great to know
👍: 0 ⏩: 1

Dude, you are my hero. I have been looking EVERYWHERE for a tutorial that would tell me how to color the lines and get them by themselves. Really appreciate this.
-RenDragonClaw
👍: 0 ⏩: 1


Great simple tutorial - very helpful. thank you for taking the time to make this
👍: 0 ⏩: 1


I really should start using Actions more. I'm kicking myself for not having done that before.
👍: 0 ⏩: 0

Of all the tutorials I've read, yours have always been the most helpful. Thank you for sharing.
👍: 0 ⏩: 1
I wouldn't be able to clean up my scanned line art without them. XD
👍: 0 ⏩: 0

hmm this is really cool...do yo prefer this over changing the layer to multiply?
Very helpful, thanks.
👍: 0 ⏩: 1
Yes, because with Multiply you're always making the line art darker, whereas with this I can have lighter line art for silk, metal, smoke... all kinds of effects.
👍: 0 ⏩: 1
woah...I know exactly what you mean...
alright I'm gonna have to try this out sometime. Thanks!
👍: 0 ⏩: 0

Whoo, thanks for the tutorial.
This was the step I often skip.
This should help quite a bit.
Thanks again.
👍: 0 ⏩: 0

Wow, that seems so much more simple than my "tablet over the line art" method! 
👍: 0 ⏩: 1

<= Prev |