HOME | DD
 Aevix — Brace the Storm [Process]
Published: 2014-12-21 20:32:48 +0000 UTC; Views: 2207; Favourites: 57; Downloads: 25
Redirect to original
Description
I'm missing a few in-betweens here and there, I just forgot to save more WIP sections as I worked uvu;But anyways! I think there's a lot to see in my process anyways, plus I've added in a sliced out layer mode whatever thing at the bottom c:
For 90% of this, I use Paint Tool SAI.
For the backgrounds and effects, I use Photoshop CS5
Process
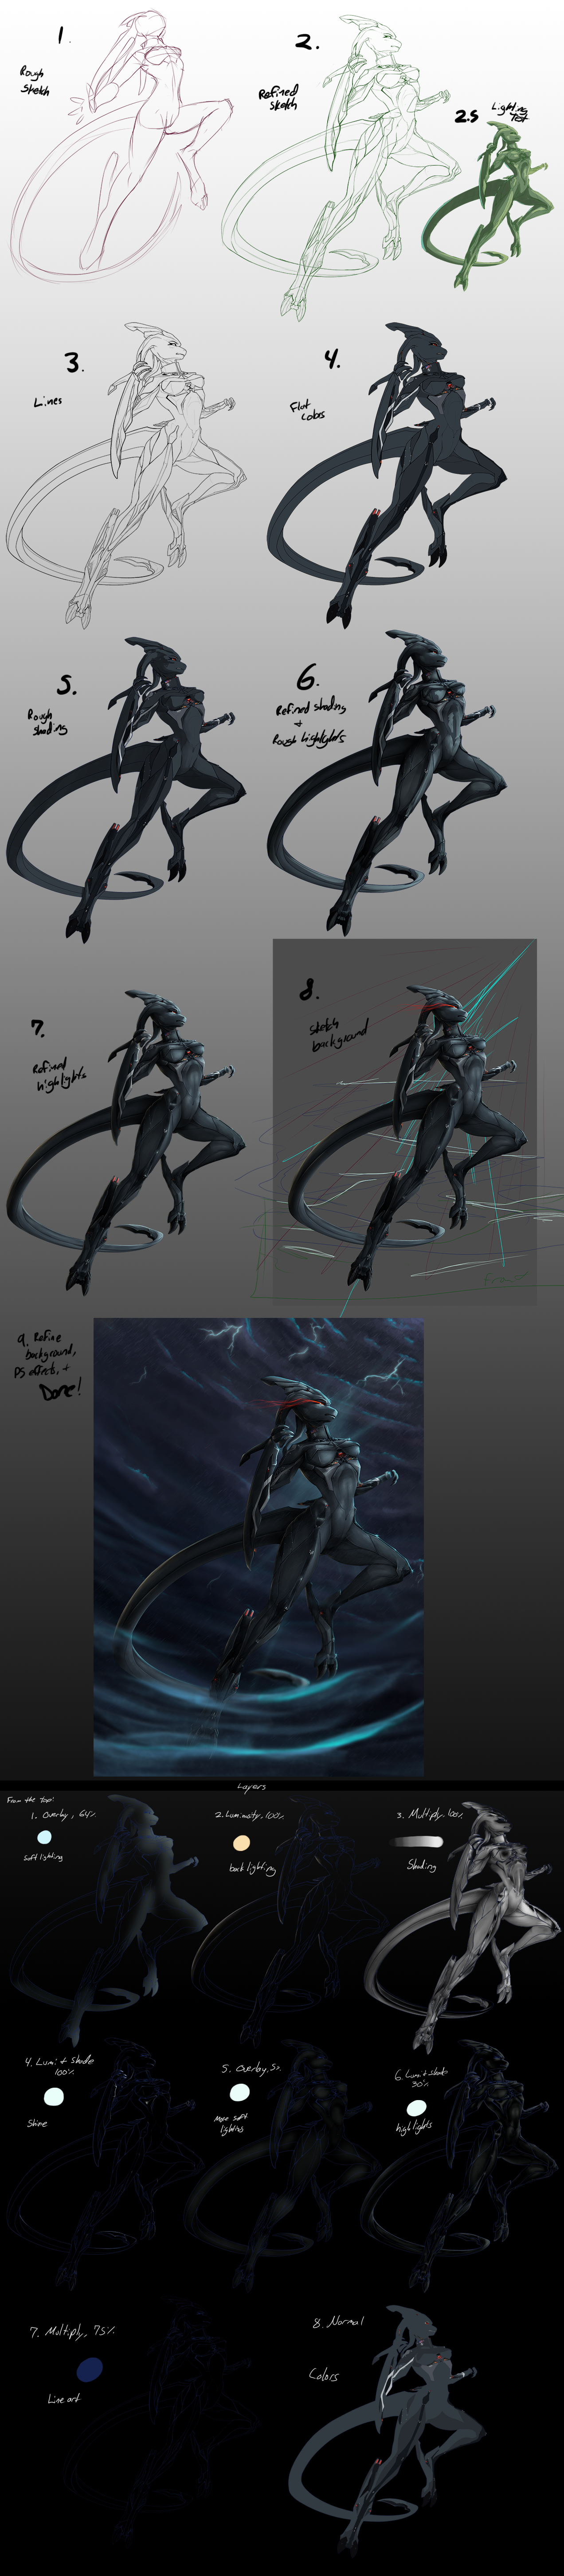
1- Rough Sketch
Just a super rough sketch to get the idea out of my mind and onto the canvas
2- Refined Sketch
Cleaned up, anatomy fixed, and detailed sketch. I had to tweak it quite a bit to get it the way I wanted it, as you can see there's a lot of repositioning!
You can also see the ways I've broken the body apart- Closest arm, main body, far arm, far leg, far tentacle, and tail are all separated into different parts so I can blur/sharpen them individually easily later
2.5- Lighting Test
Just a quick test to see how the lighting I had in mind would work
3- Lines
My line thickness varies from .5px to 3px. Generally, I use 1px or 1.5px lines. I also use a custom brush, for extra crispness.
Unseen is the additional lineart layer where all the body parts are separated onto their own layers. It comes into play later.
4- Flat Colors
All colors have their own layer. Pretty simple.
5- Rough Shading
Here I blocked out my shading. I always shade over a flat grey color then the true colors, I forgot to picture it here whoops
6- Refined Shading + Rough Highlights
I spent most of my time refining the shading. It can get pretty meticulous d: I usually begin refining at the face, then work my way down.
I also roughly patched in my highlights. I was pretty generous with it, considering the shininess I wanted to convey
7- Refined Highlights
Along with smoothing out the rough highlights, I've added a few layers of soft lighting, shine, and backlighting. It makes her stand out a bit better~
8- Sketch Background
Now I begin work on the background. I had something in mind, but as you can see it's a very rough idea. I honestly didn't think of my color scheme until I started painting the background. I'm a bad artist c:
8.5- Refining
(unpictured)
A lot of blocking out colors, trying to set a mood, all that fun stuff. Again, I had no idea what I really wanted to do, so it just came together as I worked haha.
9- Refine, add effects, done
Finished the background. Then the separation of body parts came into play- I was easily able to blur her far arm, far leg, far tentacle, and tail since they were separated out. Also made it easy to sharpen her body and close arm. My pre-planning worked out pretty well!
Layers
Notice, all blending modes are set to 'Normal' here so you can see what they look like!
Also! The layer mode "Lumi & Shade" is found only in Paint Tool SAI. In Photoshop, it's called "Linear Dodge (Add)" but it's not exactly the same- it gives a more dull tone than Lumi & Shade would
1- Overlay, 64%
Soft lighting, to help indicate light source
2- Luminosity, 100%
Backlighting. Just helps accent the side not in the light
3- Multiply, 100%
Shading! A looot of it. And notice, only one shading layer. Amy is dark, so it's really all I need. I would usually colorize my shading, but I felt black looked just fine on Amy's colors.
4- Lumi & Shade, 100%
Shiny! For some reason this is under my shading.. But it really doesn't matter; there's no shading under where I've added the super shine.
5- Overlay, 5%
Super gentle soft lighting, to help give Amy some pop
6- Lumi & Shade, 30%
Main highlights! Yeah I kinda just slap these on however I want d: But it works! Also, notice how my highlights are under my shading. It just doesn't work quite the same if they're above.
7- Multiply, 75%
My lineart! It's under everything, so it can get shaded and highlighted too. A little strange, but it works. It seems faint because it's also clipped to my base colors.
8- Normal, 100%
Base colors, on the very bottom of course. Because of my shading method I can easily edit and change my colors as I please
Aaaand that's it~
Full version here:
S'it.
Related content


Comments: 4


Incredibly interesting and useful ! Thank You for sharing this
")
👍: 0 ⏩: 1


This is so great. It's nice to see your steps.
I really love that pose - so dynamic. Very well done
👍: 0 ⏩: 0