HOME | DD
 Arehandora — MAGNOLIA step by step
Published: 2005-04-03 20:24:38 +0000 UTC; Views: 19802; Favourites: 303; Downloads: 2895
Redirect to original
Description
KONNICHI WA!!!! GOOD AFTERNOON!!!! BUENAS TARDES!!!!
[FORGIVE MY POOR ENGLISH PLEASE]
Well, to paint with the computer, I use the Corel Photopaint 11, though the nº 8, 9 and 10 have the same tools basically…. It is similar to the Adobe Photoshop…
And of course, I NEVER studied how to draw or to paint (neither anything like that), so, my way to CG is NOT THE ONLY ONE, you can find your own method....
")
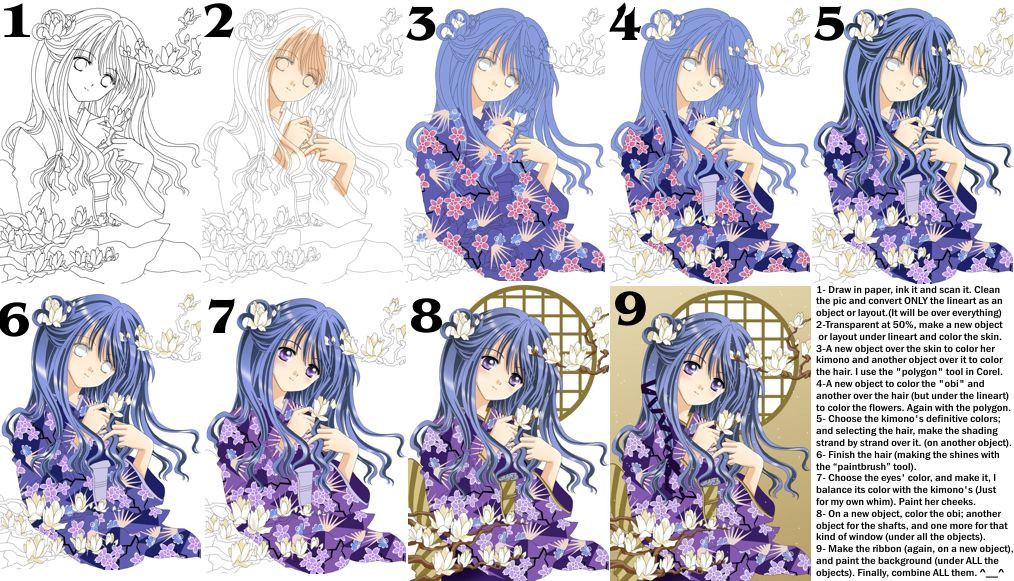
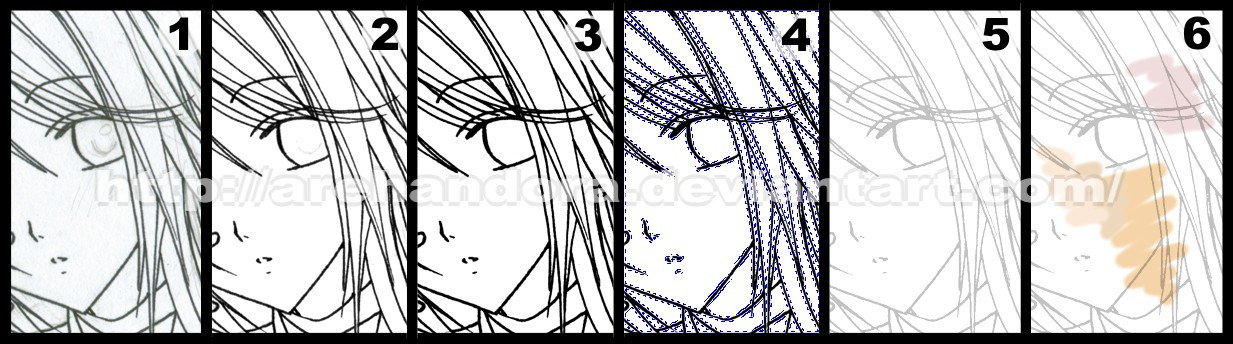
So, I draw the image that I want, ink it, and scan it with a resolution at least 300 dpi, at 100% and “black and white Photo” mode or something like that. Then, I open the image in the Corel Photopaint 11, turn it to “RGB color mode” …and with the contrast/saturation controls, I can stand out the art-line (clean it) to be able to select it with a "mask" (example: the “magic wand"), and this way I can transform it into a "object" (or "layout" if you are in the Photoshop) in the menu: OBJECT=> CREATE => CUT SELECTION. After this, everything is like a "cell" or an acetate, I mean, under this object (with your line-art), you can add all the objects that you need (menu: OBJECT=>CREATE=>NEW OBJECT) to go coloring it part by part of the picture, I do it with the tool: “Polygon” (example: in an object I do the skin of my character: face, hands, legs, …HOW? .. I choose the orange color -in the palette- so I continue -with the polygon and patience - the line-art of my pic for create my object, then I add another object above, and there I make the clothes... and this way with everything….). But why to color on objects????… Well, if you color a flower on an object, and then you add another above it to paint the leafs, is as if you added a tracing paper, so everything that you “paint//erase” there don’t affect your previous object … for this reason I think it is better for the shading (with the “paintbrush” tool), you can select the object with a mask, so, the color doesn't disperse to everywhere... ….., after you finished everything, you can put a background (if you want) and Zashhhhh!!!! You combine all the objects with the background (menu: OBJECT => to COMBINE=> ALL THE OBJECTS WITH THE BACKGROUND)!! THE END.
OMG, English is sooooooo hard!!!!;___; …I hope you can understand it, because it is difficult to explain to me…

Anyway, thanks for reading it!

EN ESPAÑOL ES MAS FACIL!!!
(porque yo puedo hablar español!!!  Aha haha hah ha ha ha ha ha….
  )
)En primer lugar, para pintar, yo uso el Corel Photopaint 11, aunque el nº 8, 9 y 10 tienen básicamente las mismas herramientas…. Como así tambien el Adobe Photoshop, casi todos se parecen bastante…
Además está muy claro que yo JAMÁS estudié dibujo ni pintura (ni nada por el estilo) y por lo tanto la manera en que lo hago NO ES LA UNICA QUE EXISTE, NI LA UNICA VALIDA, tu puedes encontrar tu propio método…
Así que primero dibujo la imagen que quiero, la entinto y la “escaneo” con una resolución de por lo menos 300 dpi, al 100% y en modo “foto blanco y negro” o algo por el estilo. Después, abro la imagen en el Corel Photopaint 11, la paso a modo “color RGB” y con los controles de contraste/saturación/brillo, hago que resalten bien las líneas del contorno de mi dibujo para después poder seleccionarlas con una “máscara” (por ejemplo la “máscara varita mágica”), y así convertirlas en un “objeto” (o “capa” si están en el Photoshop) en el menú: OBJETO=> CREAR=>CORTAR SELECCION. Luego, todo se desarrolla como un “cell” o un acetato, es decir, DEBAJO de este objeto (con las lineas de contorno del dibujo), agrego todos los objetos que necesite (OBJETO=> CREAR=> NUEVO OBJETO) para ir pintando parte por parte del dibujo, que dicho sea de paso, lo hago con la herramienta “Polígono” (ej: en un objeto pinto todo lo que es piel: cara, manos, piernas, …CÓMO? ..Elijo de la paleta de colores, el color anaranjado y después voy siguiendo –con el polígono y con mucha paciencia - las líneas de contorno del dibujo hasta armar mi objeto, luego agrego otro objeto encima, y ahí pinto todo lo que es ropa….. y así con todo….), Pero, ¿por qué pintar todo en objetos???? ….bueno, si tu pintas una flor en un objeto, y luego agregas otro encima para pintar las hojas, es como si agregaras un papel de calcar, y todo lo que pintes//borres ahí NO va a afectar lo que ya hayas hecho en otro objeto de más abajo……, …..por eso pienso que es práctico para sombrear (usando el la herramienta “pincel”) sin estropear lo que ya estaba pintado, además puedes poner una máscara en el objeto para que el color no se escape a los costados. Después que terminaste todo, le puedes poner un fondo (si tu quieres) y Zashhhhh!!!! Combinas todos los objetos con el fondo (OBJETO=>COMBINAR=>TODOS LOS OBJETOS CON EL FONDO) y LISTO!!
Bueno, espero haberme explicado más o menos, es difícil de contar lo que uno hace para pintar por escrito… T__T
Pero en fin, espero que al menos les sirva de algo…

Nos vemos, See you, Mata ne!!!!!!!!!!


Related content


Comments: 63

OMG!!!! OTRO USUARIO DEL COREL PHOTOPAINT!!! YAY!!!! ^-^ esto realmente me va a servir muchísimo, porque todos los tutoriales que conosco son para photoshop.... muchísimas gracias por hacer esto!!! ^-^
👍: 0 ⏩: 0

please se puede poner como lo haces paso a paso???????
👍: 0 ⏩: 0
gracias!!!!!!!!!!!!!!!!!!!!!!!!!!!!!!!!!!![link]
👍: 0 ⏩: 0

que buen tutorial me sirvio de mucho!! te lo agradesco!
👍: 0 ⏩: 0


Thank You For That
NiCe (:
صور الحلقه الاخيره من مسلسل نور
👍: 0 ⏩: 0
Thank You For That
NiCe (:
صور الحلقه الاخيره من مسلسل نور
👍: 0 ⏩: 0

thanks for the tips! i've tried it out eventhough i cant really cope up with your instructions. i'm bad with words, u see. i have some problem with the shadow but i force my way through! haha!! the result could be browse in my gallery. it would be great if you could give some comments on it. thanks again!!
👍: 0 ⏩: 0


i like ur step by steps they are verry helpfull
👍: 0 ⏩: 0

These steps are very helpful!! Your art is amazing. You should try to make a manga or an anime one day ^ _ ^
👍: 0 ⏩: 0

se ve tan facil de hacer que me dan ganas de intentarle XD aunque si se que requerire paciencia pero en fin vale la pena
👍: 0 ⏩: 0

O.O You never studied how to draw but you can make art like Magnolia? That's amazing!
👍: 0 ⏩: 0

Es precioso *-* ~ En verdad tienes paciencia >,
👍: 0 ⏩: 0

Ah, tienes un stilo tan fantastico... español no es mi lengua, ni el inglés, pero me gustaría que estuviera suficiente ^^
👍: 0 ⏩: 0

thank you for showing and teaching us how to color in such lovely way~ <3
👍: 0 ⏩: 0


muy weno ^^, aunke me tendré q bajar el corel para ponerlo en práctica
👍: 0 ⏩: 0

U use painter whan coloring her hair? Or U use mouse? It's awesome!!!
👍: 0 ⏩: 0


awesome..I might try that. I so wish I could be better at coloring pics XD
👍: 0 ⏩: 0

Pucha, a mi aún no me sale pintar la parte oscura del cabello ")
utilizo el mismo programa que vos(bueno, casi
Aunque mi problema con el pelo es terrible

👍: 0 ⏩: 0

WOW, these are so helpful!^^ Now I can actually understand how to work Photoshop now...XD Thanks so much!^^
👍: 0 ⏩: 0

gracias por este corto pero sustancial minitutorial, lo voy a tener muy en cuenta. Gracias.
👍: 0 ⏩: 0

Thank you so much! This makes things a lot easier
👍: 0 ⏩: 0

This is rather fun, and when you say object, do you mean layers? Most likely, I'll just do the math ^.^ Very kind of you to share your tips, and I'll be keeping track of this, just because I am a dork when it comes to layering/changing resolution!
👍: 0 ⏩: 0

pretty picture^^ and the tutorial was helpful. also...your english isnt bad at all! u speak it better than me XD and ive spoken it....well its like the only language i can speak o.O; some people on the internet type SO BAD! (and people in my class too) you cant read it at all >.<
👍: 0 ⏩: 0

wow I just love that artwork >o< Wow sound complex o.O
👍: 0 ⏩: 0

o.o woohhh!!! esa explicacion esta muy completa, me ha servido de ayuda muchisimas gracias n.n (aunque sigo siendo realmente mala al colorear XDU)
👍: 0 ⏩: 0
Yoshimi-Ayumata [2005-06-22 02:10:49 +0000 UTC]
This is a great tutorial! Btw, your english is VERY good! I applaude you! :applause:
Muy bien! Adios!
👍: 0 ⏩: 0

oh my god!! so awesome! i never thought of the 50% transparency thing.... awesome!!
👍: 0 ⏩: 0

ay, pero su inglés es bueno. gracias por hacer la clase particular. me ayuda mucha.
también, muchas gracias por el favorito.
lo siento que mi español es malo. xD
👍: 0 ⏩: 0

thank you so much!!! XD Hopefully I can learn more!
👍: 0 ⏩: 0


Hope I'll understand this....... I'm not too understand Eng
BUT!! ThANkS Soo MuCH ... hyaaaa.... I always wanna learn about CG, especially like your arts

👍: 0 ⏩: 0


ehhhhhhhh oh man i wish i could understand i've been trying to learn how to color so nice like you, but it never works this is the first explanation i've seen ....but i still cant understand.....i guess i just dont have the programs...the knowlege of how to use these programs..or the program for that matter
👍: 0 ⏩: 0

Sounds like it takes a lot more patience than I have, oh by the way you're English is better than my Spanish teacher's so don't worry
👍: 0 ⏩: 0

great tutorial. but i just installed photoshop 7 and i dont know how to turn my lineart from a background to an object/layout =// help?
👍: 0 ⏩: 0

i love the picture gr8t and thanks for putting it in spanish
👍: 0 ⏩: 0

Omg 0__o I was looking everywhere for tips like that 0__o and I finally found it !  (Smile)")

👍: 0 ⏩: 0


wah! me encantó!
Yo tengo mil programas de dibujo.. @_@ Corel Draw, Photoshop, Paint shop pro, OpenCanvas (con el que ahora hago las lineas), pero me bajaré el trial del Corel Photopaint a ver que tal es =3
Mi problema con el pelo es que lo intento hacer a pulso las sombras.. y siempre salen horribles.. no sabía como la gente como hacías tú en tu dibujo le salian perfectas @__@ (y sigo sin entenderlo XD) x eso acabo tan cansada haciendo dibujos.. xq me agobio con las lineas >_<. Eso de poner transparente el "sketch" no se me habia ocurrido.. Siempre se aprende algo nuevo ^__^
Arigato!!~
👍: 0 ⏩: 0

btw... with what do you ink your drawing? with a fineliner?
👍: 0 ⏩: 0
aww..thank you so much for the tutorial!! ^__^ *glomps you a hundred times* *bows for you*
👍: 0 ⏩: 0

Wow - I already loved the picture, now I know how you achieved such good results I feel inspired to see what my creativity can produce! Thank you for this very clear well written tutorial

👍: 0 ⏩: 0

Miles de gracias, Arehandora! 

👍: 0 ⏩: 0

| Next =>