HOME | DD
 asilaydyingdl — Tutorial: Custom 7 Authui.dll
Published: 2010-07-05 21:01:29 +0000 UTC; Views: 57613; Favourites: 58; Downloads: 2217
Redirect to original
Description
THIS PROJECT IS NO LONGER SUPPORTED.Tutorial: Custom 7 Authui.dll
The download contains a full .doc version of the directions.
Many of you may have desired to create a custom Logon screen free of Windows elements, or with a reduced amount of Windows elements. In XP, the process was simple. Just install a premade custom logon which replaced those elements for you. However, this ability was lost with the advent of the authui.dll in Vista. Yet in Vista, there was still much you could do with the authui. However, that is not so in Windows 7.
So, in this tutorial, I will tell you exactly what you need to know in order to create your own custom authui.dll file. First, let’s review the two major limitations of the Windows 7 authui.dll.
Limitation 1: Inability to erase data from bitmaps.
You cannot erase anything from the original bitmaps in the authui. Doing so will disturb the transparency and render the bitmap malicious to the authui. Therefore, whenever you edit a bitmap you must either copy/paste your work directly over the existing image, or draw in solid colors overtop of the existing work. This means that when you change the user picture frame, the edges must blend into the logon screen’s background image.
Limitation 2: Inability to change placement of the User Picture frame and Password box.
This limitation is something that may eventually be overcome with more time and effort, however, we will avoid any attempt at adjusting the placement for the sake of this tutorial. When considering the logon background image, consider that you will not be able to relocate those, and make sure that any images embedded into the background image will not be covered up by the user picture frame and password box.
Limitation 3: I AM NOT RESPONSIBLE FOR DAMAGE DONE TO YOUR COMPUTER. As always, edit and use edited dll files at your own risk.
Now, let’s create! First, you will need two tools; Resource Hacker and GIMP (or equivalent programs that you are familiar with). If you do not have them, here are links to download them.
Resource Hacker: [link]
GIMP: [link]
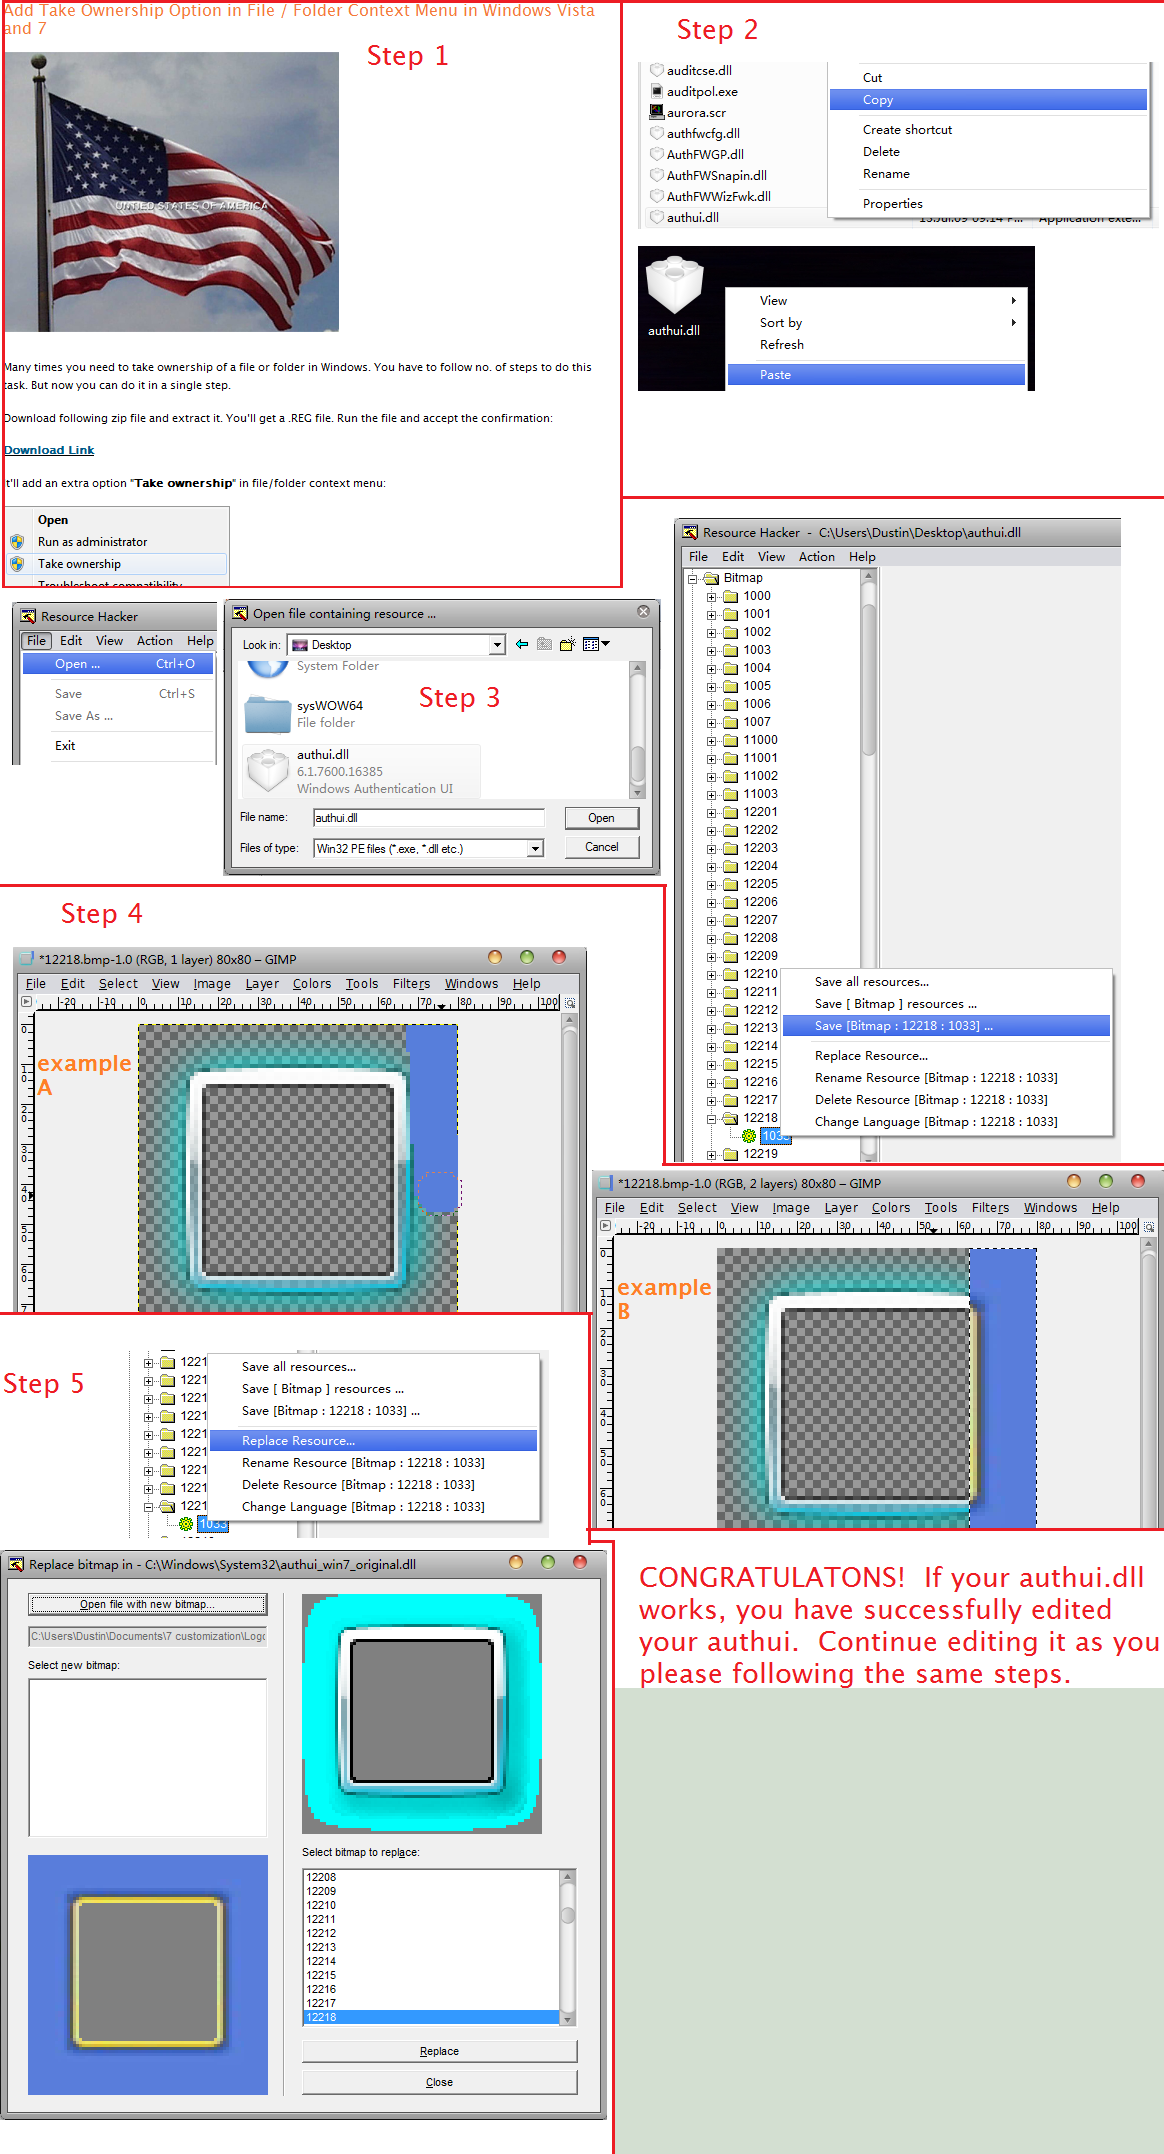
Step 1: Disabling UAC and installing Take Ownership.
First, visit this link [link] and install the Take Ownership.reg. After that, go to your User Accounts in the Control Panel. Click on the “Change User Account Control Settings” or equivalent link and disable your User Account Control. Restart your computer.
Step 2: Create a modifiable authui.dll.
Navigate to your WindowsSystem32 folder and locate the authui.dll. Copy and and paste it someplace else, like your desktop. DO NOT REMOVE IT FROM YOUR SYSTEM32 FOLDER!!!! You will not be able to login or access your Ctrl+Alt+Del screen if you do. Navigate to your desktop and right click on the copy you made and take ownership of it. Then, open it using Resource Hacker.
Step 3: Extract the bitmaps.
Open Resource Hacker. Now click on file>open. Navigate to the location of your copy (i.e. the desktop) and open the authui.dll. You will now see a folder tree in the left navigation pane of Resource Hacker. Expand the Bitmap folder. Now, scroll down to bitmap number 12218. Expand it as well. Click on “1033” to highlight it. You will now see a picture of the current bitmap in the right pane of Resource Hacker. Right click on 1033 and select “Save [Bitmap:12218:103]…” and save the bitmap to a location, such as your desktop. Repeat this step for the following bitmaps:
12219, 12220, 12221, 12222, 12223, 12224, 12225, 12226, 12227, 12233, 12234, 12235, 12236, 12237, 12238, 12280, 12281, 12282, 12286, 12287, and 12288.
Step 4: Editing the bitmaps.
Open up GIMP. In gimp, go to file>Open and open up 12218. We will practice with it. There are only two ways we can edit this image. The first way is to draw directly over the existing image. You see this in example A in the screenshot. DO NOT DRAW INSIDE THE FRAME. This may cause your frame to render improperly. The second way is to copy and paste a pre-made image over top of the existing frame. You see this in example B in the screenshot. DO NOT PASTE INSIDE THE FRAME. This may cause your frame to render improperly. After you are done drawing or copying/pasting your image in, save the bitmap.
Step 5: Integrating your edited bitmaps with Resource Hacker.
Open your authui.dll again using resource hacker. Navigate again to the 12218 bitmap. Now, right click on 1033 like in step 3. This time, click on “Replace Resource…” and navigate to the bitmap you just edited. Select it and click on “Replace” in the dialog. Congratulations! You now have your own custom bitmap. Click on File>Save in Resource Hacker to save your edits.
Step 6: Testing.
BEFORE YOU TEST, I HIGHLY RECOMMEND THE FOLLOWING: Either A) have your Windows 7 install disk near so you can run a repair utility if there is a problem or B) set your computer up as a dual boot system. Dual booting is easier because you can just log onto your other OS, navigate to your Windows 7 System32 folder, and restore the original authui.dll.
To test, you must first navigate to your System32 folder and rename your original authui.dll. Give it a name like “authui_win7original.dll” or something that makes it recognizable. After you rename, copy and paste the edited authui.dll into your System32 folder. To test your authui, perform the following:
A. Hit Ctrl+Alt+Del. If the CAD screen appears, click on “Lock Screen.” If the screen locks successfully and you can unlock it, then proceed to next step.
B. Save what you are doing and log off of your computer. If you can log off and log back in, Proceed to next step.
C. Go to your control Panel and click on User Acounts. If you are a single account user, turn on the guest account. If you are a multiple accounts user, turn off your all accounts but you own. Now log off and log back in again.
If the tests worked, congratulations! You have successfully edited your authui.dll. Now following these same steps, continue to edit your authui as you please.
Optional edits:
This tutorial tells you have to remove the shutdown button from the dialog: [link]
This tutorial tells you how to remove the branding and ease of access button from the dialog: [link]
This tutorial was created using resources from the following deviation:
XP Logon for 7 by Asilaydyingdl: [link]
Related content


Comments: 49


why dont u just upgrade ur windows?
👍: 0 ⏩: 0

Prolly _the best_ tutorial I have found on the subject. Thanks so much ^_~
👍: 0 ⏩: 0

I was wanting to upload my own custom startup screens, and I was trying to find out how to edit my own .tbs files to do so. Is there a tutorial on that?
👍: 0 ⏩: 0

Thanx I didn't want to edit every bitmap in the library and so this helped a lot.
👍: 0 ⏩: 1

I've never tampered with it, so I honestly don't know. Sorry!
👍: 0 ⏩: 0

Everytime I copy the modified authui.dll it seems to recover itself, I make sure that I cpy the modified one and then, suddenly when I copy it to system32 and open it again with reshack the frame appears as the original, do you know why this happens?
👍: 0 ⏩: 1
Sounds like something to do with your administrative privileges. Even if you are the computer administrator it is possible that you don't have full ownership of your System32 folder. Try and verify that you have full privileges and/or that you are the administrator.
👍: 0 ⏩: 0

Anyone interested in customizing authui should check out this page. I have been looking all over for something like this..
[link]
👍: 0 ⏩: 0


Just snooping around. I love finding info like this.
👍: 0 ⏩: 1
Good, I'm glad you enjoy.
👍: 0 ⏩: 0

is this working with x64? have had alot of problems opening dll files that are x64. Thanks
👍: 0 ⏩: 1
Its been confirmed working on 64 bit by a tester. If you are having trouble, I do not know how I can be of any more assistance since I do not have 64 bit myself. Sorry. Maybe you don't have full administrative rights? Thats my only guess.
👍: 0 ⏩: 1

How i can remove this frame or make this frame transparent??? I'm vietnamese, sorry about my English
👍: 0 ⏩: 1
Attempting to remove the original frame would make your authui unusable. The only way you could have your own transparency is to fake it. What I mean is once you have chosen your background image, copy and paste sections background image to overlay the original frame. Similar to what I did on my OS X Login. The frame is still there, but since the colors are the same as then background image you can't tell the frame is there.
👍: 0 ⏩: 1
I had remove this frame succesfully.
I used restorator to hack UIFILE and change picture size online 627 and 628. So this frame was hidden.
 (Smile)")
👍: 0 ⏩: 1
Ah, you used a different program. Resource Hacker wouldn't have agreed with that lol.
👍: 0 ⏩: 0


Wowser, this is the best for creating Custom Logon screens. Shizzzzzam!!!
👍: 0 ⏩: 1
Hahahahahaha thanks for the favorite!
👍: 0 ⏩: 1
Ha, No problem!! Once you start mucking with the Windows GUI, NOTHING is good enough unless you mod the hell out of it
👍: 0 ⏩: 0


")

Nice tutorial. Just wanted to point out that yes you can change location of Userframe as well. Some people might like to know you can elimintate alot of uncessasary images from the dll if you run into trouble with oversizing as Windows has a limitation on the size of the Authui.dll. Also for users running 64Bit,they can use Restorator 2007 to edit the Authui.dll located in the SysWOW64 folder. Also users can create a Restore Point before making changes and the changes can be reverted if the modification fails. System disk is not needed in 99.9% case
👍: 0 ⏩: 2
Oh, and regarding changing the frame location, for the sake of this tutorial I left a lot of that complex stuff out. I wouldn't delete any bitmaps. Its easier and safer to just remove stuff by changing the location tag to "none" in the code, which is how I removed stuff in my logins. I'm still figuring out the location stuff. I plan on updating my Win7 Logons with working buttons and such, probably won't relocate the user frames because it isn't necessary in my deviations.
👍: 0 ⏩: 0
You can't log in to your system if the authui is malicious. So System Restore is not helpful. And as far as the sysWOW64 folder, on 7 the files don't need edited. At last check they didn't at least. The guy who tested the 64 bit version of my Snow Leopard Login only tested it by replacing the system32 file and it worked for him.
👍: 0 ⏩: 0


 (Wink)")


Very good tut.
I'm sure it will help lots of people out
👍: 0 ⏩: 1
Thank you! I hope so. Maybe now someone into programming can create a tool automate the process and create custom authui files simply.
👍: 0 ⏩: 1
You never know.
There are some very smart cookies out there
👍: 0 ⏩: 1

Great tut. Thanx for doing all this for the community.

👍: 0 ⏩: 1