HOME | DD
 AtFirstPlush — FUR REPLACEMENT TUTORIAL

Published: 2011-04-22 19:39:22 +0000 UTC; Views: 7791; Favourites: 76; Downloads: 0
Redirect to original
Description
May of you know that I always try to be very helpful with your many questions on soft mounts etc. and even though MANY would LOVE to see a detailed live streaming of what I do, or want a picture tutorial on how to make a soft mount taxidermy from start to finish... but here is something most anyone can do, and it could make a wonderfully dramatic difference in your outcome. And with a little practice, pretty much anyone with any kind of artistic ability can do it too, when it comes to pelts, leather, or even resurrecting an older beloved stuffed animal.Now, be it a legless 'wall hanger' that you love, a L/S (life size) pelt that you'd like to mount up - but haven't because of some obvious slips, or it's your first or even your 50th soft mount, here is what "I" do to fix the slipped out & bald areas. And with such a great response to the Poll I posted, here is my "slipped area, patch replacement guide/tutorial."
Please, READ it THROUGH first, I have spent A lot of time and effort on typing this out for you. Read and RE-read the steps before you begin, at least twice. Because a step may be continued into the following step, further explaining why it's done and how - and if you don't read ahead, you may make a mistake!! It will prove to be very helpful when you finally begin. Never assume anything and try not to skip ahead.
 A little background on my experience: I first started out 'making' my first and only 'soft mount' a LONG time ago, when I was about 13-15 years old. (For those of you who DON'T know, I am now 38.) My grandmother had a 3 mink stole that was falling apart. I had been asking my parents for a ferret at this time- where all I got in response was a firm "No." So, my grandmother gave me the main mink from that stole/shawl which had the mouth clip. I just loved it, but it was so... flat! So, I opened the stitching in the lower belly area, stuffed it with some fiber-fill, haphazardly sewed it back up, and loved it until it simply fell apart. THEN, about 2 years ago ( late 2009?), I saw Foxy's work. It opened the door fully for me as to just how far this could go - and that I could purchase WHOLE tanned unused furs if I looked in the right places. And these animals pelts' would surely look real!! Many have kindly stated that I have come a LONG way since I first began my soft mount taxidermy, and I greatly appreciate all of those kind and encouraging comments.
  And I believe I have come far enough along to be able to give out some basic advice. Anyhow, making realistic animals out of faux fur is something I had been trying to do for years! And my first real fur soft mount was Ro-Jo, a huge red coyote. Anyhow, No soft mount or L/S would turn out well without a LOT of prep work FIRST. And slipped fur replacement and sewing holes shut, is the FIRST thing I EVER do to any of my pelts before I attempt to make than come 'alive' once again.
Remember, it's all part of the prep work.
As far as sewing/patching, I began with the basics (this is before I even joined DA on a free basis.) Like I said, I was making faux fur stuffed animals/plush from patterns, then went to making my own stuffed animal patterns because I couldn't find what I wanted to make - and nothing, including faux fur or patterns out their was ever 'realistic' enough for me.
I have sold several of my faux plush, and have been honored by those who have purchased my soft mounted taxidermy, and by those who have commissioned me to do "mount your pelt, commissions."
Despite the fact that I don't have the majority of my faux plush posted here on DA in my "Faux Plush" gallery. I have applied that experience from the faux plush to my soft mounted plush taxidermies. AKA soft mounted taxidermy, and now I am passing what I've learned along to those who would like to know more on the subject.
NOTE: When sewing REAL fur and leather, I have used the 'baseball' stitch to mend and sew my soft mounts, never a sewing machine. If you don't know what the baseball stitch is, feel free to Google it before you begin.
---------------------------------------------------------------------
FINALLY, HERE IS THE TUTORIAL PART:
#1- (I know, I can hear the *DUHHHH'S!* looming in the air ... but it's a reminder for the newbies, DON'T be lazy!) Be sure that the color of the REPLACEMENT fur matches as closely as possible to the pelt you are working on, and that it's of the SAME species.
#2- Use a straight edged blade, such as an Xacto knife, or scalpel to cut out the bald area right up to the clean fur line (ONE AREA AT A TIME) in the pelt you need to make a patch(s) in- it may seem to go slowly, but slow and steady wins the race. Don't leave any bald space left behine while cutting, or it WILL show through when all is said and done. Trying to work too quickly will almost always cause you to make stupid mistakes, including cutting into an area that you didn't want to, and if you do that, you'll have to repair that area first. So, go slowly and surely, and you'll be fine.
#3- Once you have finished cutting out your slipped area, very carefully trace the cut out you just did from the pelt as closely as possible by tracing your pattern as closely as possible onto your thin cardboard using a BALLPOINT PEN, (such as a cereal box, anything thicker will cause you to make the replacement fur too large. A big NO-NO. Bigger/thicker pattern material is NOT better here.) Now, this is VERY important, mark both the bald fur sided leather you have removed from the pelt and your PATTERN side "A" for the fur side, and side "B" for the leather side. Double check to make sure that the sides of both the leather and the cardboard MATCH up nearly perfectly and that you marked them correctly. DO CUT/ALTER the CARDBOARD(IF YOU HAVE TO) to match the cut out leather, do NOT CUT THE slipped out leather you cut from the pelt.
#3A - The old adage is to "Check 3x's - then cut."
 NOTE: Make sure your pattern is UPSIDE down when TRACING YOUR PATTERN onto the new replacement fur. EX: You should be cutting out your replacement fur with the LEATHER side up, so your pattern should be showing you, side "B." That's why you mark your pattern accordingly. If you have a brain fart, use your 'slipped out' leather that you removed for ref. OR If you can't remember, or you were too lazy to follow this "A-B" step in the process, match your PATTERN to the cut out area, fitting it into the hole like a puzzle piece, then actually mark it's sides "A" and "B" - then do the same to the cardboard pattern. I told you NOT to be lazy... it actually waists time. Now, cut ON the ballpoint line you made onto your scrap fur. Again, go slowly, and stick to that line!
#4- Now you should have your slipped out piece, your pattern that matches, and your new replacement fur that should match up with the slipped out area. Using the baseball stitch, begin to sew your new fur into place. Go about an inch, and check to make sure your new fur still matches up to the hole it's going into. NEVER assume that because you made an exact duplicate on your scrap from your cardboard pattern, that the new one fur will fit perfectly. AND How well you stitch it in, matters! You may have to start from a new area(more then one needle and thread being used at the same time) to make sure the new part fits in with accuracy.
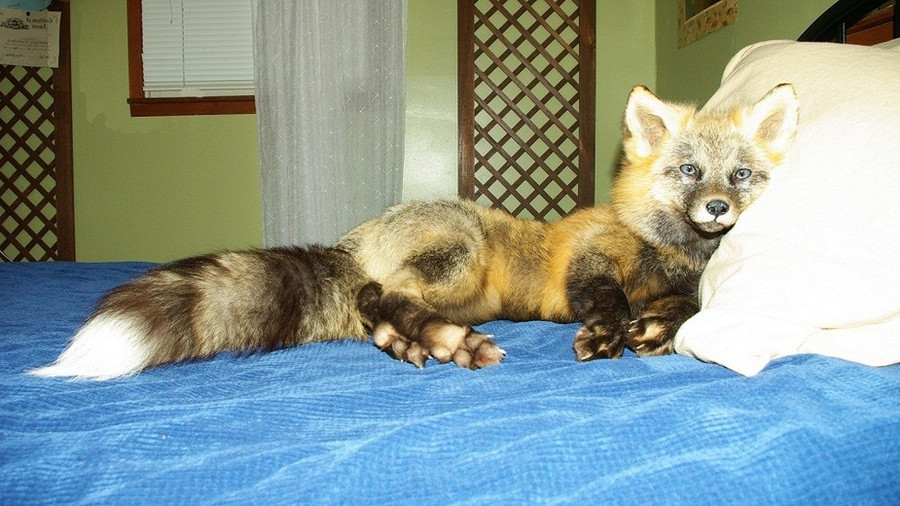
#5- What I did in the pictures: As you can see, there were two major slips. I did the same with the smaller slipped area as I did with the larger. You may also see that my patch is in three parts. I did not have a big enough scrap that matched, and the area had 3 color types, so I cut the pattern in 3, matched my scraps to them, and then sewed the scraps together BEFORE sewing the ONE new area into place.
You may have also noticed that my repairs don't appear to match up in an even line at the bottom edge of the pelt by the anus, leaving the edge of the pelt 'off kilter.' For me, that is fine, because I later on added an extra edge strip, so that I could clean out and utilize the scrotal area. This coyote was missing some leg skin as well as leather between the scrotum and anal areas that lead up to it. I also double baseball stitched the entire (all) area(s) to make sure that it would last a VERY long time. Most of this is not fully shown in the replaced patched areas so that we could focus on the issues at hand.
*SPECIAL NOTE* none of the pelt NOR the scrap was hydrated. Hydrating any of the area before OR during patchwork would have caused undue stretch to the areas, and since my scraps were tanned by different companies, hydrating ANY of them would have caused major issues in the end - including possible tearing and undue stretching with distortion - and once dry, possibly stiff areas. So, DO NOT HYDRATE ANYTHING DURING THIS PROCESS!!!Good luck, and share your pictures! XD
~Andi
Related content


Comments: 21

Aha! Here is your tutorial on repairing slips! Is it okay if I put a link to it in my 'slips' tutorial? I thought I first saw it in Crafts-of-Taxidermy. Jeez-there are so many inactive taxi groups out there!
👍: 0 ⏩: 1

Yeah, sure. Go ahead. No problem at all.
 (Smile)")
👍: 0 ⏩: 1
Okee dokee! I had to go into it to post to submit it correctly anyway. I don't know exactly how I screwed up, but all I really posted was a link to the article in my Stash.
👍: 0 ⏩: 1
Really? I hadn't noticed. I thought that was a clever way to post. 0_- I don't get stash, other than to share images privately. I didn't even know you could do journals like that, & never knew why they showed up in my stash, even AFTER posting. dA should come with a manual. lol
👍: 0 ⏩: 1
I stumbled upon stash writer by accident. I went to do a journal entry, and I saw the option 'stash' in the upper right hand corner. Makes it way easier to do tutorials (well, unless you screw up like I did!)
👍: 0 ⏩: 1
Daw. LOL. I've obviously never used it. Think about it for urself, as a happy accident & a learning curve.
👍: 0 ⏩: 0
I know this tutorial is older, but I just read it with interest because my current cross fox has 5 slipped areas. This has been very helpful and well written. Mary
👍: 0 ⏩: 0

I can't wait to see it!!!!!!!!!!
👍: 0 ⏩: 1
")


Thank so much. I just got a grey fox that has a large rubbed area and now I know how to fix it.
 (Wink)")
👍: 0 ⏩: 1

I recently acquired a very cute mountable red fox, that has suffered a bit of fur slip, this tutorial will be most handy, thank you ^_^ x
👍: 0 ⏩: 0

Thank you so much! When I get my silver fox I'll be able to replace the rubbed fur on her.
")
👍: 0 ⏩: 1
Too kewl, glad I could help!!
Just did the same thing myself in 3 diff places on another coyote of mine! It's a super way to keep them beautiful!
👍: 0 ⏩: 1
Yep! Now I just have to find some silver fur scraps once she arrives.
👍: 0 ⏩: 0


Awesome tutorial andi! I thankfully have no use for this yet, BUT if i should need to replace some fur i will totally use this!
👍: 0 ⏩: 0

