HOME | DD
 BlackUniGryphon — Tutorial Light Shading Reflect
Published: 2005-12-08 18:35:44 +0000 UTC; Views: 42226; Favourites: 701; Downloads: 986
Redirect to original
Description
******************************************** FULL VIEW TO READ THE PICTURE!!!!!!
 ********************************************
INTRO:
This is the Basics of the theories behind Lighting, Reflection, and Shading. It's theories and science which you can apply to your art. I only got into the basics. But, if you think about it all complex things are actually a bunch of basic things clumped together.
I jotted this on a Sticky note, to prove a point. It's so simple, and so basic that anyone can do it.
If baffles me, to no end, that no one knows the basics like, blending or Lighting, Shading and reflection.
So, without getting into the technical principles in mathematical formats like the Physics text books, or getting into the philosophies like The German Scientist/Poet Goethe, I'll just show you!
Bam! It's this easy!
****************************
This exercise is what I learned at BCIT (New Jersey). I didn't go to regular high school, I went to a Vocational Institute. I studied what they called "Advertising, Art & Design" which is the same exact things as "Graphic Art".
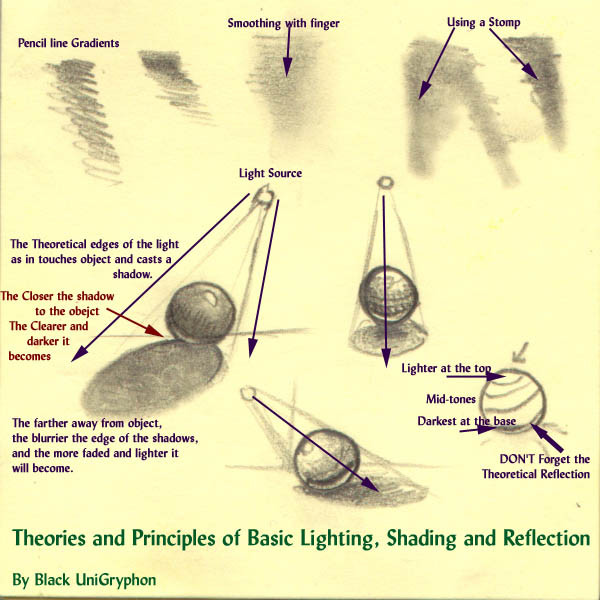
* Basically, you draw some spheres (or balls).
* Then you choose the angle from which your Light source is coming from.
* Based on the edge of where the light touches the ball is where you make your cast shadow.
* The ball its self will have bands of tone: Darker(er)-Light(er)
* The farther away you get from the light source, the darker the shadow on the object/ball.
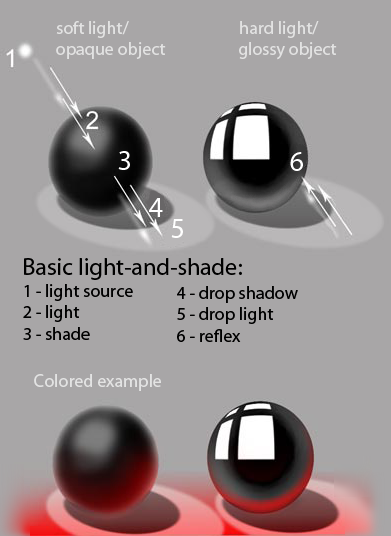
* But, you MUST remember to leave an edge of light tone so the edge of the ball and the edge of it's cast shadow don't touch or blend together seamlessly. This is called a "reflection light" or just a "reflection" and it's only a theory, but it's important. Otherwise it doesn't look right. This was something that was emphasized deeply in class.
* The Cast Shadow gets crisper and clearer, the closer it is to the object, not to mention it's also darker.
* But, the farther away the edge from the object and the light the blurrier, lighter, and unclear it becomes.
* Another thing to Note:
Notice that the shadow here is an elips. Where the edges of the light lines are is where the edges of the cast shadow goes.
* Don't forget to erase you Light source lines. They are just to help you. After all they are based on Theory.
******************************
* You can actually try this excersize from any angle of light.
* You can also try this with multiple light sources.
* Most things you draw will have multiple light sources anyway, which is why you'll need to learn the reflection theory.
Now think of what this could mean with your own art work. The same principles apply. So, try learning different textures and tones.
******************************
Blending:
There are different ways to convey the tones in the shading.
* Impressionist Shading: If you just like working with pencils, you can try an Impressionist style. These tend to be more organized in there lines.
* Finger Blending: You can also blend the lines for smooth tones and gradients. The easiest way to learn it is by taking your fingers and smudging the graphite pencil lines (or charcoal/Pastel).
* Using a Stomp To Blend: But, a step further up from that, and even better is what's called a "stomp". Everyone seems to have a different name for it. But, it's a thick, tightly rolled up paper tool, that you can sand (with sand paper) to a point, and smudge the tones much better and easier.
* TIP: You can also use a kneaded Eraser for special effects in reflections, light lines, etc.
*********************
Shading Cheats:
Hate Shading?
Well, if you pretty much "get it" with all this shading theory and reflection, you can cheat by indicating small sections of where you want the shading/shadows to be.
Lightly shade in the sections with a pencil until it conveys a shadow or shading.
People whom have no clue about shading have no idea that you cheated, and when they look at the drawing their brain will have been tricked into thinking/believing there's a shadow their.
It's so simple, I do it all the time, and people swear it's detailed when it's not.
********************************
Having said/written all of that.... hopefully by now you'll understand the concepts, and be freed. the mysteries of basics is all gone!
NOW: go to your favorite artist's galleries and look at their works with your new eyes and new thinking and analyze what they did!
Aha! Now you know what they did, and how they did it!
") Have fun!
Have fun!***********************
Also, if you want to Check out this Lesson from nethersphere.com: www.nethersphere.com/howto_jew…
Stephanie explains the same principle but for a glass jewl.
Related content


Comments: 36


I'm like a sponge...the learning type, not the "take advantage of others" type...want to know anything and everything to add to my learning and become better at drawing so thanks...appreciate it...lots!
👍: 0 ⏩: 0


I think your shading tutorial is one of the best ones I've come across so far. *favorites you* xD you speak in plain english and no techinical terms easy to under stand.
This will hopefully help me shade my stuff better so I can help out on my friends site..
Thanks so much! <3
👍: 0 ⏩: 0


this is great for referencing i thank you deeply
👍: 0 ⏩: 0

Hi, i am writing an article "6 things and 6 tuts you should know for perfect photo manipulation" and i would love to add your tut image to this article with link to your tutorial and link to your deviant account! It will be published on my site [link]
Is it ok?? thank you!
👍: 0 ⏩: 1


Your Resources have been included in our weekly Friday FumZ FrenZy event article for the Resources & Stock image gallery [link]
Thank you for sharing with the community.

👍: 0 ⏩: 0

i use it ><
and i needed box one too but i didnt find but it went well^^
👍: 0 ⏩: 0

If u talk to most fine art ppl, they will tell u never to use ur finger for blending. Fingers usually contain oil that will stick to the paper and make any more corrections over it like erasing or adding more tone difficult.
Try wrapping your finger over a soft cloth napkin or try using an ear bud. Improvise.
Great Tutorial.
👍: 0 ⏩: 1

I agrea about the oil thing...
but, strangely I know several people who like the oilly aspect part of it better.
I guess it depends on the individual atstes, eh?

👍: 0 ⏩: 0

 (Smile)")

I'm so glad to read that! ^_^
👍: 0 ⏩: 1

This might help too! [link]
👍: 0 ⏩: 1

thank you for this. Now I understand shading a lot more now
👍: 0 ⏩: 1


I had figured out most of the shading stuff on my own, but I never considered the reflection theory! I love you!!

👍: 0 ⏩: 1