HOME | DD
 brackman71 — Planet Tutorial
Published: 2007-08-23 00:52:13 +0000 UTC; Views: 37828; Favourites: 454; Downloads: 889
Redirect to original
Description
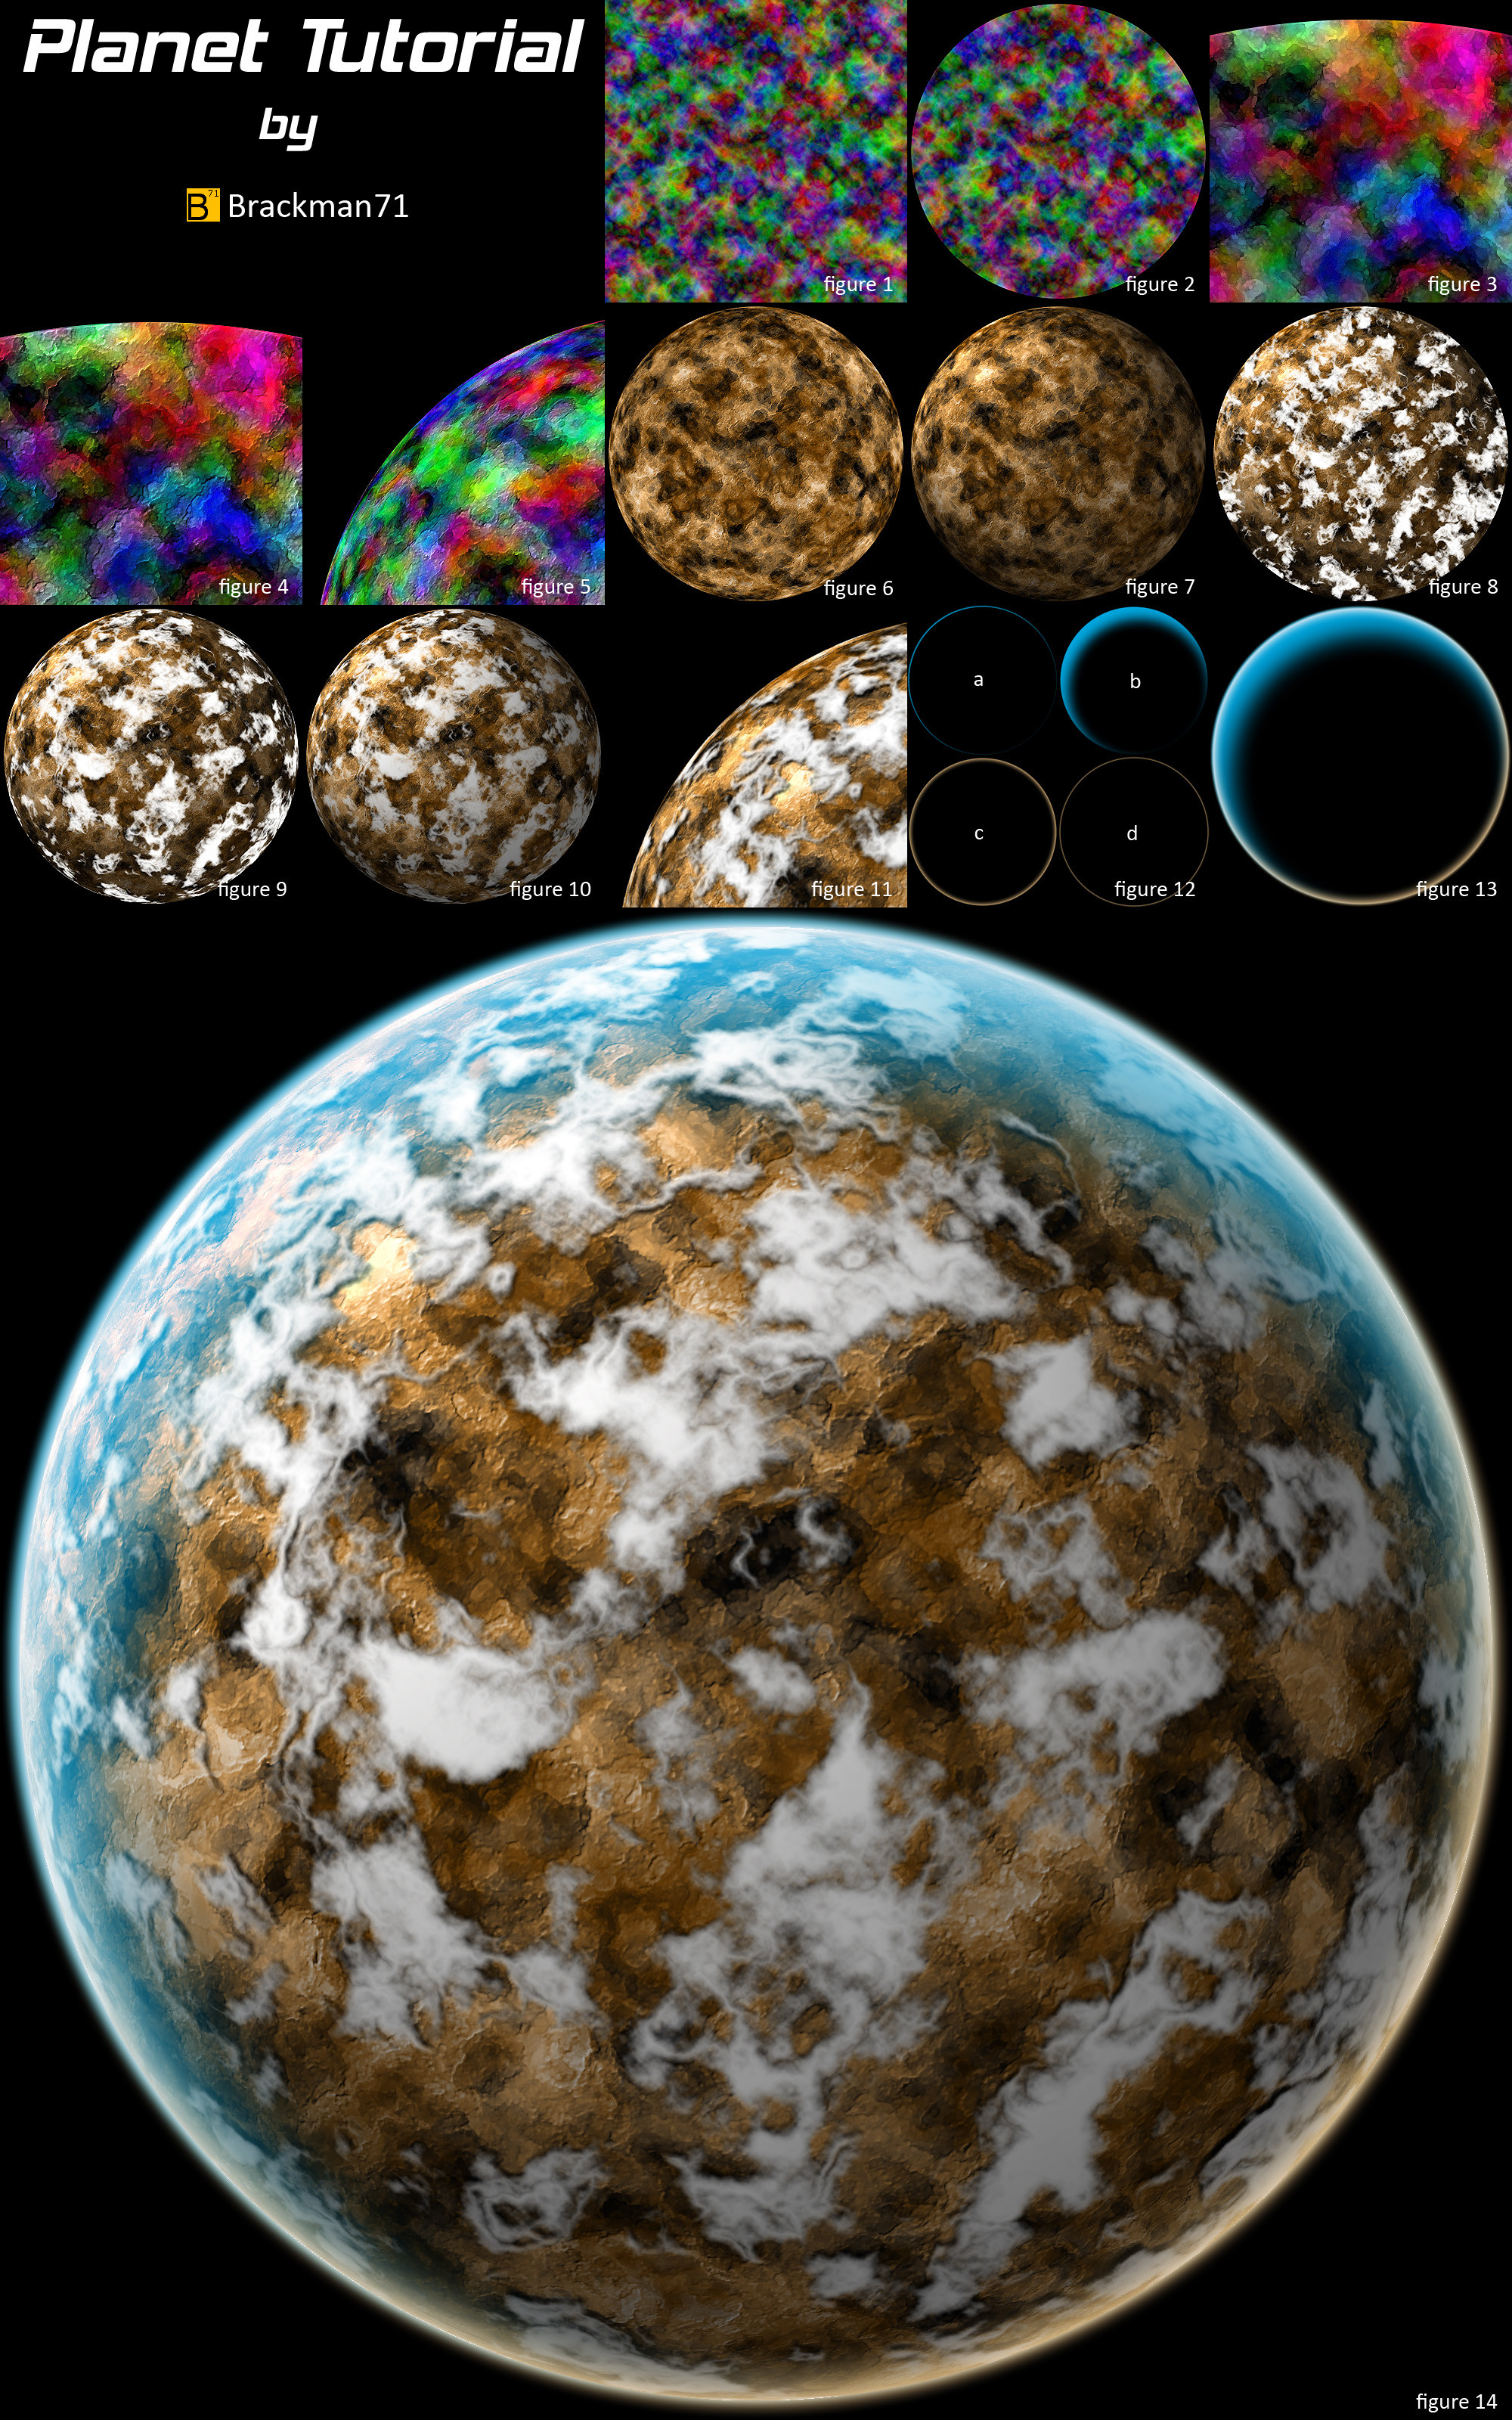
Here's a tutorial on how to create a realistic planet FROM SCRATCH using NOTHING but Photoshop.Open a new document that's 2000 x 2000 pixels.
First, you will need to create a texture for the planet's surface. I have chosen to run the filter "Difference Clouds" ten times on each color channel individually (red, green, blue). This gives a very colorful, cloudy appearance to the entire frame. (See Fig. 1)
Second, select a large circular section from the middle of the image. Be sure to make the selection completely circular. Cut this out and paste it onto its own layer. This is your planet. (See Fig. 2)
Next, run a filter of your choosing on the planet to change its appearance from a cloudy fractal to something more planet-like. I have chosen the 'watercolor' filter. (See Fig. 3)
For more texture, duplicate the planet layer. Convert the planet to grayscale, run the emboss filter on it, then change the layer blending to 'soft light' to make the texture appear 3-dimensional. (See Fig. 4)
Flatten these 2 layers together. This is the new planet.
To give your planet a 3-Dimensional look, we need to convert it into a sphere. Select only the planet. (Ctrl-click on the thumbnail on the layers tab.) Run the filter/distort/spherize command. This will make your planet appear spherical. (See Fig. 5)
Next, you might want to colorize your planet for that certain 'barely habitable' look. I have chosen to make my planet a rusty and barren place. Add a hue/saturation layer and set the 'colorize' option. Choose a nice orange color (hue 35) and set the saturation to your liking. (See Fig. 6)
Flatten these 2 layers together. This is the new planet.
To give your planet a 3-Dimensional Lighting effect, choose filter/render/lighting_effects. Use the default setting, change the source to the upper left corner, and make sure the width of the ellipse is as wide as your planet. Once complete, your planet will now look 3D. (See Fig. 7)
You may stop here if your planet doesn't have an atmosphere. If it does, proceed to the next step.
To create clouds, we will use a similar technique. First, render 5-10 iterations of the 'Difference Clouds' on a new layer. Select the area of the planet (ctrl-click on it's layer thumbnail) and cut and paste it onto its own layer. Next change the levels (ctrl-L) to set the amount of clouds. I have chosen about 80, gamma of 2.0, and left the high end at 255. Next use select/color_range to select the brightest part of the clouds. Set the 'fuzziness' parameter to 200 and click OK. On a new layer, paint in this selection with a bright white. This is your cloud layer. (See Fig. 8)
Next, apply the spherize command to the cloud layer to make the clouds appear spherical. (See Fig. 9)
Then apply the same lighting effects to the cloud layer to make the clouds match the lighting of the planet. (See Fig. 10)
For realistic cloud shadows, you need to make a duplicate of the cloud layer, lock its transparency (on the layers tab), and fill it in with pitch black. You should have what looks like black clouds identical to the white ones. Place these 'black clouds' below the white ones. This is your cloud shadow layer. Since all shadows should appear to be below the clouds, and 'down' is always towards the center of the planet, you can select the cloud shadow layer and resize it to about 99% of its original size, centered around the planet's center. (Press ctrl-T for free transform, start dragging the corner handle, hold down shift to ensure the aspect is maintained, and alt to ensure that the operation occurs around the center.) When you are done, the cloud shadows layer should be slightly smaller than the clouds, and centered on the planet. (See Fig. 11)
The final phases are to create a realistic atmosphere.
First, create a black circle the same size as your planet. (New layer, ctrl-click on the layer thumbnail for the planet layer, then fill with black.) This will be your atmosphere layer. Set the layer blending to 'screen'. Open the layer effects dialogue and set the following:
Enable the 'drop shadow' option. Set the color to a nice blue, and set the lighting direction to the lower right. Set the drop shadow to 100% opacity, normal mode, and with an offset that is slightly off, and slightly blurry. This is the part of your atmosphere that overlaps the background. (See Fig. 12a)
Enable the 'inner shadow' option. Set the color to the same nice blue as before, and set the lighting direction to the upper left. Set the inner shadow to 100% opacity, normal mode, and with a very large size and distance. This is the main atmosphere of your planet. (See Fig. 12b)
Next you can enable a 'dim light' atmosphere effect. I have chosen a rusty color to enhance the barren feel of this planet. Set the inner glow and outer glow to be the same rusty color. Set the inner glow to be somewhat larger (See Fig. 12c) than the outer glow (See Fig. 12d).
Then you will have a complete atmosphere. (See Fig. 13)
Enable all layer sets, from top to bottom: Atmosphere, Clouds, Cloud Shadows, and Planet. (See Fig. 14)
There you have it! A complete planet FROM SCRATCH using NOTHING but Photoshop!
I hope you enjoyed this tutorial!
-Brackman71
Related content


Comments: 47

👍: 1 ⏩: 0


i love the multi colored clouds.. but im not sure how you did it exactly D:
could you please explain exactly how you did it for me? :3
👍: 0 ⏩: 0

")
")


i make a planet with the tutorial: [link]
thank's for making
👍: 0 ⏩: 0


great tutorial thanks so much for sharing your techniques
👍: 0 ⏩: 0


Hello, and thanks for a thorough and awesome tutorial! I used it in a picture of the oldie characters Kefka (Final Fantasy 6) and Magus/Janus (Chrono Trigger), here: [link]
👍: 0 ⏩: 0


Great tutorial! I can't get my planet to look like it should in figure 6. My planet color looks much more flat. Your planet in figure 6 has darker patches of brown and some white light areas too. Was there an extra step you took to get the dark brown circle areas and the light areas?
👍: 0 ⏩: 0


👍: 0 ⏩: 0

Incredible. Have been playing with this for awhile now, and some of the results have been astonishing. Have attempted several different filters now. A wood grain gave the planet a very angry feel, like perpetual storms. Another planet I did the clouds several times, and added different colors to make seas, some even methane. Added something different this last time though. You pointed out that you need to lower the shadow of the clouds more towards the center. You're right, you do, but I got to thinking some as well. Using this same ideology, you also need to expand the clouds a bit as well. Not too much as you don't want them way above the atmosphere, but the latest planet I did now how the faintest hint of separation of layers such as ionisphere and stratosphere. You can just see the highest clouds on the sides of the planet. Looks pretty cool. Thank you for this tutorial. I deem it invaluable.
👍: 0 ⏩: 0
Had some problems, and don't think I did everything right, but finished my first planet. Looks really pretty good. Huge thanks.
👍: 0 ⏩: 0

Thank you so much!
Heres my first attempt, the clouds are shocking.
[link]
👍: 0 ⏩: 1

your welcome... heres my first atempt useing his tut [link]
👍: 0 ⏩: 0


This tutorial is amazing! It helped me a hell of a lot with this piece:
[link]
Thank you for sharing <3
👍: 0 ⏩: 0
Thank you so much for sharing! I used your help here: [link]
thank you once again <3
👍: 0 ⏩: 0

Whoa this is cool. I made several planets now and I often tried to avoid using photos as textures (just because, go fig). This is a very nice outcome!
👍: 0 ⏩: 0


How do you add the color? You mentioned changing it to grayscale? I don't get that part... But this is well worth a

👍: 0 ⏩: 1
OK, I figured that out now, nevermind. Nice work!
👍: 0 ⏩: 1

Add the color? I just selected the "colorize" checkbox in the Hue/Saturation window.
👍: 0 ⏩: 0

I'm having trouble following several steps on this. Primarily the first one. Can you explain how to work those...color channels?
👍: 0 ⏩: 1

Surely...
In Photoshop, the default layout has a box in the bottom right, with several tabs across its top, being "Layers", "Channels", and "Paths".
Select the "Channels" tab of that small window, and the image's color channels will be displayed (should be 4 of them... "RGB", "Red", "Green", and Blue") for you to edit each color channel individually. The default is "RGB", which means you are affecting all color channels simultaneously. We need to change this to work with only ONE color.
To do so, select the name of one channel, in this case, "Red". Reset the colors to black and white. (Keyboard Shortcut "D".) Then run the difference clouds filter by selecting filter\render\difference_clouds.(Your image will appear either black/white or red/white depending on your PS preferences.)
That was one pass... to do it 9 more times, press "Ctrl-F" to repeat the last filter 9 times.
Select the next color channel (Green) and press "Ctrl-F" 10 times.
Select the next color channel (Blue) and press "Ctrl-F" 10 times.
To see the final result, with all colors again, select the "RGB" channel to return PS to its default setting.
...and there you have it!
I hope this helps! Good Luck!
👍: 0 ⏩: 0

I am looking forward to giving this a try.
Thank you for posting this.

👍: 0 ⏩: 0


It looks amazing! ^^ Thanks a lot for helping me create my own textures, though I kinda rushed the lighting and clouds part. =w=
👍: 0 ⏩: 0

Ima totally try this out!  (Smile)")
👍: 0 ⏩: 0

You're doing basically the same thing as the ground.
Hope this helps!
👍: 0 ⏩: 1

This is brilliant! I've made a few now (it took a while to get a hang of it, especially since I only just got proper Photoshop - had Elements before) and they look fantastic. Thanks!
👍: 0 ⏩: 1
Awesome, I'm glad you liked it!
Post your planets here so I can see what you've done!
Cheers!
👍: 0 ⏩: 0

Playing God again, are we?
..an amazing finished product, it's stunning! I want to book passage aboard an orbiting 'liner, to really see it all!

👍: 0 ⏩: 1
Yep.
Been a while since I've played Black & White
I could also do a HUGE tutorial on how to do this in 3DS Max... but it's easier to do it as layers in Photoshop.
...now about that spaceliner...
 (Wink)")
👍: 0 ⏩: 1