HOME | DD
 davidyardin — Ms Marvel Steps 12 + 13

Published: 2009-05-18 23:46:33 +0000 UTC; Views: 20763; Favourites: 342; Downloads: 756
Redirect to original
Description
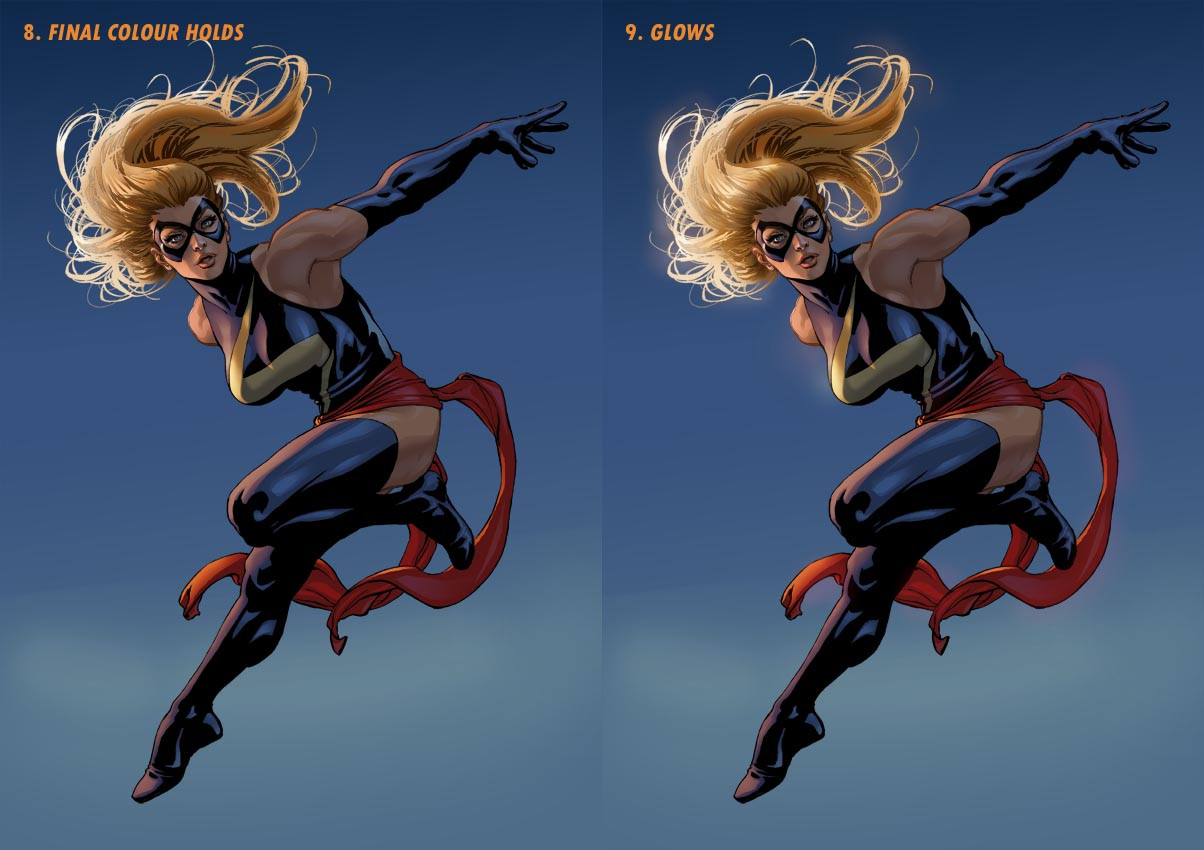
Steps 12. Clouds Final & 13. FinalPutting the foreground and background clouds together, I'm just about finished with the piece. The final thing to add was the bright light source. I'm not generally a fan of the standard Photoshop lens flares (I prefer to make my own if I'm going to use a flare effect), but in this case I think the stock standard flare worked out all right, and really amped up the brighness that I wanted from the light source (plus those little circle effects look cool
 (Cool)") ).
).
Related content


Comments: 75

im new here ... n went trough a lot of pics but this one is the best!!! love it !!
👍: 0 ⏩: 0

Wow! This tutorial was great! Thank you very much for shearing!
 (Smile)")
👍: 0 ⏩: 1

great work!
--
NEW COMMISSION OPEN: [link] 
👍: 0 ⏩: 1

Great Tutorial. I really don't have the hang of colouring but I'll be working on it and hopefully utilising your tips well. Great Piece.
👍: 0 ⏩: 1

Thanks. Hope you find it useful.
👍: 0 ⏩: 0

Thanks for the tips! Looks great and I too admire your grasp of lighting!
👍: 0 ⏩: 1

I bought a print of this from you at supernova a few years back, Very inspirational drawing and color. your lighting really sets a scene
👍: 0 ⏩: 1
Thank you very much.
👍: 0 ⏩: 0

Soooo helpfull indeed. Thanks to you to share your tricks. I'll try some of that on my next coloring.
👍: 0 ⏩: 1

This is absolutely amazing and amazingly helpful.
So you seriously do you lineart/inking by traditional ink and then scan and color in photoshop!? I've tried that before, but I can always see my colors through my lines...
👍: 0 ⏩: 1
Thanks. Yes I ink traditionally and scan it in to colour in Photoshop.
If you have your lineart layer on top, with the layer mode set to multiply, or better yet have a b&w bitmap of your lineart (with the white part selected then deleted, so you just have the black lineart), you shouldn't have a problem doing your colours on a seperate layer underneath.
👍: 0 ⏩: 1
I have done the multiply thing before, but I will have to try that bitmap thing. It sound interesting.
I'll keep playing around with it, and thank you for helping me out ^^
👍: 0 ⏩: 1
Yeah it's a lot easier to do colour holds on the lineart, if it's bitmapped first, and not on a multiply layer.
👍: 0 ⏩: 1
hmm...okay. I tried it the other day, but couldn't make heads or tales of it either. I've also been playing with a mix of posterize + cutout filters onto the lineart then multiplying the layer. I think one of the main issues was that i draw so small that even in a 01 Micron the lineart is thick
Thanks again for putting up with all my questions

👍: 0 ⏩: 0


well, this was most nice =3 I like being tidy and following some sorta criteria for everything, except coloring... which I've been trying to practice lately...
this was very informative and nice =3, love the final piece
👍: 0 ⏩: 1

Thanks for sharing your process with us. Fantastic
👍: 0 ⏩: 1
Thanks, and no problem.
👍: 0 ⏩: 0


")

👍: 0 ⏩: 0

Of course I'm feelin the turn out, but whats tha hub bub about lens flairs? I've heard nothing but bad things about them for a long time..... I've never heard it explained.....
👍: 0 ⏩: 0


LOVE this series of steps, it's a great tutorial!
(btw, you should post links to the other steps in the descriptions!)
👍: 0 ⏩: 1
Yes I should go back and do that; I was pressed for time while I was uploading them.
👍: 0 ⏩: 0

sorry but I think Step 12 is a little bit better than the final version
There's a bit too much light in Step 13
👍: 0 ⏩: 1
Yeah I could have stopped at 12, but I was aiming for that bright light though.
👍: 0 ⏩: 0

Very very informative. Nice to see a play by play from an artist whose work I actually know.
Though now I'm gonna be going over some of the covers you've done and trying to reverse engineer them and figure them out
")
👍: 0 ⏩: 1
Glad it was informative.
I haven't coloured any of my covers yet though (only thumbnails), so you'll be reverse engineering someone else's work.
 (Wink)")
👍: 0 ⏩: 1


Damn man, all that work and at the last moment you throw in that cheap ass lens flare and ruin it. Please oh please take it out! It's like 1995 all over again!
👍: 0 ⏩: 1
| Next =>