HOME | DD
 deviantbluebug — Cover Tutorial Part 1

Published: 2007-02-01 00:27:13 +0000 UTC; Views: 1811; Favourites: 17; Downloads: 42
Redirect to original
Description
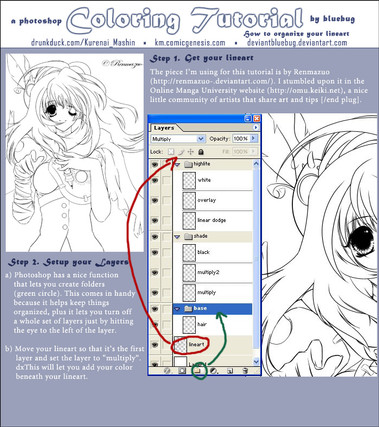
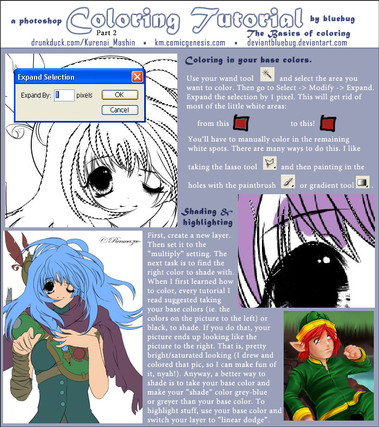
Here's part 1 of a tutorial for the Chapter 7 cover of my comic, Kurenai Mashin. While I'm finished the cover, I won't post the finished version until Feb 14, because that's when it's due to upload on my website.Related content
Comments: 14

Thanks! Tutorials are oddly fun to make. I like to organize things and pretend I'm witty, I guess XD
👍: 0 ⏩: 0

Superb tips. I don't know what good changing the layer properties to color will do but I will experiment.
One note. The beginning sketch was just that. Far from what is considered to be fine line weighted lineart. Did you complete the lineart before going to the color scheme?
I still have problems making smooth lines, they always seem a bit jagged. I wondered if it is just more practice or is there a way I could use photoshop to help me out.
Thank You for the tutorial, I collect all of yours. They are so explanatory that I have very few questions about them and bit by bit, my art looks better.
Did you ever consider we are going to revolutionize the way things get done?
👍: 0 ⏩: 1

Changing the layer properties does wonders for coloring. Especially when you put layers and layers. Um ... if I remember correctly, I just pencilled Link. Then I colored him and added the deku shrub on the computer.
I don't know of a good way Photoshop smooths out lines. I have the same problem. I think a lot of it depends on the quality of the pen you're using (if it bleeds a lot) and the quality of the paper. Otherwise the only way to smooth out lines in Photoshop is to either repaint over your lines using the lasso tool or the erase the edges of your lines (also using the lasso tool).
I don't think I'm going to revolutionize the way things get done, but I'm constantly amazed at how technology keeps changing and letting us do things differently.
👍: 0 ⏩: 1

You know, I just improved the quality of my line art by perhaps 25%. I found that using something called A french curve LOL! helps for the
longer strokes.
Taking shorter strokes also has helped some, but nothing as good as yours. I didn't think you could use the lasso tool to erase. If it smooths out my lines I am all for it. I'll try it and let you know.
Once more, Thanks for helping out.
👍: 0 ⏩: 1

A french curve is a kind of like a plastic ruler but several curves to aid you drawing slopes. My finished art still looks sketchy to me. I do my best to clean it up but it always has the look of sketch rather than the solid weighted lines you have. On your art, you can't tell if you ever lifted the pen from paper. On mine you can always tell where the line is shaky or where I started and stopped.
The french curve helps me with my slopes and curves. You can find an example here :[link]
Hope this clears things up!
👍: 0 ⏩: 1

Thanks for the explanation.
To improve your lineart, I suggest varying the line width. This makes it look more interesting, plus it gets impossible to tell where you've liften pen off paper. And smaller strokes is definitely key as well. I don't usually think while I'm inking, but I think what I do is lift the pen when I get to an intersection (ie. where one line meets the other). That also makes it hard to tell where pen lifts off paper.
👍: 0 ⏩: 0

I love how you show step by steps! Can't wait to see the finished work!
I really need to catch up on your comic!
👍: 0 ⏩: 1

I'm really happy with the final pic. Luckily I left most of my layers intact this time, which is why I ended up with 150+ layers at the end. Usually I flatten my pics at several points and end up losing lots of layers, so I can't usually do a tutorial like this. It's neat though. I like seeing the progression of the picture myself.
I hope you have a chance to read the comic too ^_^ It's a good time to start reading since there's notes pages and the cover for the next two weeks. The next chapter should be a doozy.
👍: 0 ⏩: 1

150 layers!? Holy COW!
I shall do that, then
👍: 0 ⏩: 1

Heheh. Yeah. I'm a layer fanatic. I get carried away because I've run into trouble when I've had too few layers.
👍: 0 ⏩: 1

Ah, gtcha! Well, everyone has a different approach and way of doing things!
👍: 0 ⏩: 1
