HOME | DD
 Filmchild — Part 1 Eye Effects Tutorial
by-nc-nd

Published: 2008-03-16 23:04:42 +0000 UTC; Views: 15952; Favourites: 183; Downloads: 1304
Redirect to original
Description
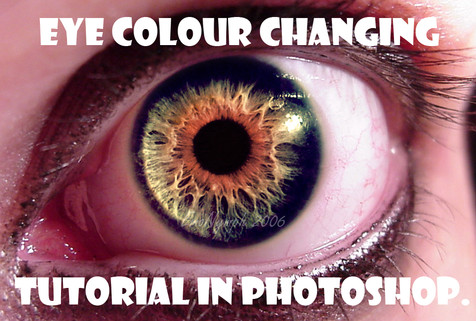
There are a lot of things you can do with Photoshop but recently one of the most popular things everyone is doing is manipulated the eye.I’m not going to lie and say that I’m an expert on this particular effect but here I’ll teach you how I work with eyes in the simplest way possible.
Part 2 can be found here [link]
Part 1 Dodging the Eye


 You can download this for all images you see here in this layout and the how-to description


First Things First


 Working With Stock Model and Their Eyes


There will be models that have great eyes with wonderful detail and then you’ll find ones whose overall body is high pixel quality but his or her eyes are not so hot.
It’s a crapshoot as it all comes down to the camera the stock artist used and the lighting for the quality of the picture.


 Choosing Your Image


Plain and simple, the better qualities you work with the better your manips come out to be.
Your First Step
So you have your image, you’ll want to zoom in on the eye. NOTE: When zooming you’ll want to get close enough to see the details of the iris.
What Now?
Take a look at your tools on your toolbar there. There are a few things you can do here.
Dodging The Eye
Your doge tool brings out the light in whatever you put it under. This works well with eyes in that you can bring out eyes that have irises with highlights in them or even lighten up a brown eye (this works better when the brown eye is higher pixel image)
Take your doge tool and enlarge your tool so that it is not only circular but big enough to reach from the retina (the black center) to the end of the iris. Hold the tool down and in a circle go slowly around the eye.
NOTE: The more you go over the eye the brighter it will become, you might want that effect you might not.
To dodge the iris even more left up on the mouse and hold it down again for another round.
Stock credit -
[link]
End of Part 1
Related content
Comments: 33

zip link is gone. poo wanted to try the tutorial.
👍: 0 ⏩: 0

Damn, I love that camera you have for those kind of close-ups! 
👍: 0 ⏩: 1

I like the camera too. 
👍: 0 ⏩: 1

Oh snap. O well. Maybe I will take a bunch of eye pics and pic the one that works the best. lol
👍: 0 ⏩: 1

I find it very helpful to use the paths tool and feather the edges
👍: 0 ⏩: 1

Hmm never thought of that before, can I ask what the paths tool is? I may know it by sight but not by name.
👍: 0 ⏩: 1

ah crap i meant the free select tool,
(the little lasso)
👍: 0 ⏩: 1

but either way your tutorial helped a lot
👍: 0 ⏩: 1

Thank you I'm so glad you think so.
👍: 0 ⏩: 0

Yeah yeah *rolls eyes* 

👍: 0 ⏩: 1

hmmm....the eye ,which I presume to be female, is looking at cars, most likely a parking lot...had to say it : P But It's a usefull tutorial too : D
👍: 0 ⏩: 1

Yes she is lol, it was high resolution and I was lazy enough not to edit it out, and thank you I’m so glad you find it helpful.
👍: 0 ⏩: 1

well....it is a tutorial xD and it is not shit...which makes it usefull : P
👍: 0 ⏩: 1

Very helpful. Cannot wait to try out the technique. There is so much to learn about PhotoShop and most of the alleged "help" topics that come up aren't helpful at all. I truly depend on wonderful tutorials like this to learn
👍: 0 ⏩: 1

I'm so glad it came in use for you, I try to keep all my tutorials as simple as possible. But the best way to learn though is through trial and error.
👍: 0 ⏩: 0

Simple and easy to follow tutorials are always welcome.
But wouldn't it be better to do the dodging on a separate layer so you can control the amount via layer opacity slider.
👍: 0 ⏩: 1

Yes it would have been easier and I should have thought about that. I suppose I was trying to keep it as simple as possible and making a new layer to control the dodge was something that slipped my mind.
I personally would have done it as I do a great number of things I have discovered though trial and error to edit my work. I suppose I was afraid of making it too confusing.
I might go back and put it in as a step later or as a helpful hint.
Thank you for the idea it really would make it easier. 
👍: 0 ⏩: 0

I'm happy to see a non-anime tutorial for Photoshop. If you search "Photoshop tutorial" everything on the firt page of popular is Anime, Anime is exaggerated.
Thanks for your tutorial!
👍: 0 ⏩: 1

I’m so glad you found it. I don’t work with animae personally I don’t like the style.
But I hope this comes in handy for you.
👍: 0 ⏩: 0

Just excellent. I'm saving this for the future...
👍: 0 ⏩: 1


👍: 0 ⏩: 1

YAY! first comment! thanx a lot 4 sharing your knowledge... nice tutorial, useful an brief. :joy:
👍: 0 ⏩: 1

I'm so glad in was useful to you!
👍: 0 ⏩: 0


