HOME | DD
 Geosammy — Gimp Preferences Tutorial
Published: 2012-05-26 09:13:19 +0000 UTC; Views: 2754; Favourites: 24; Downloads: 89
Redirect to original
Description
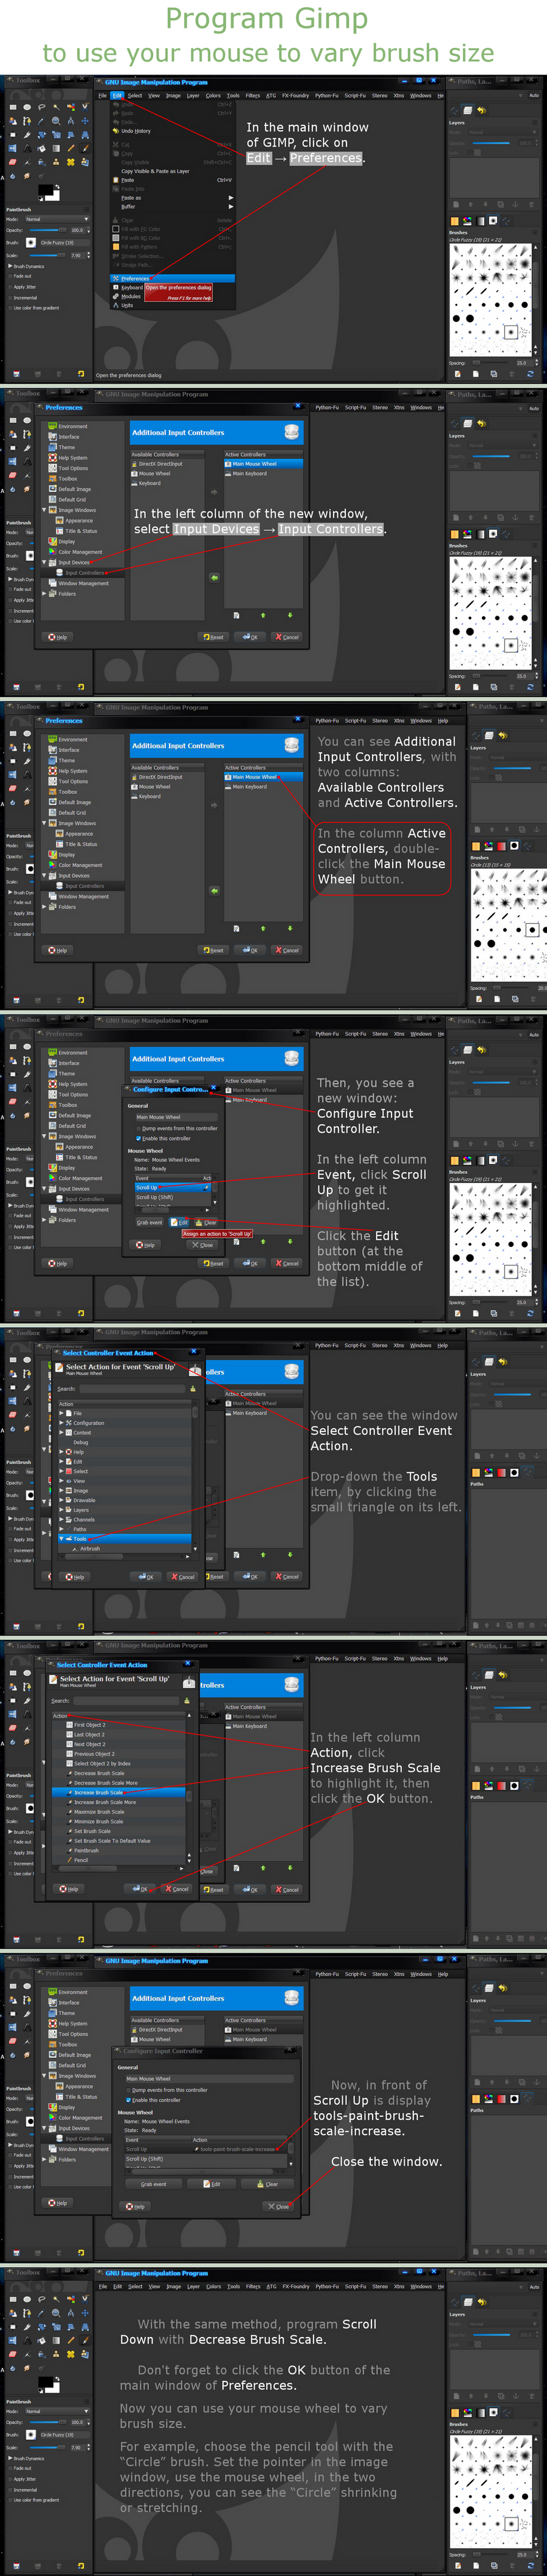
Hopefully this tutorial will show you how to program Gimp, to use your mouse wheel to vary the size of brushes.If anyone is interested in having a tutorial created for a particular subject about Gimp, let me know and I'll do my best to make it happen.
Related content


Comments: 32

how to you make gimp black instead of the standard white
👍: 0 ⏩: 1

It's a theme from the "Gtk2 Theme Selector Package" called "Aurora-Midnight".
👍: 0 ⏩: 1

Oh man! That's one of most handy GIMP tutorials I ever saw! Thanks
")
👍: 0 ⏩: 1
Thanks... I try to see what people might need and then offer it.
This preference change was something I struggled with myself as a Gimp user and thought, if it was good for me... then it should be useful.
It's really a very simple change that can make a big difference in the way Gimp's interface operates, especially for beginners.
Thanks a bunch.
👍: 0 ⏩: 1
I had no idea that I might make shortcuts for almost any GIMP action! You made my work a lot easier and faster!

👍: 0 ⏩: 1
So you noticed, Happy Gimping!
👍: 0 ⏩: 0

Thank you million times for this! This is a treasure for starters like me
 (Smile)")
👍: 0 ⏩: 1
Your welcome and that's right, because it's people like yourself that are new to GIMP for which this tutorial was designed.
Happy Gimping and Happy New Year as well.
 (Wink)")
👍: 0 ⏩: 0


Your welcome and I hope it works for you.
👍: 0 ⏩: 1

Ya. Me 2!! I sounds neat!!
👍: 0 ⏩: 1
If you follow the tutorial, you shouldn't have any difficulty programing your mouse wheel to work as described. If you have any issues feel free to ask me for assistance. I'll be happy to help you out.
👍: 0 ⏩: 1
Thanx. By the way, do you know how to get your cursor to have that glowing effect when you draw. I saw it on YouTube.
👍: 0 ⏩: 1
Your welcome.
I'm not quite sure what your looking for, but you can create a glowing cursor of whatever color you like using Gimp and save it as a... "Microsoft Windows Icon".
Most cursors are about 32x32 or smaller.
Once you've created the cursor in Gimp and saved it as a windows icon. You have to rename the file extension of the cursor image from .ico to .cur
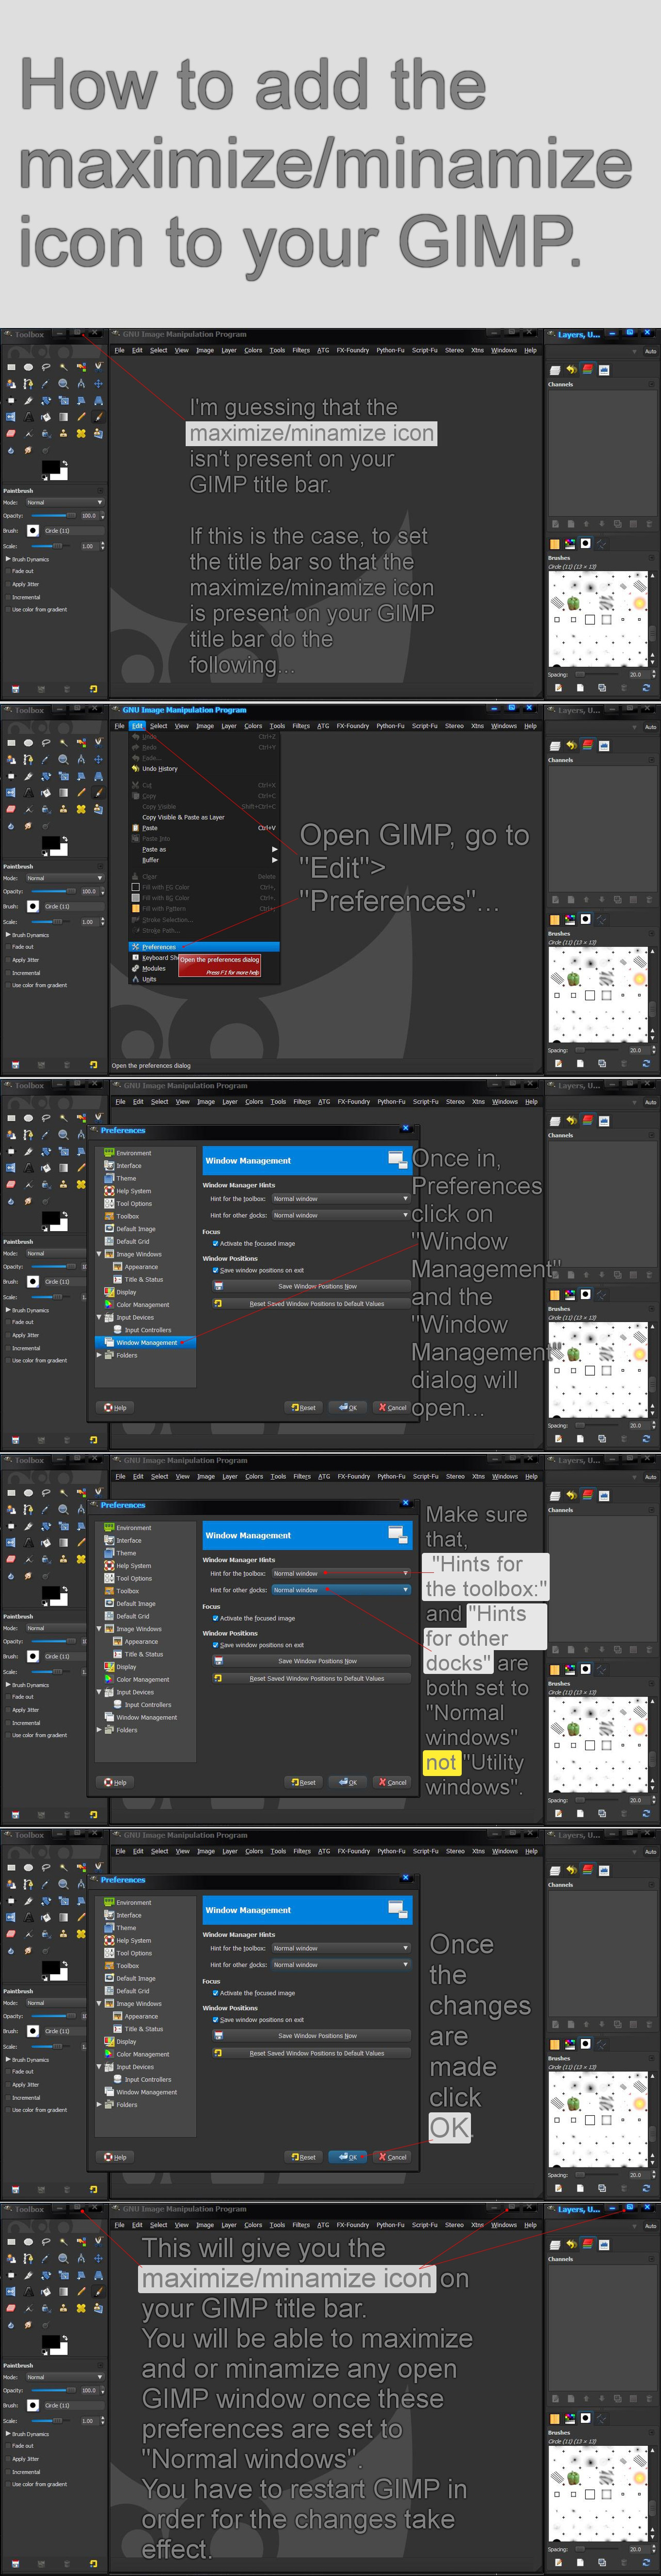
In order to change file extensions you must be able to see them. If you can't normally see any file's extension, then you have to go to your "Folder Options" > "View" and uncheck "Hide extensions for known file types" and click apply.
Now you should be able to see any file's extension on your computer.
Rename the cursor's file extension to .cur and place the file in you Windows Cursor folder.
You can find the Windows Cursors folder in C: >> explore >> windows >> cursor...
Once you've placed the cursor in the right folder you can then use it with gimp or anywhere else on your computer.
You may have a glowing cursor in your Windows Cursor folder already.
You can even download a glowing cursors for free here [link] and install it yourself.
I'm still not sure that this is what your looking for, but it's a start.
👍: 0 ⏩: 0

Nicely done! I already knew this, but, the more tuts out there the better.
👍: 0 ⏩: 1
Thanks the comment and your favor. 
It's a really nice convenience to have, for those that use their mouse exclusively.
👍: 0 ⏩: 1


this is a very handy tutorial and someone could say you could find this information 
Thanks for sharing.

👍: 0 ⏩: 1
The information is there, but isn't very understandable to a "newbe" like yourself. To try to follow what Gimp.org has, can be very frustrating at best for those who are just starting out with Gimp.
That's why I put together this tutorial.
This preference option is very handy and to know how to implement it is important to any possible future Gimpologist.
Thanks for your comment and your favor.
Enjoy and Happy Gimping!
👍: 0 ⏩: 0

Your welcome, it's something I've been aware of for some time and thought I'd show other about it.
This information is also available at Gimp.org, but without pictures of Gimp's interface to showing you where/what things are.
Happy Gimping!
👍: 0 ⏩: 1


I only hope that it's understandable... I'm guessing that you were able to figure it out.
It's very convenient (when using a mouse) to be able to change the size of a brush with the mouse wheel. I use a pen tablet most of the time, but I still also use my mouse.
👍: 0 ⏩: 1

I have been using Gimp for years, so no problem figuring it out on my part. Look forward to testing it out soon. I used to use a tablet some, but since converting to a thumb wheel mouse, I have enough control to not need the tablet for most things. Thanks again, and I'm sure anyone that uses Gimp a lot will appreciate your tutorial.
👍: 0 ⏩: 1
Thanks...
You'll find it most convenient being able to re-size brushes using the mouse wheel. It may take a little getting use to though and you may catch yourself doing it the old way, but it's a really nice Gimp feature that is mostly over-looked.
The information is all out there at Gimp.org. Trying to following "Gimp.org's" instructions on how to do this, could prove frustrating to most newbies.
I tried to make the tutorial more comprehensible, using screen-shots of the Gimp interface for those new to Gimping.
Any seasoned veteran to Gimp should already know this preference modification anyway.
👍: 0 ⏩: 0