HOME | DD
 JoKeR0720 — HDRI Tutorial
Published: 2006-04-26 18:12:37 +0000 UTC; Views: 32114; Favourites: 136; Downloads: 2333
Redirect to original
Description
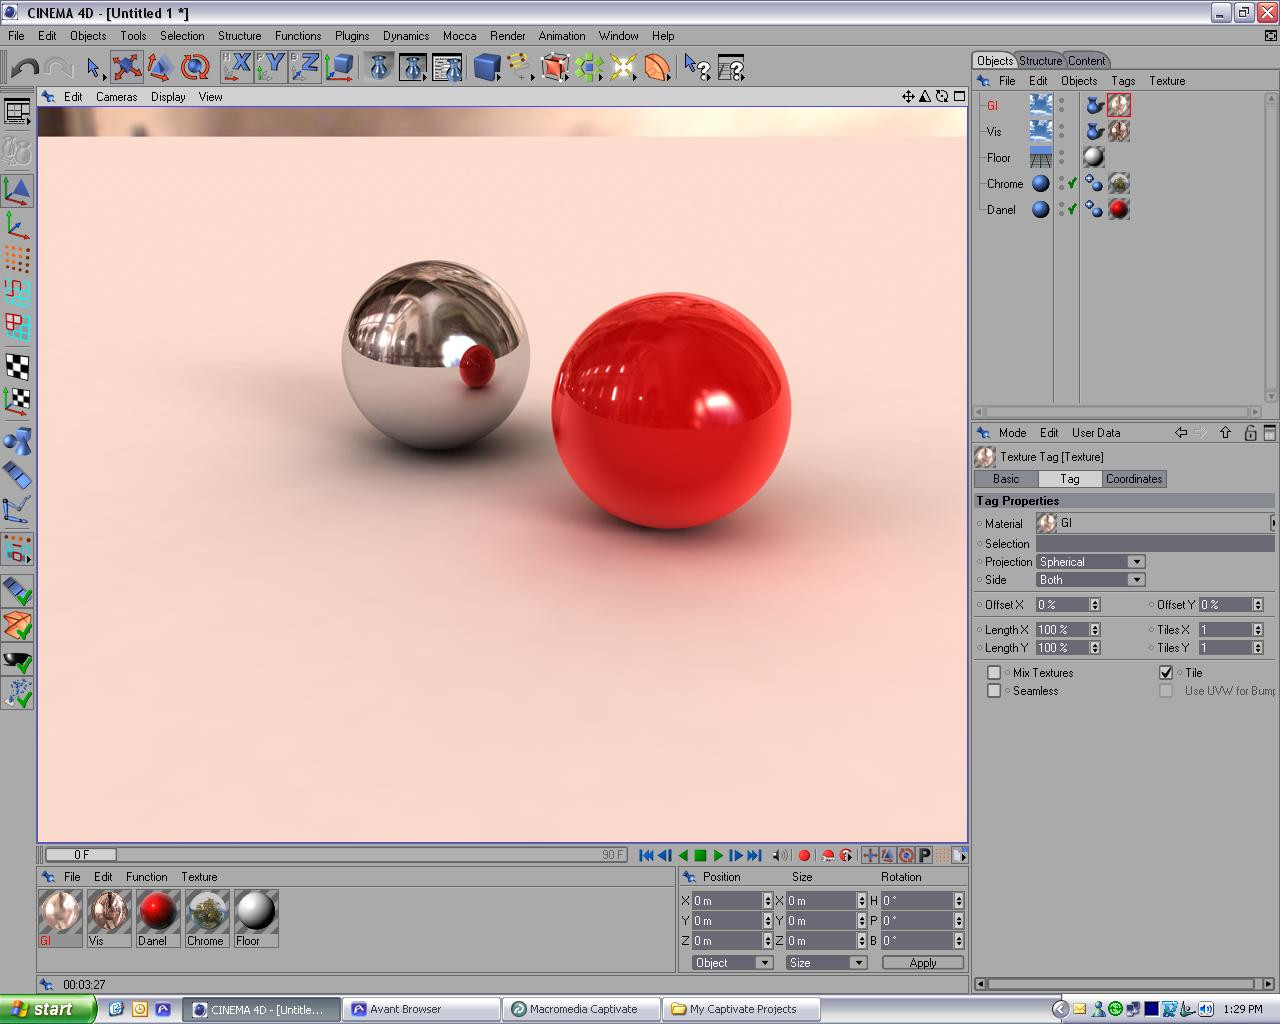
For my little mini guide here, I used Cinema4D v9.521...1: Create a simple floor, and a simple sphere sitting on the floor. (the normal sphere has a radius of 100, so move the sphere to 100m on the 'Y' axis
2: Create TWO sky objects
3: Rename one sky object 'GI' and name the other 'Vis' (this is just for ease of quick reference)
4: Right click the GI sky object, Choose 'Cinema4D Tags/compositing' (Do the same for Vis)
5: Click on the new Compositing tag in the objects window, to the right of GI. Uncheck EVERY box except 'Seen by GI.' So only 'Seen by GI' should be selected under GI
6: Click on the new Compositing tag in the objects window to the right of Vis. Uncheck: Cast Shadows, Recieve shadows, self shadowing, seen by GI. Everything else should stay as default. (If you want the HDRI to be shown in the render leave these settings. If you do not want to see the HDRI when rendered, but only want the reflections, uncheck seen by camera)
7: (This is a side tutorial for making the chrome I use in my renders, you can use a Denel shader instead of making chrome if you wish) Create a new material, and rename it Chrome. Go into the Basic tab in the material editor. Uncheck color and check reflection. You should now have a mirror ball. Click on the reflection tab, then click on the arrow next to Texture. Choose Fresnel. Your ball will now be reflective on the ouside but not the middle. This is backwards, so click on the small image of fresnel (black to white gradient). Pull the left (white) slider to the right about 50%. Then slide the right slider (black) all the way to the left past the white slider and all the way to the left 100% of the way. You can now move the white slider all the way to the right 100% of the way. Our little fresnel image should now be the opposite of what it was before. Click on the material again in the material selection area. Select the Specular tab, Move the width to about 20% give or take, and move the height to 100%. This is a VERY simple version of the chrome I generally make for my images. Bump maps, diffusion, and other things should be added to make it look a little less perfect.****EDIT: I've been told that I should put my full chrome tutorial up... So Look for a better looking Chrome Tutorial to come***
8: Make another new material, name it floor. I generally make the color white and 100% brightness just for the floor.. you can make it what ever you want.... I would say to not play with reflective flooring yet.
9: Make another new material and name it GI. Turn off all the tabs except Luminance (in the basic tab). Go to the Luminance channel and click the three dots to open a file for texture. Here you will navigate to your HDRI and open it. I suggest very high resolution HDRIs for the best images. The ones I generally use are about 6250x3125. Though really high resolution images are not esp needed, they do produce much better renders, and are great when you want to add 'fake' floors and such.
10: Ok, if you are using v9.5 you will probably notice that your image looks awfully white, I dont now why this is, and if you are running 9.0 it probably looks just fine. In the cases it looks too light (like v9.5 most of the time) select a mix mode of subtract, and put the mix strength to 30%. You might want a brighter or darker version of this.. so experiment on what you like. Change both the blur offset and blur scale to 10%. This will make the lighting more realistic and not as 'sharp'
11: Copy the material you just made, and rename it to Vis. Go into the Luminance channel and change the blur offset to 0% and the blur scale to -100% (negative 100%). This will in most cases (like really high resolution images) will make the image sharper and give great reflections. This -100% is not needed, but I tend to use it.
12: Apply the materials to the appropiate objects. Vis goes on Vis, Gi on Gi, and etc.
***Applying the GI-material to GI-object will give the best and most realistic lighting for your HDRI, but im some cases you might want to just put a plan white material on the GI-o, so that the color of the HDRI doesn't change the color of your flooring.. I'll post both results to show you what I mean.
13: Apply another light if you so choose. For sharp Caustics and sharp shadows you might want to add another light. In my [link] deviation I didn't use any extra lighting, but in my [link] deviation I added more lighting to get better caustics. You can easily find a basic tutorial on how to create caustics in C4D on the net.
14: Go into render settings.
15: Under output, set your resolution and film format to what you want. I generally create all my images at 1280x1024.
16: Under save choose where, and what format you want your image to be. I have recently just been using JPEG because they are smaller than BMP and PNG, DA and Internet Explorer are happier using JPEGS.
17: Under Antialiasing, Choose 'Best.' I've never played with the rest of the settings, and truthfully I dont know what they do in Antialiasing. If you know... PLEASE TELL ME.
18: Under Options uncheck AutoLight.
19: Under Global Illumination (Radiocity) I generally do a 'test render' using the default settings. Just to see what it comes up with
Default Settings:
100%
70%
1/1
3
300
3
70
I then move up to a higher setting if I'm happy with my test render... I'll use
100%
80%
1/1
3
350
20
200
Given I'm happy with that, and I dont need to make any further changes, I change to these:
**This is generally good enough, sometimes I have to go higher just to get the quality I want. The larger your image resolution, the higher these settings should be.
100%
80%
1/1
3
350
75
500
***Note: at these render settings, renders on low performance machines will be very long. Also, if you know of any better settings, or just want to help me out by explaining more in detail as to what they are, PLEASE LET ME KNOW. I have merely just tested a bunch of times until I was happy
 (Smile)") So, I'm basically a n00b that comes up with basic images.
So, I'm basically a n00b that comes up with basic images. 20: If you have caustic lighting, turn on caustics.
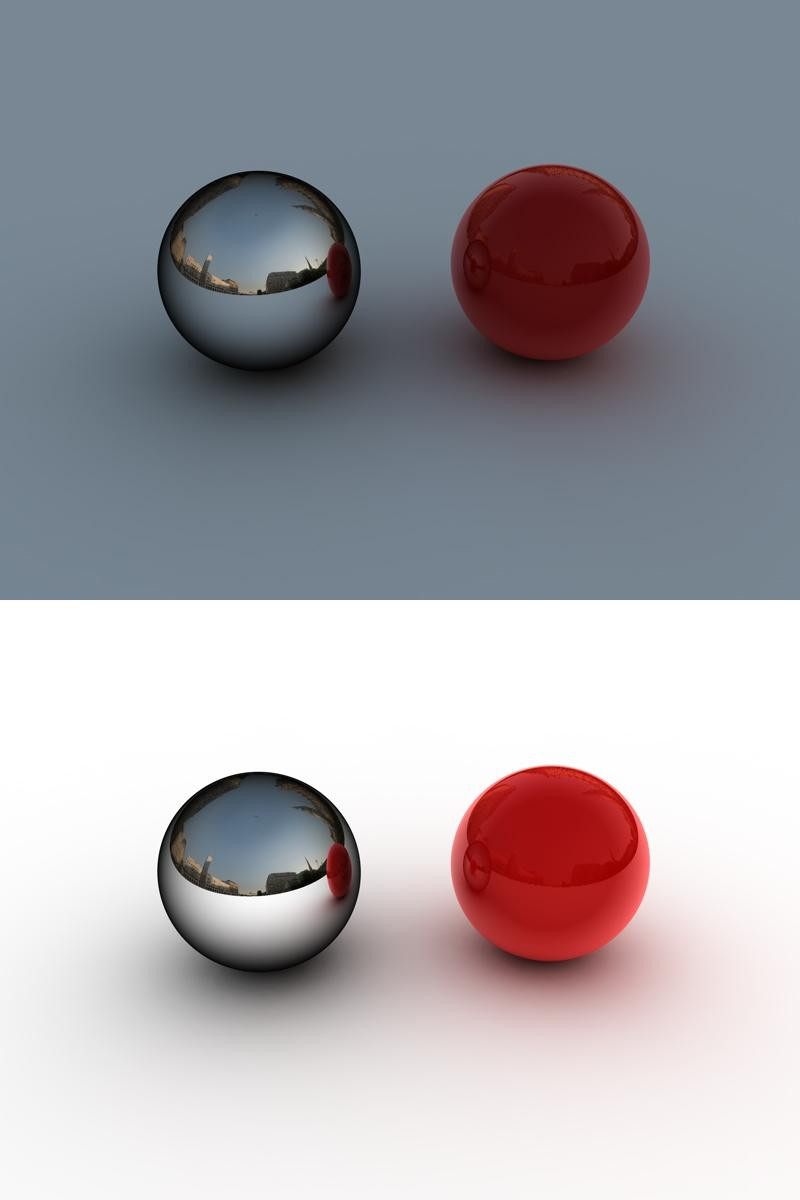
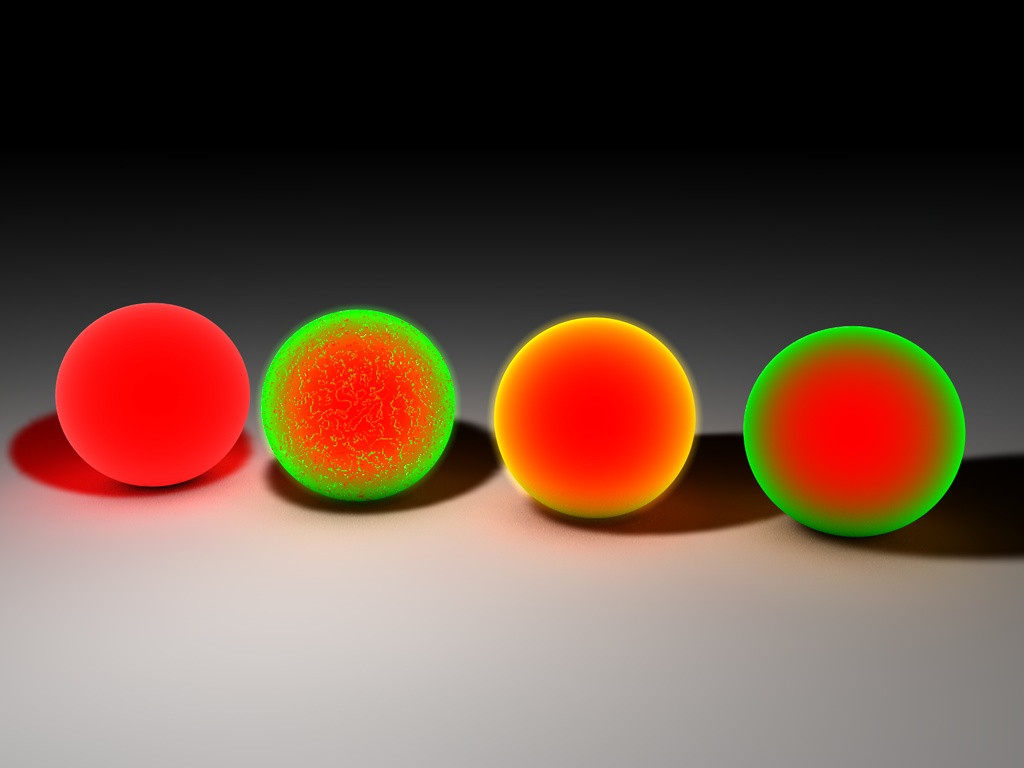
21: Render... It should be exactly how I have here (I've added another ball with the Danel shader just to show you how it came out. My renders are also using the second test render settings I've given you, since there is no need for a SUPER render for this scene):
Top render (with GI-m on GI-o)
Bottom render (with a plan white material on my GI-o)
As I've said many times before... this only took about 30 seconds if that to set up. But the renders take a long time. Also, as I said in my tutorial.. these are MY settings, I have only tested a wide range of things and was happy with what I came out with at the end. If you know of any better settings, or something I have done here that is completely dumb, PLEASE LET ME KNOW!
Please Please Please Comment! If you use this tutorial for a render, please show me... I'd like to see it. A little credit for help would be nice in the description also
Happy rendering!
Related content


Comments: 65

Oh, also, the chrome material on that one ball is a bit off. I wouldn't pay too much attention to the chrome
👍: 0 ⏩: 0
No problem
👍: 0 ⏩: 0

Cool, I'm glad you found it useful! Let me know when you make something using the ideas I portrayed here.
👍: 0 ⏩: 0

Very nice tutorial! Ive only had c4d for 2 days and i have gotten a great result! It will be in my gallery in a few minutes if you want to see it.
👍: 0 ⏩: 1
I'm really glad you enjoyed it... if you go to: [link] you can see a newer, and possibaly better HDRI tutorial. I haven't used C4D in a VERY long time, so I couldn't remember which is better, but I def think it is worth a look. Thank you for your kind comments and the

👍: 0 ⏩: 0
Much much better
👍: 0 ⏩: 0

uuhh ein forget to ask, what should i do to get a white floor?
👍: 0 ⏩: 0
hi, i tried your tut but i don't know, the result isn't good i think
uh: [link]
so, what do you mean?
👍: 0 ⏩: 1
I do not see a floor for your shadows to be caught on... don't pay attention to how to make that chrome either... I have since made a video tutorial... perhaps you will have better luck with it. [link] Try that tutorial and let me know how it works out for you.
👍: 0 ⏩: 0

wow impressive, the shaddow on the metal one might be a bit too dark but the red one is amazing! love it
👍: 0 ⏩: 2
Dunno how I never saw this comment. Thanks
👍: 0 ⏩: 0
yeah, I had a completely wrong idea of chrome when I made this
👍: 0 ⏩: 0

")
Dont know how I never saw this comment, but thanks
👍: 0 ⏩: 0
Thanks, I have video tutorials up too.
👍: 0 ⏩: 0
Cool man, tell me what you think when you're done
👍: 0 ⏩: 1

I cooould figure out some things.
Well white floor. It wasn't bright white. Maybe I'm too stupid I don't know.
Next thing with that chrome.
Well I'll drop you link then I'm going to re do it.
👍: 0 ⏩: 0

looks like a great tutorial.
Ill surely try it sometime.. dunno if my poor pc can handle it though?
👍: 0 ⏩: 1
Thank you. And I hope your PC can live.
👍: 0 ⏩: 0

ahh i see wat u mean with the silver and red, but nah i hadnt seen it. mine was done in 3dsmax as well
")
👍: 0 ⏩: 1

YEAH BUT I DUNNO WHY I CANT GET AN ENTIRELY WHITE FLOOR!
I DID EVERY TUTORIAL AROUND AND JUST DIDNT WORK
👍: 0 ⏩: 1
I know how
This is what you do... for the GI sky object... make the material white.. .that should do it...
👍: 0 ⏩: 1
well it still doesnt work its like grey...the sky is white know but i need the floor freak im gonna cry so frustrating.
👍: 0 ⏩: 2
I was wondering if you ever solved this problem?
👍: 0 ⏩: 1
yes i did time ago... i changed to maya.
👍: 0 ⏩: 0
haha, and you have perfect white sky object, and perfect white floor object? Make sure sky object is 100% luminance and that's it, no color or anything... and make sure the floor is just color white, with no specular or anything... it should work...
👍: 0 ⏩: 1
hahahaha im using maya rite now and it works i got frustrated by it and started asking till i bumped into maya. you should try it its pretty neat, more capable animational speaking, a little more easy to tweak but WAY harder to use
👍: 0 ⏩: 1

great tutorial, i'm noob in cinema4d so it helps me a lot
greetz!
👍: 0 ⏩: 1
Thanks very much ")
👍: 0 ⏩: 0

WOW dude this is very detailed. this should help me quite a bit
👍: 0 ⏩: 1
Well, I hope it helps
👍: 0 ⏩: 1
When i get my cinema 4d i want to try this to be the first thing i do
👍: 0 ⏩: 1

hi i just submitted a picture, after reading you tutorial: [link]
the influence is obviously
however... nice tut
 (Wink)")
👍: 0 ⏩: 1


nice tut joker! ..")
👍: 0 ⏩: 1
hehe, thanks... Don't follow that Chrome part though.. it isn't exactly how I do mine.. but it is in the right path
👍: 0 ⏩: 0


I have no idea why people are bitching this is a great tut, nice work mate.
👍: 0 ⏩: 1
Well Thank you! I just thought I would give a quick little piece of help to new Cinema4D users, or people that might want to get a better render than they have been getting... Ah well... Everyone thinks their ways of doing things are better... But atleast I tried to help
Thanks again!
👍: 0 ⏩: 0

Man, I'm so never using Cinema 4D, seems to complicated to do fake HDRI. Cause yours isn't real HDRI or the shadows would be going in some direction.
But damn, you have to do like 1000 things just to make it work.
👍: 0 ⏩: 2

i honestly couldn't be bothered reading that whole tutorial as i know how to use hdri in c4d. And i'm telling you that it is easy.
1. make a sky,
2. make a material with the hdri loaded in the luminance channel.
3. apply material to sky.
4. Stick and object with a plane in.
5. hit render
Voilia!
👍: 0 ⏩: 0
This isn't faking HDRI... this is HDRI.. But, you can add a light to make more directional shadows.. it also depends on where the light source is in your HDRI.
👍: 0 ⏩: 1
| Next =>