HOME | DD
 joulee — A Digital Coloring Tutorial: 1

Published: 2004-08-11 18:52:54 +0000 UTC; Views: 258123; Favourites: 2083; Downloads: 68360
Redirect to original
Description
Finally, a long-promised tutorial sees the light of day (well, part one at least)~! >D >DThe downloaded zip file contains the main tutorial word document, as well as a large image of the picture during each step. It's pretty detailed and long, but hopefully that should be a good thing....
Anyway, without further adeiu, here is an excerpt... Download the zip to read (and see) the rest!
7/25/05 Edit: Part two now available (clothing, lace): [link]
8/10/05 Edit: Part three now available (how to color hair): [link]
--start excerpt--
The Tools!
Let me preface my tutorial by starting off with my "tools of the trade." I used a laptop with not-too-great processing power (800 MHz) but decent memory (520MB RAM), a Wacom 6x8 in. tablet, and Adobe Photoshop 7.0 and Corel Painter 7.0, although this particular picture was mainly done using Photoshop.
I trade off between the programs because there's certain things that both are good for. However, I consider myself to be a much more adept Photoshop user due mainly to having lots more experience with it (and also laziness in devoting time to completely familiarizing myself and learning all that Painter has to offer... It's a tricky program! >D). That said, the thing I like most about Painter is its better responsiveness to my tablet. At least in my opinion, (and this is the opinion of someone who has a terribly shaky hand and has about a 15% success rate in producing a nice line on paper at any given time), Painter leaves a smoother, more natural stroke. So I typically use Painter to sketch, ink (if I need to--a lot of the time, I stick with seamless CG), and do strand-y hair. >D
Photoshop is solid for most everything else, and it has the advantage of having the Dodge tool and Smudge tool, which I use religiously. (I know Painter can do similar things, but I personally don't like the results as much.) Oh, and it's color tweaking and shape-transforming features are pretty useful too.
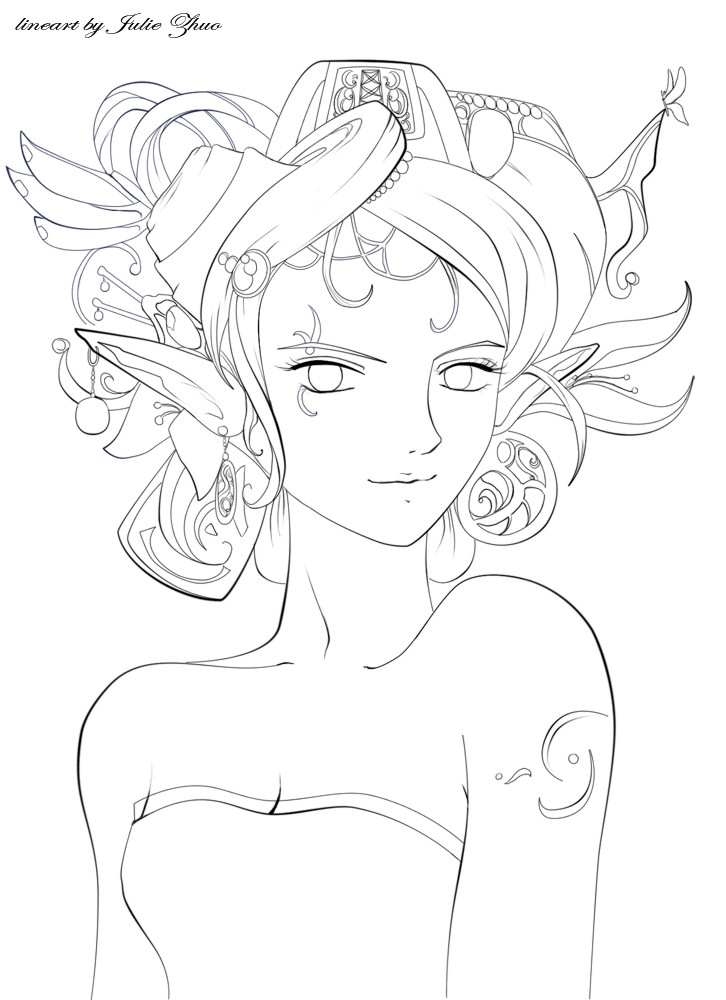
1) So here's how I start--roughly sketching a design in Painter using the pen ink tool. Starting with a blank canvas, I create a new layer just for the ink lines (this layer will always be one of the top-most layers, since we want it to be above everything else). I just mainly concern myself with the details of the face for now (why? Habit, I suppose ^_^), and leave the rest of the body as an amalgamation of messy lines. I want my Dark Chi to look... well, I suppose the "darkest" a persecon can get is emotionless and maybe slightly sad. So I accomplish this by making her Chi-ish eyes stare slightly down and appear like they're looking off into the distance, a non-smiling mouth, and a slightly hunched back. Oh, for reference, the original file is pretty large. Like 1200x1600 or something like that. Whenever I’m referencing particular brush sizes in the future (and I try to avoid doing so for this reason, but I know some got past me), keep in mind that that’s relative to the size of this canvas. If you’re working with a smaller piece, then a “big brush” size for you may vary.
Now comes the next step, probably my least favorite of them all, and that is.... *drumrolls* outlining! Sometimes I do this in Painter if my current sketch is too messy and I need to completely re-ink. If the original sketch isn't too bad or if I'm working on a picture where more detailed inking isn't too necessary (like a seamless CG picture) then I cheat a bit in Photoshop and basically use the eraser to erase everything except the line that I want to keep, and then the smudge tool to smooth out that line.
2) But... This picture will undergo "reinking." I basically open the file (always saved as a .PSD until the very end), click on the sketch layer, and go to Image->Adjustments->Color Balance and play around with the settings until I've made the whole thing a nice, light shade of cyan. Since I'm going to ink over this layer, I want it to remain visible but noticeably separate from my brand-spankin' new and shiny layer. After that's done, I create a new layer above this sketch layer (called “ink”) and return to Painter.
3) Now comes the "nice inking" stage. Basically, it's pretty self-explanatory. Pick a lovely, pointy pen (I like to use smooth ink pen and make the tip pretty small--you can experiment with the lines if you like) and neatly trace over the sketch. Like I mentioned before, I'm not much of an inker and don't really enjoy it, so I try and get away with as little inking as possible. Coloring is more work if you don't ink all the details now, but that's a sacrifice I'm willing to make. For example, even though I know there's plenty of detailed lace I will eventually add to her dress and probably a flower in her hair, I choose to skip inking all that in. Additionally, you can see from the screen shots that the body of the inked Freya looks different from the “sketch.” I determined that the original frame was too small, and promptly made adjustments on my “nice ink” layer. Did I mention my rough sketches aren’t very thought out? The inking, on the other hand, will serve as a platform for the rest of the picture, so I’m more careful with the way things look.
After you're finished, you can delete the old sketch layer and marvel at the cleanliness of the picture now.
") (I actually kept it around for a few more steps, and really turned down the opacity of the layer to 20%)
(I actually kept it around for a few more steps, and really turned down the opacity of the layer to 20%)4) The next step has always been one of my favorites since ancient times--coloring skin! It's by habit that I color skin first--no real substantial reason other than maybe the fact that I like to see the face done as soon as possible (only when the face is done do I feel like I'm really in the "groove" of coloring ^^), and the skin is such a big part of the face. Actually, for this picture, I want to try and experiment on a "different" type of coloring. (I guess I shouldn't be writing tutorials on anything that's not a "tried and true" method, but I don't think this is really *too* drastically different than what I normally do.) Basically, I'm going to attempt what I call "soft-cel," which is sort of a compromise between normal cel-style coloring and soft-style coloring........
--end excerpt--
Related content


Comments: 253

really helpful! cant wait to try'em out.
👍: 0 ⏩: 0

Wow, the pic is so pretty and the tutorial is really helpful! Keep up the good work.
👍: 0 ⏩: 0

it really help thaaaaaaaaaaaaank a lotttttttttttt
👍: 0 ⏩: 0


holy crap... i wish i could sketch and color half as well as you do.. haha
gaiaonline.com... ftw!
👍: 0 ⏩: 0

Ah! S'all confusing! O_O' I love your picture though (saw it on Gaia first). I'm interested in how you coloured it, because mine always come out really flat and boring. ¬_¬ And I don't have Photoshop either, which is a bit of a bummer.
👍: 0 ⏩: 1

thank you! ^_^ You should invest in OpenCanvas maybe.. or even oekaki! >D Or Gimp... that's a free program. I hear it's pretty good.
👍: 0 ⏩: 1
Yeah...I do have paint programs, but I've always wanted Photoshop. ^^ I have procreate painter classic and photostudio 5. *sigh* Ah well, I'll get there eventually. ^^
👍: 0 ⏩: 1
painter classic is pretty cool.... don't despair! You'll get there eventually!
👍: 0 ⏩: 1
Lol thanks. ^^ Hee, I need to improve with my digital art. I'm not very good. ^^
👍: 0 ⏩: 0

I have a little question about tablet coulouring: do you use the pen pressure to shade or do you make individual layers with different tones? 
👍: 0 ⏩: 1
I use pen pressure to shade, and layers when I'm working with different colors ^_^
👍: 0 ⏩: 0

cool, the prequel to that last tutorial. Sweet! This should help for a different coloring style.
👍: 0 ⏩: 1
new coloring style = fun! ^_^ Hope it helps you!
👍: 0 ⏩: 1
heheheh, it sure wil! thanks!
👍: 0 ⏩: 0

This is very useful!! ^^ And a lovely picture! xD
👍: 0 ⏩: 1

I was wondering, before I try this tutorial, would it come out the same way if I used a tablet?
👍: 0 ⏩: 1
Oh, I totally use a tablet, so yes. It should be more similar to what I did.
👍: 0 ⏩: 1
Really!! Whew that's a relief, by the way what size tablet do you use because I'm not sure which size I would want.
👍: 0 ⏩: 1
I use 6x8. I find it works very well for me. ^___^
👍: 0 ⏩: 0


wow... thanks for the tutorial!
👍: 0 ⏩: 1
you're welcome! I hope it helps! ^^
👍: 0 ⏩: 0

THis isn't anything like what I expected. I need to get photoshop. Keep making more tutorials! And great pieces of art!

👍: 0 ⏩: 0

Cool tutorial! Good job!!!
U should also write a tutorial how to actually draw those characters ^_^
👍: 0 ⏩: 0

Omfg. That's how you do it.
* downloads and sneaks off to Photoshop *
")

👍: 0 ⏩: 1

excuse me? would u still happen to have that file? the download thing doesnt work anymore and i dont know if joulee gets on anymore. Please help if you can^^
👍: 0 ⏩: 0

Very helpful for newbies like me.
Thanks for sharing
👍: 0 ⏩: 0

Wow! I allways wanted to try digital art  (Smile)")
👍: 0 ⏩: 0

Hi, I've been trying to follow your steps in detail, just regarding step 12 to brighten the eyes, I followed your instructions using dodge tool at 50% exposure set to highlights. I just opened up your step 11 picture and applied the dodge tool. But mine ended up being reddish, then pink, then white. How did you get your eyes to take on that faint orangy coloured glow?
Sorry! I'm completely new to this stuff, so if it's a stoopid question hehe sorry
")
👍: 0 ⏩: 1
Try choosing a more orangish from the orange side of the spectrum, and not from the magenta side. That may make a difference.
👍: 0 ⏩: 0

OMG I LOVE YOU. THIS IS SO GREAT YOU ARE WONDERFUL AND LOVELY AND BRILLIANT AND
(omitted for excessively disgusting admiration)
anyway
will you marry me?
👍: 0 ⏩: 0

Thank you so much for this awesome tutorial!! This is one of the few that I actually undertsand all the steps. Please make part 2 so I can learn more!!!
👍: 0 ⏩: 1
Glad you liked it! ^_____^ I hope to make part two soon, but.... it might be a while since I'm back in school
👍: 0 ⏩: 0

I downloaded this tutorial, and by the time I want to unzip it it says "they're not files to unzip"
Is this tutorial still working?
👍: 0 ⏩: 0

This is THE best anime CG tutorial I have seen - Ever!!! Thanks a bil for taking the time to lead me (and others) through these steps. You're amazingly talented!!
👍: 0 ⏩: 0

I do like to read on other people's techniques... So, thanks for that, Joulee!
👍: 0 ⏩: 0


I like it ^_^ You're good at drawing ^^
👍: 0 ⏩: 0


wooow.... THANKU!! MUCHOS GRACIAS!!... *skips away with her newfound knowledge*
👍: 0 ⏩: 0

AWESOME. Thank you for posting this!

👍: 0 ⏩: 0

wow Thats really good!!! You should put together your own little guide how to color something as good as that!!!Id lto see it
👍: 0 ⏩: 0

*le gasp* Thank you! ^______^ I've only just started using Photoshop to color... this will help me a lot! 
👍: 0 ⏩: 0

;o; thank you so much i've been asknig so many people and never got a proper answer til now XD (on why the hell you have to color outside the lines <_< (Wink)")
👍: 0 ⏩: 2
Normal--but the outline layer should still be above this layer
Glad you find it helpful!
👍: 0 ⏩: 1

Do you still have the file? When I try to download it it says file not found. I really want to try this out.
")
👍: 0 ⏩: 0
<= Prev | | Next =>