HOME | DD
 LaughingScarab — Elytron Tutorial

Published: 2008-11-06 22:26:30 +0000 UTC; Views: 8133; Favourites: 88; Downloads: 0
Redirect to original
Description
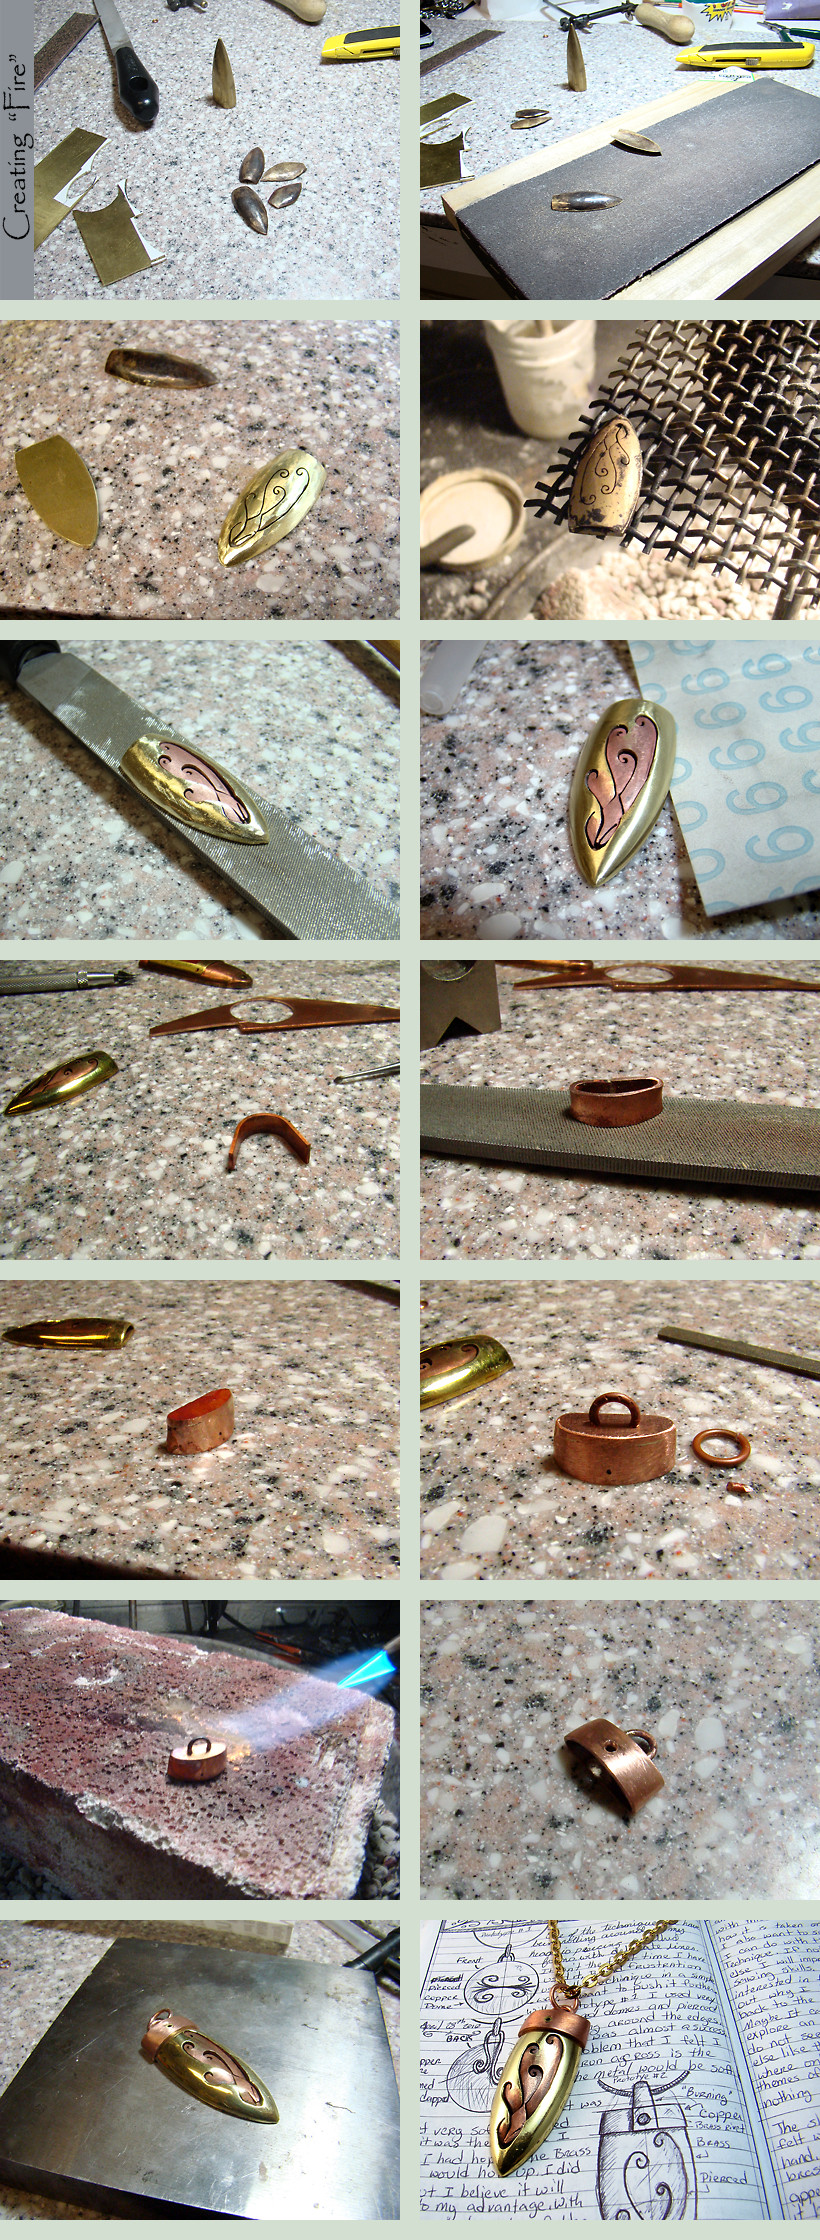
I said I'd do it and I did (2 months after the fact): a tutorial made for Elytron 5.Tools: Jeweler’s saw, needle files, small torch, charcoal block, various pliers, trivet, flex shaft machine, drill bits, polishing wheels, fine paintbrush
Materials: a sheet of 24 gauge copper; washed enamel powders in black, opaque blue, and transparent blue; silver dust, hard solder.
1. The design to be made is drawn onto the first layer of metal. Each cell is then pierced by a drill bit. In this picture I have already sawn out the top center cell.
2. Using the jeweler’s saw, pierce out the cells. This is done before cutting out the overall shape, as piercing is much easier with extra surrounding material to hold onto.
3. Once you have removed the cells, cut out the shape of the piece, and trace it onto the metal once more. Make any alterations that you might want to see on the backing (here I have added a tab to connect to the bail) and then cut that out as well.
4. Stack the two parts on top of one another and solder them together. The heat from the torch will anneal the piece for step 5.
5. Using a combination of pliers and, if you have mutant thumbs like me, your hands, form the piece into a sort of long half-domed shape, like a beetle’s wing cover.
6. First with files, and then with rubber polishing wheels, shape and smooth the surface. The piece should have almost a full polish before you apply the enamel; that way there is less polishing to do later and thus no chance of scratching or discoloring the enamel.
7. I start with a base coat of black enamel. My enamels are kept saturated with water so that they are paste-like in consistency. To fill the cells, apply little blobs with a brush, then add a bit more water so that the enamel spreads into all the corners of each cell. Place the piece on the trivet and let air-dry before applying the torch. Heating wet enamel makes it spurt all over the place.
8. Heat gently and evenly from underneath until the enamel melts down. Let the piece air-cool.
9. Repeat steps 7 and 8, adding opaque blue enamel to the top of each cell, then add silver dust to the bottoms of each cell. Heat as above except, of course, the silver will not melt; it will fuse into the enamel below it. Once the silver has been fused on and the piece has cooled, brush off any excess silver dust.
10. Add layers of transparent blue over the whole cells until the color is nice and strong.
11. Remove any stray bits of enamel on the outer surface, and polish the piece.
12. Add a simple copper bail and you’re done! I made this one by cutting a diamond-shape out of sheet copper, folding it over, and drilling a hole through it.
Related content


Comments: 26

I'm taking a silver smithing class where I also get to mess around with copper and brass, I'll have to try doing something like this once i finish with my current project.
👍: 0 ⏩: 0

very useful! Thank you! Some day... if I think now that my grandfather was a jeweller and when he died I was too young to realize that I should have asked for his workshop materials and tools to be kept for me, I feel like crying

👍: 0 ⏩: 0

Hay didn't that saw (electronic am I correct) dosent it like throw your metal around?
, you make it look so easy.
👍: 0 ⏩: 1

It's a hand saw, similar in structure to a coping saw but with a very thin blade for fine work.
👍: 0 ⏩: 1
wow, you must have a steady had to be making work like you do, I struggle when cutting foil like metals, I always slip or rip them..
👍: 0 ⏩: 0

Hello!
I am asking your permission to list this tutorial in the upcoming issue of #DEVIANCE-ZINE
You would be credited fully, and possible an example of your work featuring this technique would be included as well.
I hope you reply by Dec 10th.
In either case, thank you for your time!
-MimB
 (Smile)")
👍: 0 ⏩: 1
I can't think of any reason why not. Go ahead.
👍: 0 ⏩: 1
Hey!
I realize this is a rather belated notice, but the Issue of the Zine with the link to your Tutorial included has been submitted to dA, in case you were interested: [link]
Thank you again so much for giving us permission to use it!
-mimB
👍: 0 ⏩: 0

Wow, you make this look so easy to do! I wish I had the tools to do this...maybe one day. ")
👍: 0 ⏩: 0

...You and Paul Hudson are conspiring together to keep me at SCAD. All this scientific illustration stuff is starting, and now you're making me really want to take some metals classes. I'm never gonna get out of here!
👍: 0 ⏩: 1
This is what you get for being curious about everything. At least you get to go for free!
👍: 0 ⏩: 0

excelent tutorial! (and piece) If I'd only know were to find that enamel... u_u xD
👍: 0 ⏩: 1
Thanks! Also you can find the enamels themselves at [link]
👍: 0 ⏩: 1
")

cool. always interesting to see the creation process
👍: 0 ⏩: 1


I will probably never ever be able to do this, but I really enjoyed seeing the transformation! Awesome!
👍: 0 ⏩: 1

This is great!!
I shall dream until the day I can make some simple metalsmithing jewelry..... 


👍: 0 ⏩: 1
You're welcome! Also looking at your work you'll be capable of much more than "simple" when you set your hand to smithery.
👍: 0 ⏩: 1
I am definitely looking forward to be able to play with some flames... heh..
👍: 0 ⏩: 0

i have done this..........but mine never turned out so beautiful....
👍: 0 ⏩: 1
Thanks! It's the silver dust that really makes it.
👍: 0 ⏩: 1
