HOME | DD
 malpup — Easy lineart coloring tutorial
Published: 2009-04-23 18:24:18 +0000 UTC; Views: 48448; Favourites: 556; Downloads: 1428
Redirect to original
Description
ANOTHER EDIT!You guys, I am so glad that everyone likes this so much, but really it is an awful messy method and I've learned a lot since making it! It's actually wildly embarrassing (holy typos) but I'm leaving it up in case anyone can be helped by it. I've stopped answering questions for now!
 (Smile)") (9/16/2012)
(9/16/2012)EDIT:::
Changed the name. This is a SIMPLE, LINEART COLORING TUTORIAL. Not just a GIMP coloring tutorial.
AAAH! My First tutorial.
I've been sitting here for about 2 hours writing down all this as I colored the picture.

So... I hope it's thorough enough! Anything you think I should add, let me know. I'll do it.
Markings:
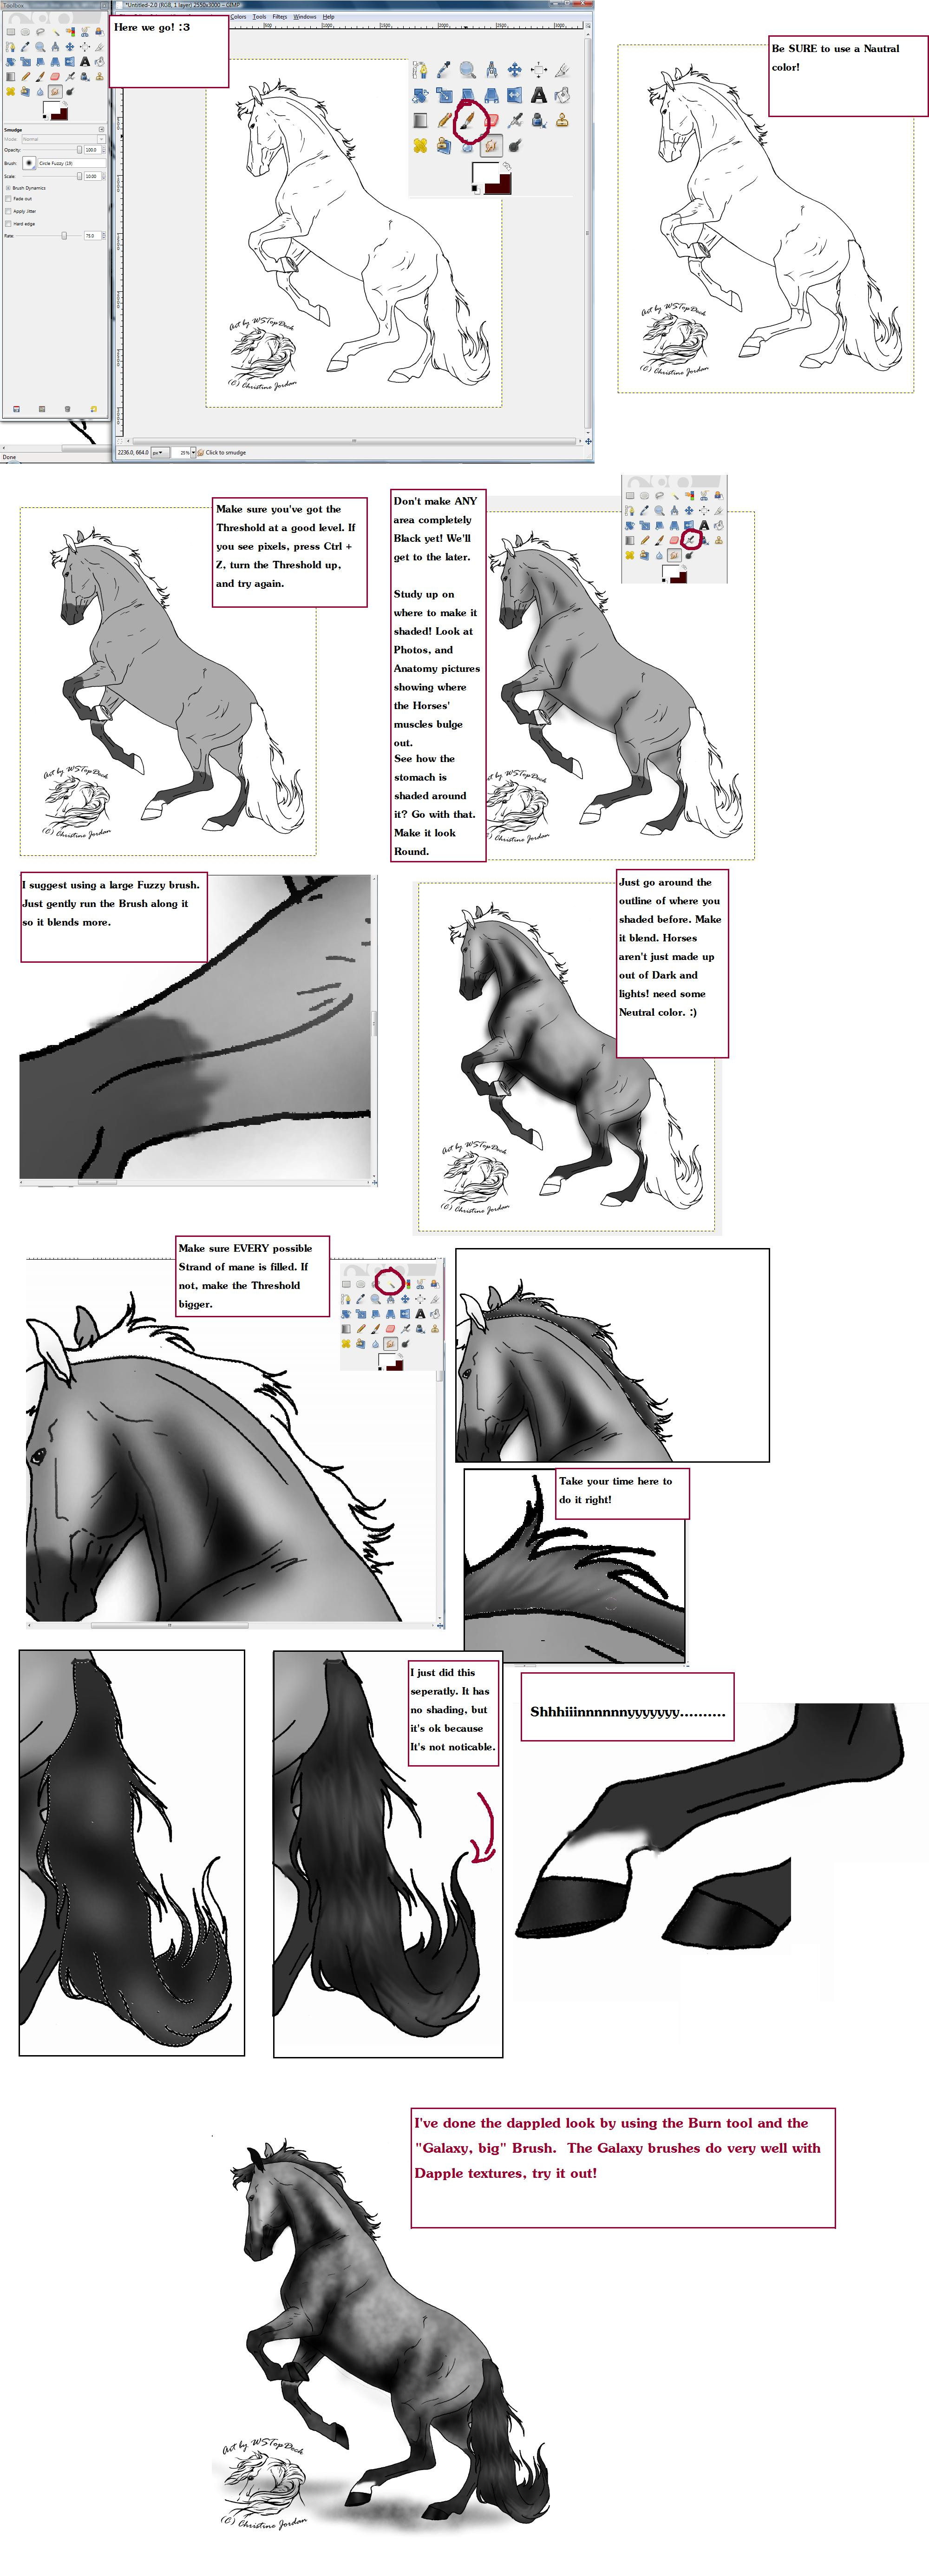
Take the brush tool on "Circle" and set is to a neutral color of what you want the markings to be. Then simply make the markings. Be sure they touch both ends, so that when you fill it it won't leak out. After that, Fill in the Horse (NOT the mane and Tail or Hooves) with a slightly LIGHTER color than you want the places to be!
Shading:
Select the "Airbrush" tool and Make the FG Color Black.
Set the Rate to about 17.3 and the Pressure to about 4.3 for best results. Make the brush the largest "Circle fuzzy".
Next, look where I have taken the black and lightly brushed it on. Do some studying on where Horses are shaded.
TIP: What I like to do is think of a place for the light to be coming from, and make Two yellow beams coming from it and down onto the Horse. Then I try to focus on exactly where the Lgiht would hit, and pass over.
 (Wink)")
Darken where you have shaded by going over it again with the Airbrush tool. After you've done that, put the pressure down to about 2 and go over the outline of where you've shaded to make it blend more.
Highlighting:
Take the Circle Fuzzy brush once again,b ut set the FG color to white or very light Grey. Set the pressure of the Airbrush at about 4.7.
Quickly, in small circles, run over the Point of Hip, Withers and the top part of the neck. Next, get the cheek bone, Round part of the stomach, and down the Bulging parts of the legs until they're generously Highlighted to your liking.
Blend:
Blend the Markings in gently with the "Smudge tool". Do this by Zooming in and going up and down a little bit to make it look less "Bold".
Darken again:
Take the Airbrush tool once again and Do the the very DARKEST parts of where you shaded, and make them almost Black. (As it would be this was for a Photo).
After this, Use the "Burn" tool, select the largest Circle brush, and go over the whole Picture. This is why you were to make the Colors a little Lighter than you wanted them to be. I'm not sure why, but I think Darkening it afterwords makes it look much better.
Clean it up:
Take the Fill Tool and Set the color to white, and the Threshold to 122.2. Then simply click a white spot outside the Horse.
Mane & Tail:
Click the "Fuzzy Select tool" (It looks like a Magic want) and set the Threshold to15.0. Then, click the Mane. Marching Ants should be going around the inside. If they escaped, set the Threshold a little lower and try again.
With the Marching ants around it, the Mane will be the ONLY thing that the tools will effect until you select off of it. This is good.
Take the Fill tool and Fill in the mane whatever color you want it to be.
Shading the Mane:
Take the Airbrush tool and set it to white with a Low Pressure Dial. After this, make the Circle Fuzzy brush whatever size necessary and go over the top part of the mane.
After that, set the FG color to Black and go over the under part of the mane (If there is one). Note: If the Mane is laying flat, there probably isn't a dark spot.
Now to make the mane Not look like a Rubber flap. XD
Take the smudge tool and set the size to very small. Small enough to be one Strand of the hair. You're going to want the Rate to be about 75.0 here.
Now, Zoomed in on the mane, and in small strokes, smudge the mane going outward. This will smudge the Dark and light places, and give the illusion that the hair is there.
Now repeat the same thing with the Forelock.
The Tail:
Now for the Tail, it's the same type of thing but a Bit different. Listen closely.
Select the Tail with the Fuzzy select tool and fill it in the color you want it to be, just as you did the mane. Note: You may need to set the Threshold Higher, considering the Tail has longer strides of hair.
Take some time to Study the Tail. Where is it coming out, and going in? If it is Straight, only the end of the bone should be shined really, and the rest only blunt.
If the Horse is in Action (Running, rearing, bucking, ect) There is a good chance the Tail has many ups and downs.
Have you studied where it would be lit and shaded? Good.
Now take the Airbrush tool first on black and do the Shaded parts only lightly. Here, the brush should be large and the pressure should be about 3.4. Now, with the same size brush and a lower Pressue, do the highlights.
Now, take the Smudge tool and set the brush to be a little larger than you'd expect the strand of hair to be.
There are a lot of different ways to do this, the particular way I did it was I took the smudge and continuously zig-zagged up and down until it appeared to look like hair. You can do this any way you want, experiment.
Hooves:
Once done the mane, go back to the Fuzzy Select tool. Put the Threshold to about 95.0 and select one of the hooves, then zoom in on it. Fill it in whatever color you want it to be. Now, on a very low Pressure setting, lightly highlight the front of the Hoof. There is no Blending, or Black Airbrushing needed.
Proceed to do this to all of the Hooves. But be sure to use Up and down strokes, not side to side.
Extra:
Do all the Extra things. Clean up around the Horse, color the eyes, fill in the ears, accessories for the Horse, or even add more highlighting to it if you want. You're done!
A big Thank you to the Lovely WSTopDeck for the Lineart! I quite enjoyed coloring it!

You can find that Lineart HERE: wstopdeck.deviantart.com/art/R…
And this is pretty much dedicated to Green-lock and Faharale . I have tried Teaching those two how to do it soo many times, and it was just too hard! So, I hope you guys like it at least.
Lineart (c) to :devwtstopdeck:
Tutorial (c) to me, malpup
If you use this to color a picture, please let me know!
Related content


Comments: 149

ok i see it... wow i feel dumb lol
👍: 0 ⏩: 1

Nice. But you need to say hoe big you make the brush.
👍: 0 ⏩: 1

omg thanks so much. i was havins some difficulty since i havent used gimp in SO LONG. but you pretty much saved me !
👍: 0 ⏩: 0


(personally) I didn't find this helpful. I like step to step things better, such as video tutorials on youtube.com.
👍: 0 ⏩: 1

No harm! To be honest, I probably wouldn't find it helpful either. I was pretty lazy making this, left out a lot of stuff and there are plenty of typos.
👍: 0 ⏩: 0

Sorry about that! I don't think I can explain it any better, though.
👍: 0 ⏩: 0

what galaxy brush did you use i have tried to fine one but they never work so what one did you use
👍: 0 ⏩: 1

Thanks this was extremely helpful! Now my creations are looking like you know... horses ")
👍: 0 ⏩: 0

This sooo hard!How do you even color without erasing the lines? D:
👍: 0 ⏩: 1
You'll get used to it in time. If this wasn't helpful, you ought to look at some other GIMP tuts! There's a hundred different ways to do things. This is just one.
👍: 0 ⏩: 0


I got messed up at the fuzzy tool part, I clicked inside the lineart so it selected it but I didn't understand how to delete it, nothing seemed to work :/
👍: 0 ⏩: 0
I'm having trouble to have it so I simply have the lines on top and I'm not colouring over them. I scrolled through some of the other comments and saw you had explained it and I tried to do it but it didn't seem to work for me and I really would like to know how.
👍: 0 ⏩: 0

i totally needed help with shading and digital fur/hair this helps a lot!
👍: 0 ⏩: 1
")
I'll try and tell you when I get the hang of it.
👍: 0 ⏩: 1


👍: 0 ⏩: 1

Awesome! I just started gimp and its very confusing! This will help alot I think, thanks for taking the time to make it! Real quick, how you you get the lineart to be your background? Thanks a bunch!
👍: 0 ⏩: 1
No problem!
Ah, what do you mean? Desktop background? Or background on the program?
👍: 0 ⏩: 1
On the program, but I found it now, thanks
👍: 0 ⏩: 0

Thank you so much for this! I've always been frustrated and confused about the white spots that appeared when I used Fill on GIMP. I had no idea about Threshold until I read this and tried it out.
Thanks again! <3
👍: 0 ⏩: 1
You're welcome! Glad I could be of assistance.
👍: 0 ⏩: 0

Ok, this is going to sound very stupid... but I've never colored lineart with gimp, so I have a question... how do I color over the original lineart without the lines dissapearing?
👍: 0 ⏩: 1
You would want to click on the layer tab, rollover "Transparency" and click "Add Alpha channel" on the layer with the lines on it.. Then create a new layer, transparent, and put it below the lines layer.
Then go to the lines layer and remove the all the white using the Fuzzy select tool. Just put the Threshold at about 15.0, then click on the white that's inside the lines.. Then delete it.
Pretty soon, after doing that to all the white on the layer.. You should have just the lines. And you can put in the color on the second layer, that should be below the lines layer.
Wow, that was probably really confusing. xD
👍: 0 ⏩: 0


Wow, this was VERY helpful! I used it to color a horse digitally for the first time, and for such a simple technique, the results are incredible! Thank you for posting this!
👍: 0 ⏩: 1
Thank you so much for the lovely comment, and for using my tutorial! I'm very glad that you enjoyed it. God bless.
👍: 0 ⏩: 0


This is such an easy tutorial to follow. Most have 500 things to do, and this one is quite simple, but the outcome is amazing. I used it on my first coat, and couldn't believe the outcome! Thanks!

👍: 0 ⏩: 1
Thank you for your very kind comment. I'm glad I could help!
👍: 0 ⏩: 0

this is awesome!! (: i used it to color a horse!! thanks for posting this!!
👍: 0 ⏩: 1

Nice Tut...do you think this works with ps too?
👍: 0 ⏩: 1
Thanks.
I'm not actually entirely sure.. I've never had any kind of photoshop. 
👍: 0 ⏩: 1
I think so too...i tell you, when i try it out
👍: 0 ⏩: 1

VERY NICE!
I'm gunna try it out myself now!
👍: 0 ⏩: 1
| Next =>