HOME | DD
 Michos9 — Lazyass Personality Core Tut.
Published: 2011-06-26 00:36:19 +0000 UTC; Views: 4764; Favourites: 90; Downloads: 66
Redirect to original
Description
OH MY GOD I MADE IT YESTERDAY AND I DON'T UNDERSTAND IT MYSELF.But seriously, OHMYGOD, WHAT THE HELL IS THAT?!
Eh-heh. Anyway, I hope most of you read the description/comments BEFORE you start making anything.
Most of the pictures need explanation, but once you undersand whatthef-ckareyoureading, everything should be easy. Maybe.
I am probably going to make a lot of spelling and grammar mistakes in this tutorial, so please point them to me, so i can make corrections. If your english is very good or very bad, this 'tutorial' is going to be a torture for you.
YOU NEED:
- At leat three white table tennis balls
- White and black permanent marker
- Table tennis ball or permanent marker in colour of Peronality Core's eye (for Space/Factual i recommend yellow/pink tennis ball)
- Two 5cm pieces of wire or two paper clips
- Glue and brush/stick
- Tiny scissors
- Pair of compasses (this is really english name for a tool to draw circles ; o?)
- Pen
- Long needle
- Pliers/Wire cutters
- Small piece of sandpaper
- Black tape (optional)
EXPLANATION:
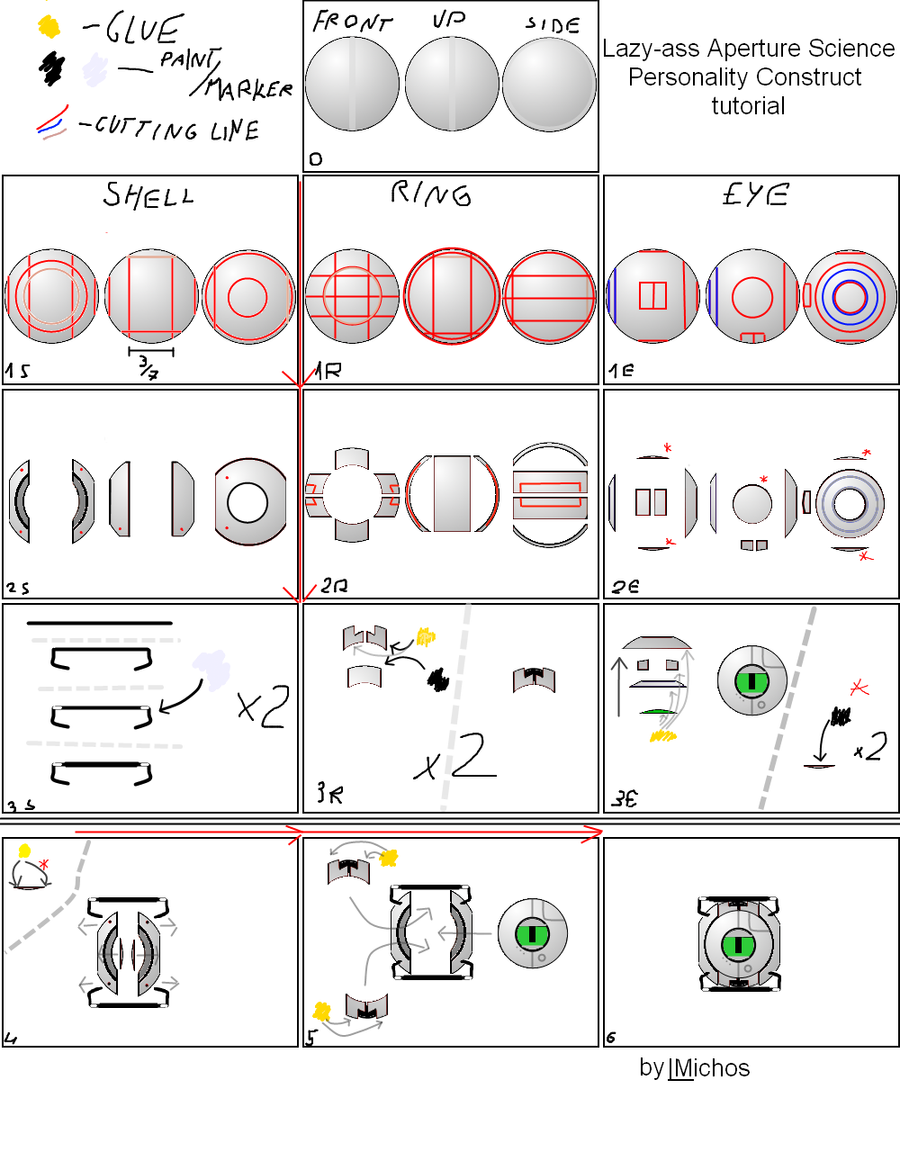
First 7 pics are NOT showing three balls, but rather ONE ball in three different shots: UP, FRONT and SIDE.
This may be hard to get at first, but after you compare pics 1X to 2X, you should get the idea.
PIC 0
Most of pingpong balls have thinner line inside. You should avoid cutting trough it, because if you are not skilled, edge will probably be rugged. You can easly find it, as most of TTballs are slightly translucent. You should relate to this line while drawing cutting lines.
PIC
There is no pic showing how to make colored iris, because it's the part that cannot be simply explained, and might be the most difficult part of whole model. There are a few ways of making iris, and i personally reccomend getting coloured pingpong ball, painting it all black, and using needle/wire to scratch out the pattern.
PICS 1X
Those pictures represent how you should draw the cutting lines, using pen and compasses. Lines on the other side of the ball are also visible, so i don't have to include 6 shots per picture. In 1S and 1R you have to make parallel circle, with centers precisely on the opposite sides of a ball. I reccomend using long needle to find those opposite spots.
PIC 1S:
In SHELL column you are making...the shell. The outmost piece of personality core, one that is static and does not move (in game. In your model nothing will move, don't get your hopes up).
This is the only pic where I put exact size of some part, because THAT IS WHAT I GOT WRONG IN ALL MY PREVIOUS MODELS. Some of the cores' pictures on 1st page of google images are showing them having very tiny 'ring' between shell pieces, while ingame it's really big, almost half of whole core's width.
Shell has two small holes on sides, one big frontal hole (eye) and one smaller hole on back (helpful when you are gluing everything together. If you have some more wire, you can make inner details, bu i never bothered with it)
PIC 2S
When you're done with cutting out shell pieces, you only need to use needle to make small holes for handles. Talking about handles...
PIC 3S
You are going to make handles out of paperclips/ wire and tape.
If your paperclips have this...rubbery-thing on them, you should remove MOST of it, but leave a piece on the middle. Paint it black, and voila, you don't have to waste your time sticking tape to it. If you are using wire/'naked' paperclips, well...stick tape to it. You just need thinner line on the handle.
After making said thinning (is this even a word?), you should shape handles using of pliers/wire cutters and paint little white spots on it.
PIC 1R
Now, when we're finally done with outer shell it's all gona be a lot easier. No. I'm lying. It's not gonna be easier, it's gonna be terrible. Run.
Mh, anyway, back to the tutorial, now we're making 'ring' part, that...is not actually a ring. It's two rectangles, that...are not actually rectangles, but...Whatever. You are going to draw 7 circles, cut out 6 pieces. I f-ucked it up on the picture, as HOLES ON THE FRONT AND ON THE BACK SHOULD BE MUCH BIGGER. You should now put the widest piece inside the shell, and see if both the front and back holes are round. If they are not, correct pieces of the 'ring'. After that you're going to-
PIC 2R
-cut out rectangular-but-not-really-rectangular holes, and -
PIC 3R
-paint the biggest two pieces black. Than glue the smaller pieces on top with TINY GAP BETWEEN THEM, and A LITTLE TO THE FRONT, so the eye can be placed under the surface pieces, and on the same level as deeper pieces. Or just f-ck all this ,save yourself long time correcting and lose just a tiny detail. Nobody is going to notice.
PIC 1E
So, this is probably the hardest one to get. You need: two rings, one bigger, one smaller, but with the same sized hole, two small rectangles, that are going to be eyelids, and two small circles, that are not actually part of an eye, but are going to hide lack of 'insides', and they should be a little bigger than holes in the shell.
One of the rings is marked blue, so the picture may be a little easier to understand.
PIC 2E
Erm. Nothing, really. I only marked the not-eye pieces with *.
Oh, you can use sandpaper to make the eye-hole smoother, if the line is rigged.
PIC 3E
Now you need to get pre-made iris, and CAREFULLY (no, really, glue easily smudges black paint) glue it to the rest of an eye. First goes Iris, then small ring (if you want, you can paint it black), then shutters, and then big ring. When the glue sets, draw all little details with pen.
You also paint the inside of little 'cover' pieces black.
PIC 4
Now, when you finally have all the elements, you only have to put it all together. First, we connect shell pieces with handles, then we glue the little pieces in holes. Then-
PIC 5
-glue the 'ring' inside of the shell, and AFTER IT'S SET, put the eye in, with no glue. Inner pieces of handles, and deeper part of ring should keep it from falling inside, and shell+outer part of ring should keep it from falling out.
PIC 6
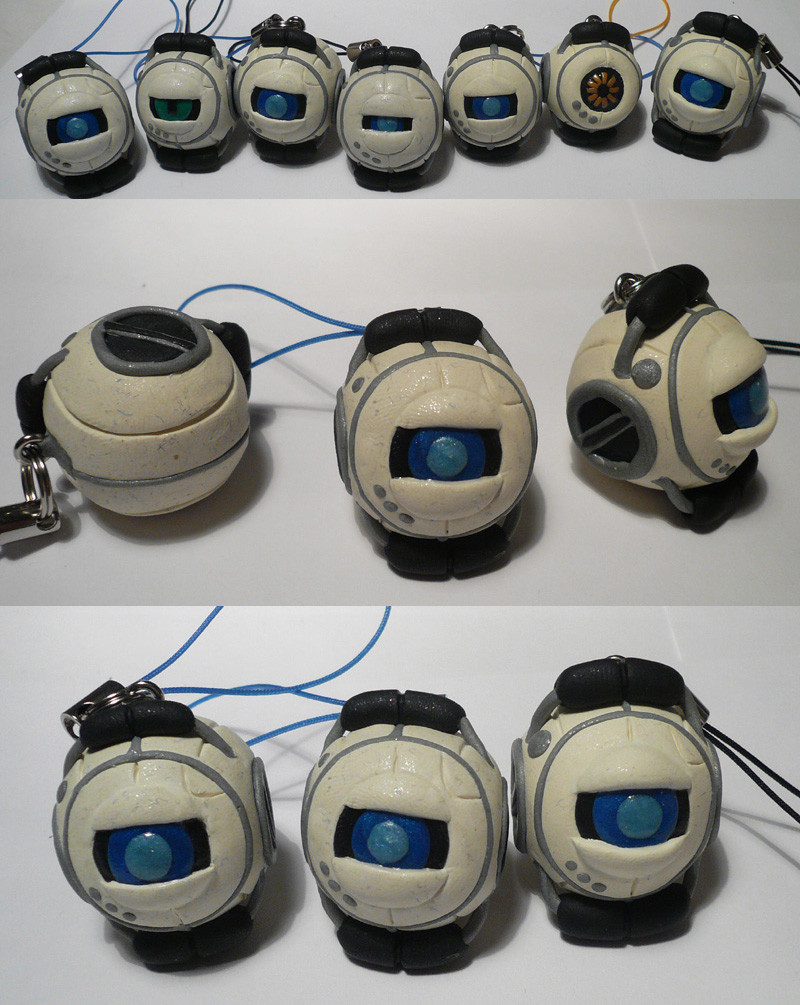
Congratulations! Look at your own probably-not-so-great-because-you-followed-some-terribly-written-guide-on-the-internet Aperture Science Peronality Construct Model and be proud! Now you should take a photo, upload it to DeviantArt, and link me in the description!
And don't forget to write a message/comment about my terrible english and all language mistakes i've made. No, seriously, i'm not kidding, please do so.
Thank you all for this
Related content


Comments: 19

I made your 100th like. Now to make some science!
👍: 0 ⏩: 0


Awesome! Now I have some ping pong balls to add to my shopping list... XD
👍: 0 ⏩: 0

hey whats the ball part saspoused to made out of? styraphome ball?
👍: 0 ⏩: 1

Did you seriously just asked me if pingpong balls are made of styrophone?
👍: 0 ⏩: 1
hey! i didnt know! jeez...
")
👍: 0 ⏩: 0

Seeing how many people actually tried this...yeah, I totally believe you.
👍: 0 ⏩: 0

Thanks for this dude. I was planning on making a simpler one, but I might take some ideas for the shell and details from this too, so it should come in handy
Cheers!
")
👍: 0 ⏩: 0


Tiny rectangles from E ball, pics E1-E3.
👍: 0 ⏩: 1

it looks cool and scientific (reading this makes me feel smart) but I am totally confused >w< i'll just figure it out later *favs*
👍: 0 ⏩: 0

This is wicked cool, can't wait to try this out~!
👍: 0 ⏩: 0


i have a feeling im gonna get a few cuts when im done making two sets.
THANK YOU SO MUCH for this tutorial 
👍: 0 ⏩: 0

 (Smile)")