HOME | DD
 myceliae —
Tutorial - Personal Wax Seal
by-nc-nd
myceliae —
Tutorial - Personal Wax Seal
by-nc-nd
Published: 2010-07-02 08:18:56 +0000 UTC; Views: 65855; Favourites: 1609; Downloads: 0
Redirect to original
Description
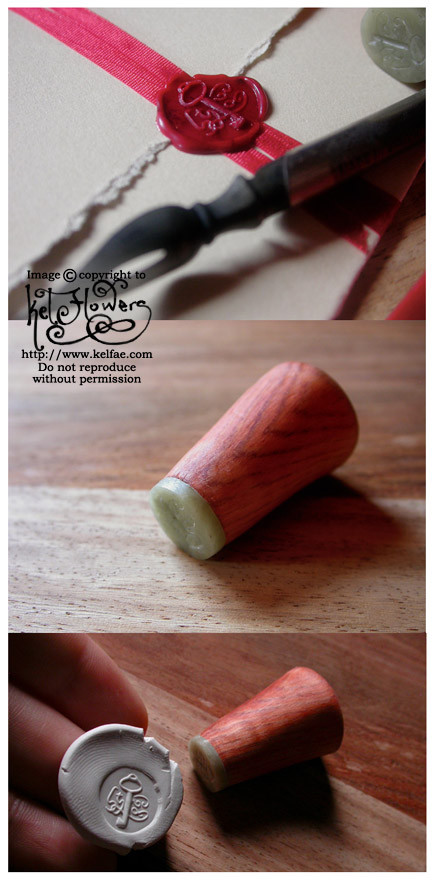
My first proper tutorial!Here for your creative pleasure, a little thing I wrote about how to create your own wax seal using things you can easily find, or source cheaply.
For so many years, I had wanted my own personal wax seal with which to close my missives. As with such things however, the ones I could find about the place were either ugly, generic, soulless, or brain-shatteringly expensive. And besides, I wanted to design my own.
So that’s what I did.
I had visions of cast silver with perhaps an ebony handle from the block I was gifted years ago (I will find a use for that little treasure one day). But I can’t smith in silver, and it’s not exactly something I can spend a lot of money on at the moment. So, time to think creatively.
And this is what I’ve come up with - a hand-carved soapstone seal with a King Billy pine handle. It took me no time at all - an evening to carve the seal and a morning for the handle and finishing - and it was dead easy. Everything I used can be easily found or sourced and won’t cost an arm or even a leg, if you’d like to give it a go.
…
Tools
My materials:
A design, drawn out first and then mirrored.
A small block of soapstone. I used a little carving that my local Asian grocer had for 50cents each. It already had a flat bottom and was roughly the right size and shape.
Wood for a handle, I used a small block of King Billy pine, which is endemic to my island home. You could use whatever you find laying about.
Wood carving tools, I used a small straight detail knife and a small scorp for hollowing the handle.
Epoxy glue
Sandpaper, several grades
Danish oil, for finishing
Polymer modeling clay, for testing the carved design
And because I lack fine carving tools with which to work the soapstone:
A fat tapestry needle
A dress-makers pin with the flat top end stuck into a split stick (for a handle).
First you’ll obviously need to work out your design. Once you’ve got something you like, you’ll need to mirror-image it in order to get a right-way-up impression when you use your stamp. I find the easiest way to do this is to draw your final design in soft pencil, fold the paper in half to one side of the drawing, and rub the back of it with a spoon (or something smooth and vaguely roundish). Now you have a visual reference for copying your design backwards onto your stone.
Soapstone is incredibly easy to carve, and you could probably carve the whole thing - handle and all - in one piece if you wanted to. I really wanted a wooden handle, so I first set about roughing out a shape for my stone that would end up set into the wood.
To start off the seal carving, I found it best to very lightly scratch it into the surface, then slowly work a layer at a time, adding a bit more pressure each round.
The round-tipped tapestry needle was very useful for creating a deep line with a soft round bottom to it - great for uniform-width lines or text. Fine detail can be worked in with the pin.
It’s also fairly easy to slip and end up with a line somewhere you don’t want one. Even the finest of lines will show up on your finished wax impression, but if you slip and leave a mark, it can be sanded out carefully without any troubles.
To test the design as you go, you can warm some clay in your fingers until it is quite soft, and use that to make an impression.
With the design finished and carved into the stone, it’s just a matter of making your handle and setting it in(if you wanted a separate one). With mine, I had carved a flat round blob on the back of my stone that would set into the wood, so I carved out a space for it to fit. This helped make it stronger.
The wood was given a good sanding with 3 or 4 grades of fine paper to make it silky smooth, the stone epoxyed in, and the handle given an oil once it had all set.
You could certainly use all sorts of things for a handle aside from carved wood - you could sculpt something with a polymer clay, for example.
In any case, this is a really easy and cheap way to create something personal, beautiful and functional. I’ve certainly gotten a lot of use out of mine already, and I’ve even used it to embellish parts of the website
 (Smile)")
Also, please remember that your seal is made from stone. And SOFT stone, so it will not take being beaten about. Take care of it and it will last a long time
Use a proper sealing wax , such as the gorgeous stuff from
Atelier Gargoyle. They also have an excellent page. about how to use your seal and wax properly.
This article is also featured on my soon-to-be-finished blog.
It also goes without saying (you'd think) that this article is mine, and if you steal it or reproduce it in any way I have the will and the means to hunt you down and poke you to death. Then i'll reanimate you, state my ownership and make sure you regret it
Love!
-Kel Flowers - kelfae.com
__________________________________________
If you do try this, please leave me a comment with a link to your picture so I can share it below. Then everyone can see what other people have done with it
It'd also be fair to stick a link in your deviation to back here
Deviants who have used my tute and let me know:
~lalalura [link]
~Nimtai [link]
__________________________________________
Related content


Comments: 212

Awesome! I've tried to find a way to make this from my one! But all the things I tried came out ór ugly ór not heat resistant enough, since your working with hot wax. This is so helpfull to me! Thank you, thank you, thank you.
Now I'll only have to find some good soapstone C:
👍: 0 ⏩: 0

Awesome! I'll add it to my already overpopulated projects list!
👍: 0 ⏩: 0

Thank you! I use to make these as a child and had forgotten. I can't tell you how important this is to me!
👍: 0 ⏩: 0

A very interesting thing to try!
Once I find the time and materials, I'll make one.
(besides, I've always wanted my own seal ._.)
👍: 0 ⏩: 0


Hey, do you think it would be OK if I make it out of gesso, instead of soapstone? I'm having difficulties finding soapstone...
👍: 0 ⏩: 0

Thanks for this! I have a friend who loves to write letters and routinely takes trips around the world. I think I'll make her one of these for her next trip!
👍: 0 ⏩: 0

this is amazing! my biggest problem is going to be designing a seal to use ;u;
👍: 0 ⏩: 0


Thanks so much! I'll have to give this a shot!
👍: 0 ⏩: 0

I'm definitely going to try this. Thanks for making the tutorial!
👍: 0 ⏩: 0

I've always wanted to seal my letters to friends, but didn't want to buy a generic seal...I'm definitely going to have to try this!
👍: 0 ⏩: 0

thanks for you tutorial.
i will try that .. (in some time)
👍: 0 ⏩: 0


Hi myceliae. I made a rose seal for a close friend's wedding [link]
Just wanted to thank you for posting this tutorial. Although I didn't closely follow your technique, it inspired me to make the seal in the first place.
👍: 0 ⏩: 0

Highly creative, thank you for sharing your creativity with others!!
If i try it (cos i've been for sooo long looking for a way to make a tiny wax seal) of course i'll let you know
👍: 0 ⏩: 0

Great instructions. I am inspired to try it for myself! Thanks!
👍: 0 ⏩: 0

Just love when somoe one make old art forms new again, I love this and really wat to try it now!!!!!!!
👍: 0 ⏩: 0


Amazing! I will try this! Thank you so very much!!!
👍: 0 ⏩: 0

I'll definitely try this! Thank you so much for making this great tutorial! (:
👍: 0 ⏩: 0

Love this one!
But the problem is I'm not good in doing carving the design.
I hope I could do one too *in time.
👍: 0 ⏩: 0


Very interesting, I've been thinking about trying this for some time now so its nice to see a tutorial for it!
👍: 0 ⏩: 0


WOW! ")
congrats on the DD
👍: 0 ⏩: 1

You're most welcome, and thankyou
👍: 0 ⏩: 0

Well heck, that sounds like fun. lol. I wonder if the craft place has soapstone...I've never tried carving before.
👍: 0 ⏩: 1


I've always wanted my own wax seal too! This helps thank you!
👍: 0 ⏩: 1

havent read much of it yet but so far it looks rly cool n i cant wait to try it out tomarrow!
")
👍: 0 ⏩: 1
Thankyou! Do have fun with it
My pen is actually an antique one, and trust me it wasn't that clean when I first got it. I had to sand all the metal parts very carefully (with ultra-fine sandpaper in a wet method) to remove all the old ink and some rust.
I keep it very clean now because it doesn't work as well if it gets gunky.
So much nicer than writing with a modern pen!
👍: 0 ⏩: 1


👍: 0 ⏩: 1
Just perseverance, I'm afraid! I keep a nice soft bunch of tissue or paper towel close by when writing so that I can wipe the nib if it gets clogged up, and if I put the pen down for any length of time. Keep it clean while the ink is still wet!
I just had a thought, what kind of ink are you using? If it's one of those drawing inks, they often contain polymers or other things that will gum up your nib and make it really hard to clean if you let it dry. A proper writing ink (or pen ink) won't do that.
👍: 0 ⏩: 1
right now im using "higgins-black magic" water proof ink. as soon as that runs out i switch to some "refilling" ink bottle i got from office max
👍: 0 ⏩: 0

I've a Signet Ring that I'd crafted from Bone, but the design isn't pictured in the photo. [link]
'Tis slightly older than this tutorial, so I can't claim you helped Me much, but I will keep all that in mind next time. Let Me Know What You Think.
👍: 0 ⏩: 1
Oh lovely. Bone is something I've wanted to work with, is it very difficult?
👍: 0 ⏩: 1
Depends on the tools at hand, and what kind of Bone. I had x-acto blades {fragile!} & a small file {half-round}, & cow Bone {DENSE!} from a round-steak, so it took Me forever. Deer Bones don't bear as much weight, & therefore don't have Bones that are quite so strong, and are a bit easier. I imagine that bones from an Elephant would be... difficult...
If you have something like a dremel, it looks to be easy to the point of cheating, but I haven't had a chance to try one of those yet. Do you have one, or at least have access to one? Soapstone is easier, and just as frangible, but Bone has Rarity that you can brag about, as I do. Frequently. Bones are extremely common, yes, but so very uncommon to work with nowadays... Be EXTREMELY careful, though. Light scratches can be sanded off, but some mistakes are permanent.
I'd only moved on from clay because Bones are neat & I'd found a pile of Them. Clay is so forgiving, but Bone is not.
Much of My gallery is filled with Bonework {but there are a few crappy little drawings also that I wouldn't mind never seeing again}. It's more like sculpture, or weapon-smithing, as opposed to actual carving, but many people {Myself included} think it's neat.
I'll likely make a Wax-Seal with a Bone handle, but I've not settled on what the Signet itself shall be made of.
{wow... that was really long... I Apologize for that...}
👍: 0 ⏩: 1
Nono, don't apologise, I love long replies
Ah no, I have no dremel. I'd have started already if that were the case!
I hadn't considered that differen't bones would be harder or easier to carve. Of course it makes sense now that I think about it.
I started making a flute with some lamb bones, but it's just. so. hard.
👍: 0 ⏩: 1
Long responses *tend* to signify that the Author cares in some way about what They're writing. Usually.
I should really get back to work. I've neglected all My little time-wasters, and I've several Ideas that were never started, and I should really write some of them down before I forget them entirely...
Do you have any pictures of the Bone flute in progress?
👍: 0 ⏩: 1
No pictures yet, I've gotten as far as sanding the bones and edges smooth, and drilling and sanding the holes. It's currently in my box marked UFO's (un-finished objects), and I think I might get back to it soon
Make things!
👍: 0 ⏩: 1
I Made Stuff! More on the way!
How is your work coming along?
👍: 0 ⏩: 0

Thank you so much for this! I have always loved the look of the old seals but the ones available around where I live are out of my budget range. ")
👍: 0 ⏩: 1
| Next =>