HOME | DD
 Nienna1990 — Dodge and Burn Tutorial Part 2

Published: 2008-10-21 17:18:35 +0000 UTC; Views: 85837; Favourites: 943; Downloads: 4949
Redirect to original
Description
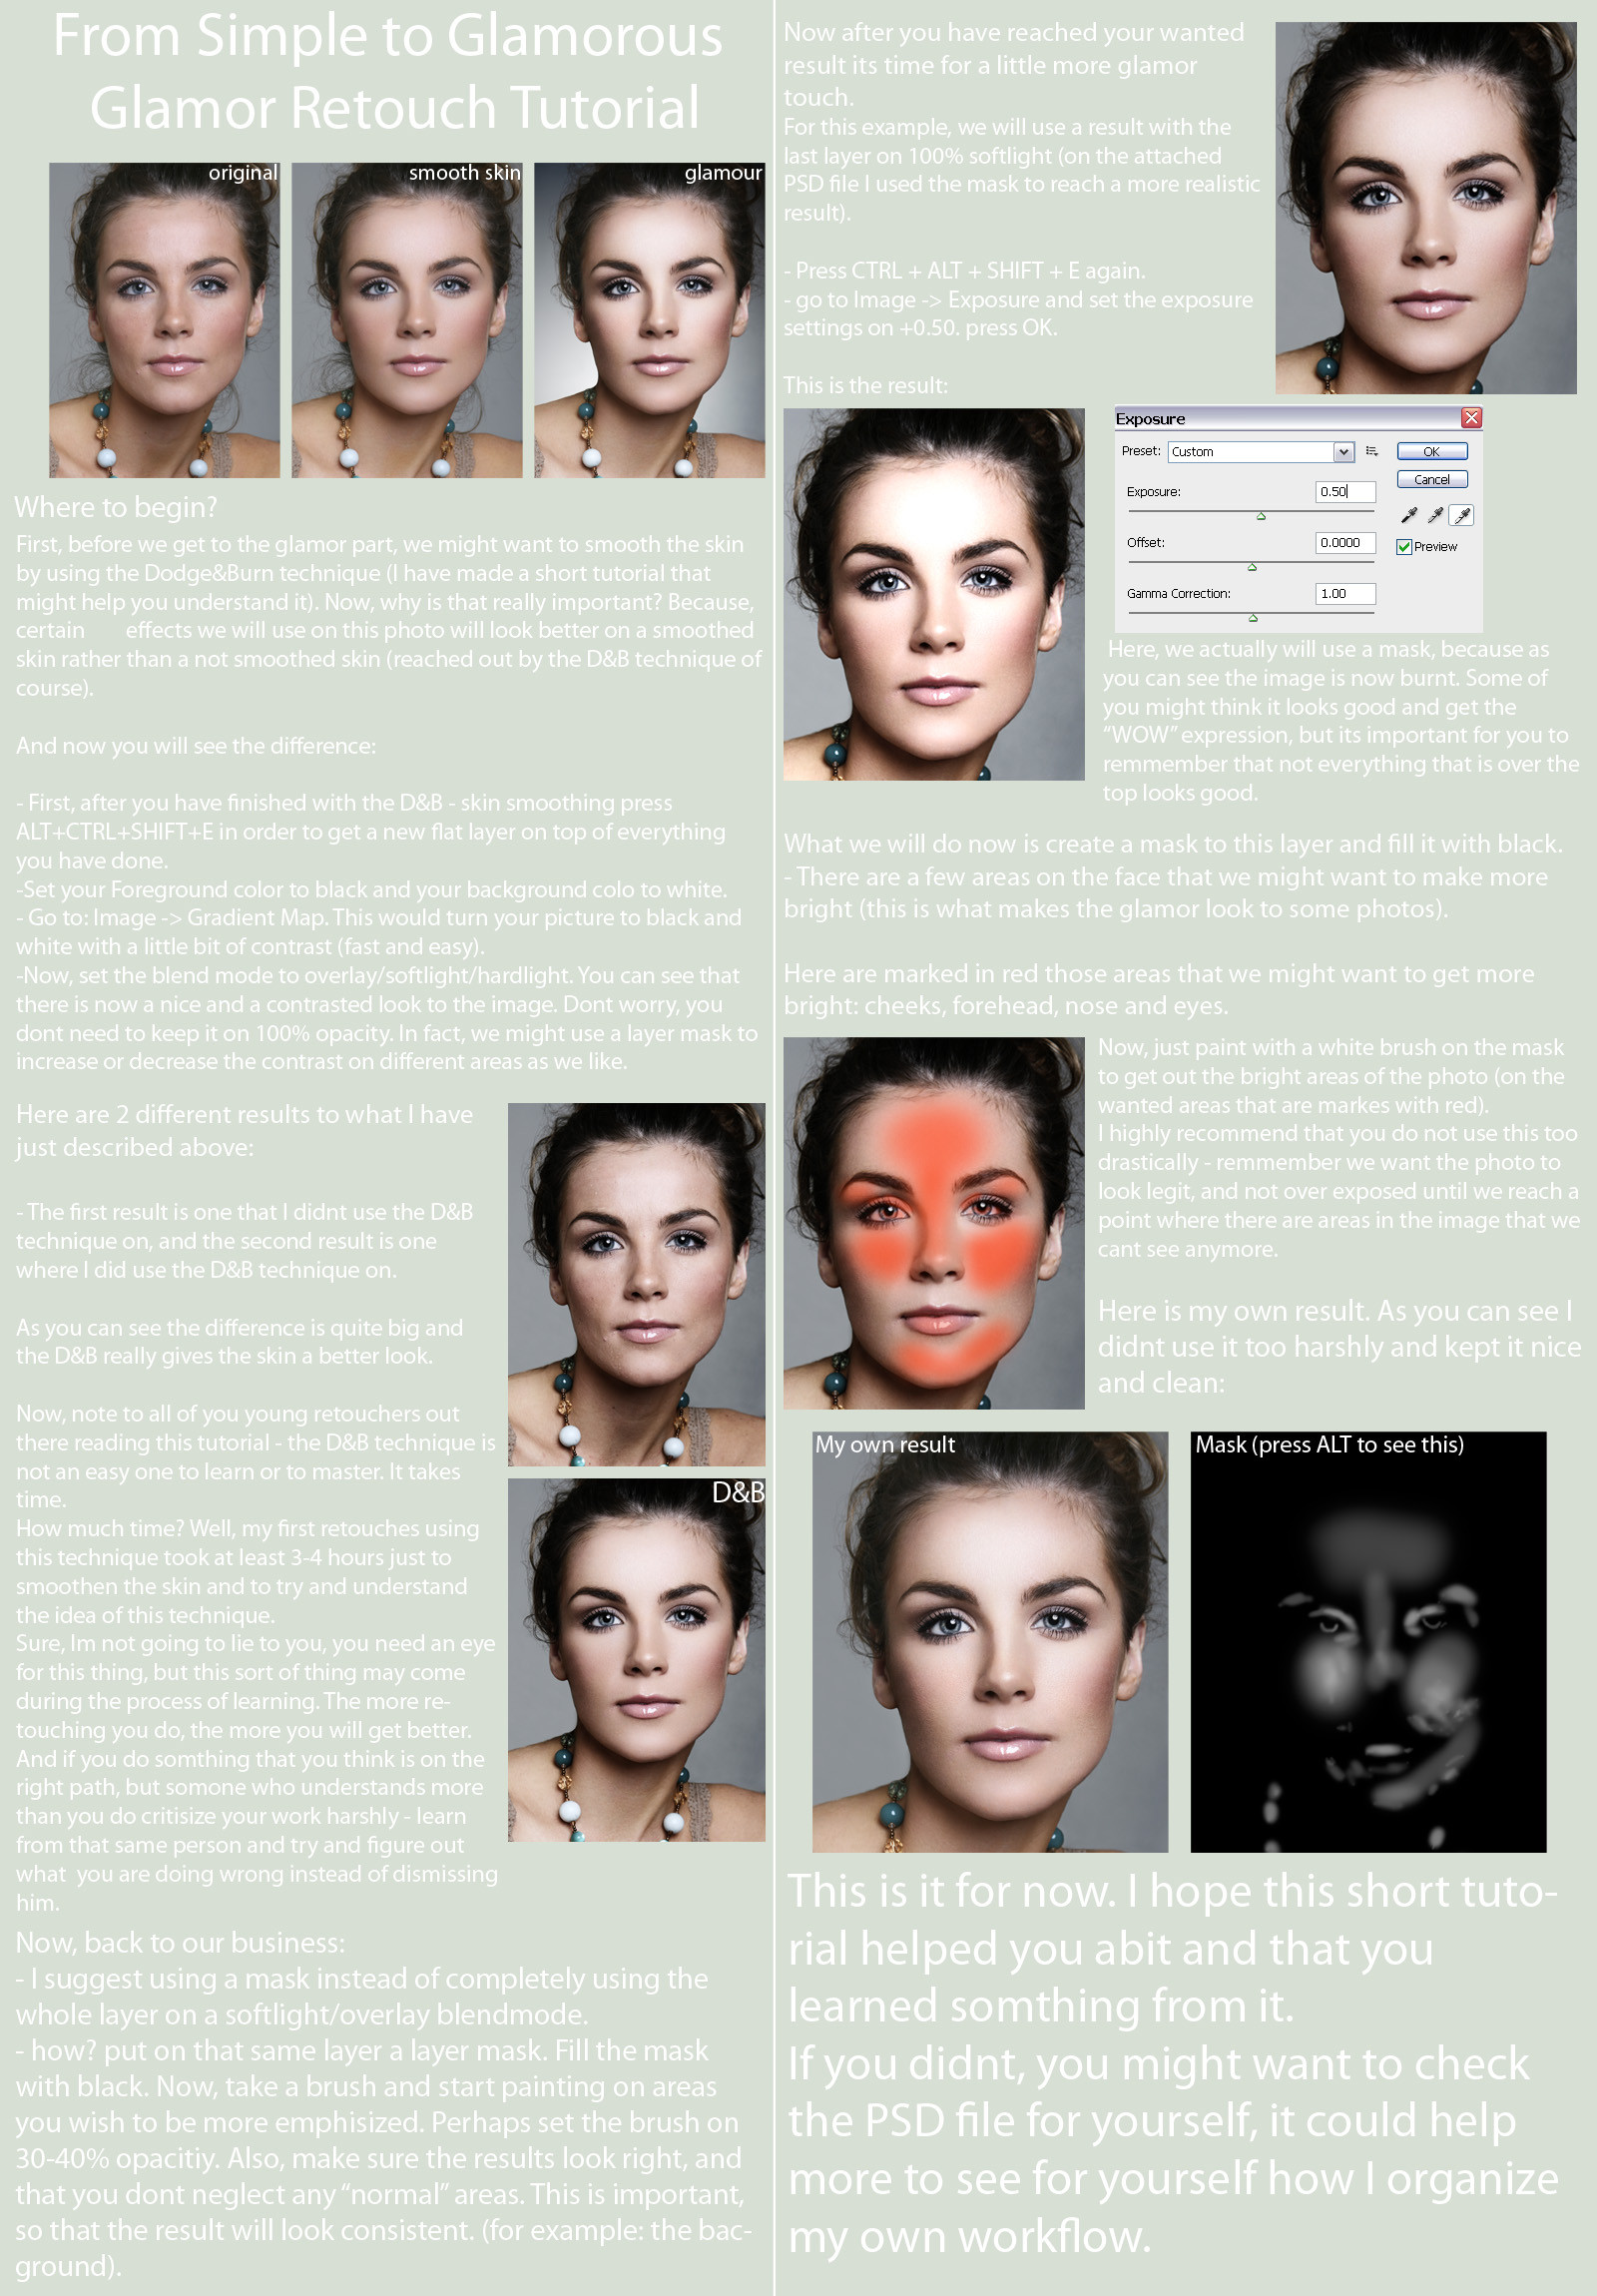
Part 2 (Smile)")
Part 1 here: [link]
Related content


Comments: 69

I'm so glad that I found this tutorial!! Thanks for sharing them!
👍: 0 ⏩: 0

oh gosh, what a wonderful woprks, however, I really REALLY DONT UNDERSTAN your tutorial, Is my english so bad? tehehehehehe , I was working until 3 hours I couldnt note any chnage in my image and ...well, I want to know if u could help me a little.
I must confess that I know that ur a busy girl ( chica ocupada ) but hope you can reply my message. thanks!
👍: 0 ⏩: 0

Awesome tutorial. The images of the masks is really informative, showing exactly what you've done. And I can see why you need a graphics tablet now! Many thanks.
👍: 0 ⏩: 0


how important is the highpass technique in the retouching process?
👍: 0 ⏩: 0

i don't understand how to finish this... what do I do with all the layers after doing the dodge technique?
👍: 0 ⏩: 2
You do the burn layer too then turn off the 'tools' group and you're done. Flatten the image if your certain you need anything else.
👍: 0 ⏩: 0


i don't understand, how do you finish this? what do I do with all the layers after doing all the dodge and burn?
👍: 0 ⏩: 0

I'm a little bit confused. You call them dodge and burn layers... are these the layers that you edited with the curves adjustment? Also, is there any actual burning/dodging... I feel like it's just using the white brush tool on the layer masks... Thanks.
👍: 0 ⏩: 1

It IS dodge and burn in the sense it lightens and darkens the photo. the difference is, this method also smooths out some of the skin textures, and more to the point, using masked layers means that it is non destructive, if you were to use the dodge and burn tools on photoshop then it will permanently change pixels, meaning if you screw up, you are stuck with it. even if you kept a duplicate layer below or a saved history state, youd still have to redo all your dodging/burning again, doing it this way means if you make a mistake you can just it over black on the mask layer and try again on that one spot. You can also further edit the mask layer to make it darker or lighter on just those areas instead of adding another curves adjustment which would affect the whole image.
And yes, the 'dodge and burn' layers are the curves layers from the previous tutorial. The curves layers make the image darker and lighter, then you fill the masks white, and paint in black on the respective layers to bring out the shadows and highlights that you want emphasised.
👍: 0 ⏩: 0


Thanks! Cool tutorial... It's a long process but results are great!
👍: 0 ⏩: 0

Thanks so much for the tutorial, been trying to find out how to do this properly!!
👍: 0 ⏩: 0


This is an amazing tutorial! It truly works miracles, especially on bags and wrinkles under the eyes! Thank youu

👍: 0 ⏩: 0

This is a really awesome technique, thank you for putting together this tutorial!
Takes a bit of trial and error but I can see how useful this will become.
👍: 0 ⏩: 0

This definitely takes some serious patience! Thanks for sharing your technique.
👍: 0 ⏩: 0

Thank you for this great tutorial, please can you tell me how to get the image back to colour after i have finished with dodging and burning
Thank you
Karl
👍: 0 ⏩: 0

when I draw on the dodge mask it makes it darker...and my foreground is white. Why is this??
👍: 0 ⏩: 0

Where is the video for this tutorial ? Can you send me the link ? I can't find it in your journal.
👍: 0 ⏩: 0

Thank you very much for this tut! It's genius xD
I have a problem though; When I try to lighten the darker areas in the dodge layer, the mask isn't the one that's painted over, it's the actualy image, what dod I do about this? It's getting so frustrating :/
👍: 0 ⏩: 1

You have to make sure you click the actual mask attached to the layer you're on, not the layer's image. A little box goes around whichever's selected so you can tell what you're working on. Another good way to know once you've selected the mask, is that your foreground/background colors turn to black and white [as they're the only colors that effect masks]
👍: 0 ⏩: 0

i don't get it, which layer am i supposed to be working on?
👍: 0 ⏩: 1

On the mask of the dodged and the burned layers.
👍: 0 ⏩: 0


wow. you are amazing. i cannot understand how you do that despite the tutorial! lol
👍: 0 ⏩: 0


thank u for sharing ur techniques..
im just having a hard time with the last parts..
do u have an updated version of this?
how do we get the final result?
hope to hear from u..
thanks
👍: 0 ⏩: 0

Thank you soooo much for this!
I tried it out last night, it took me 6 hours to do this picture- [link]
I definitely got lazy after a while, and it isn't perfect, but I am soo pleased with the final result!
Thank you, thank you thank you!
👍: 0 ⏩: 0

I love this! Best. Tut. Evar! It's pretty hard to do, because I use the touchpad of my laptop, but still the results are amazing! I'm doing a retouch of a photo of one of my friend's right now... Oh and could you make us a tutorial about make-up sometime..? That would be great ^^
👍: 0 ⏩: 0


I don't understand this tutorail, both parts.
In part 1 by the D&B process. I can't create a black mask.
In part 2 by point - 2. I see the same thing, there changed nothing on the picture.
Can you send me a note, with a clear explanation of both question?
👍: 0 ⏩: 1


this is a great tutorial, but could you tell me what brush presets do you use to get strokes like those?
👍: 0 ⏩: 0

Thank you SO much!
This was extremely helpful to me
")
👍: 0 ⏩: 0

I have a little trouble understanding.
Do you only paint on the dodge layer? not the burnt? and which is the dodge layer, the one that's named layer 1 copy?
I'm sorry for lots of questions, this is harder than I thought it would be
great tut overall though!
👍: 0 ⏩: 0

Well, i know that is TOO much too ask... but do you thing that you could make a tutorial for these effect in a full body with background photo... becouse i just LOVED this, and i couldnt do it in a photo with full body and background, and it was VERY frustating... PLZ! ;-;
Oh sorry about the english, i´m brazilian and got a poor english.. OH and i loved What Is Love in the ending of the tutorial, such a great song ^^
thankssss :*
👍: 0 ⏩: 1

First of all, this is not th right place to post your comment. This tutorial has nothing to do with my video tutorial.
Second of all, im quite busy so I cant make free time to make a tutorial just because you want it.
Ill think about it, but cant promise anything...
👍: 0 ⏩: 0


im having so much trouble with this lol, iv read these tutorials and also watched ur video tutorials, i just dont get what ur doing with the dodge and burn cause as soon as i get to that bit im just like, where the hell do i start
")
👍: 0 ⏩: 0

do you have the original image you used for this so we can practice on it? It is kind of hard not to know what to look for when doing a different image
👍: 0 ⏩: 0

thanks so much!!! I used your tutorial here [link] it helped a lot
👍: 0 ⏩: 0
| Next =>