HOME | DD
 Nsio — Nsio explains: Constructing and Analysing

Published: 2014-02-14 02:27:29 +0000 UTC; Views: 317518; Favourites: 8188; Downloads: 6967
Redirect to original
Description
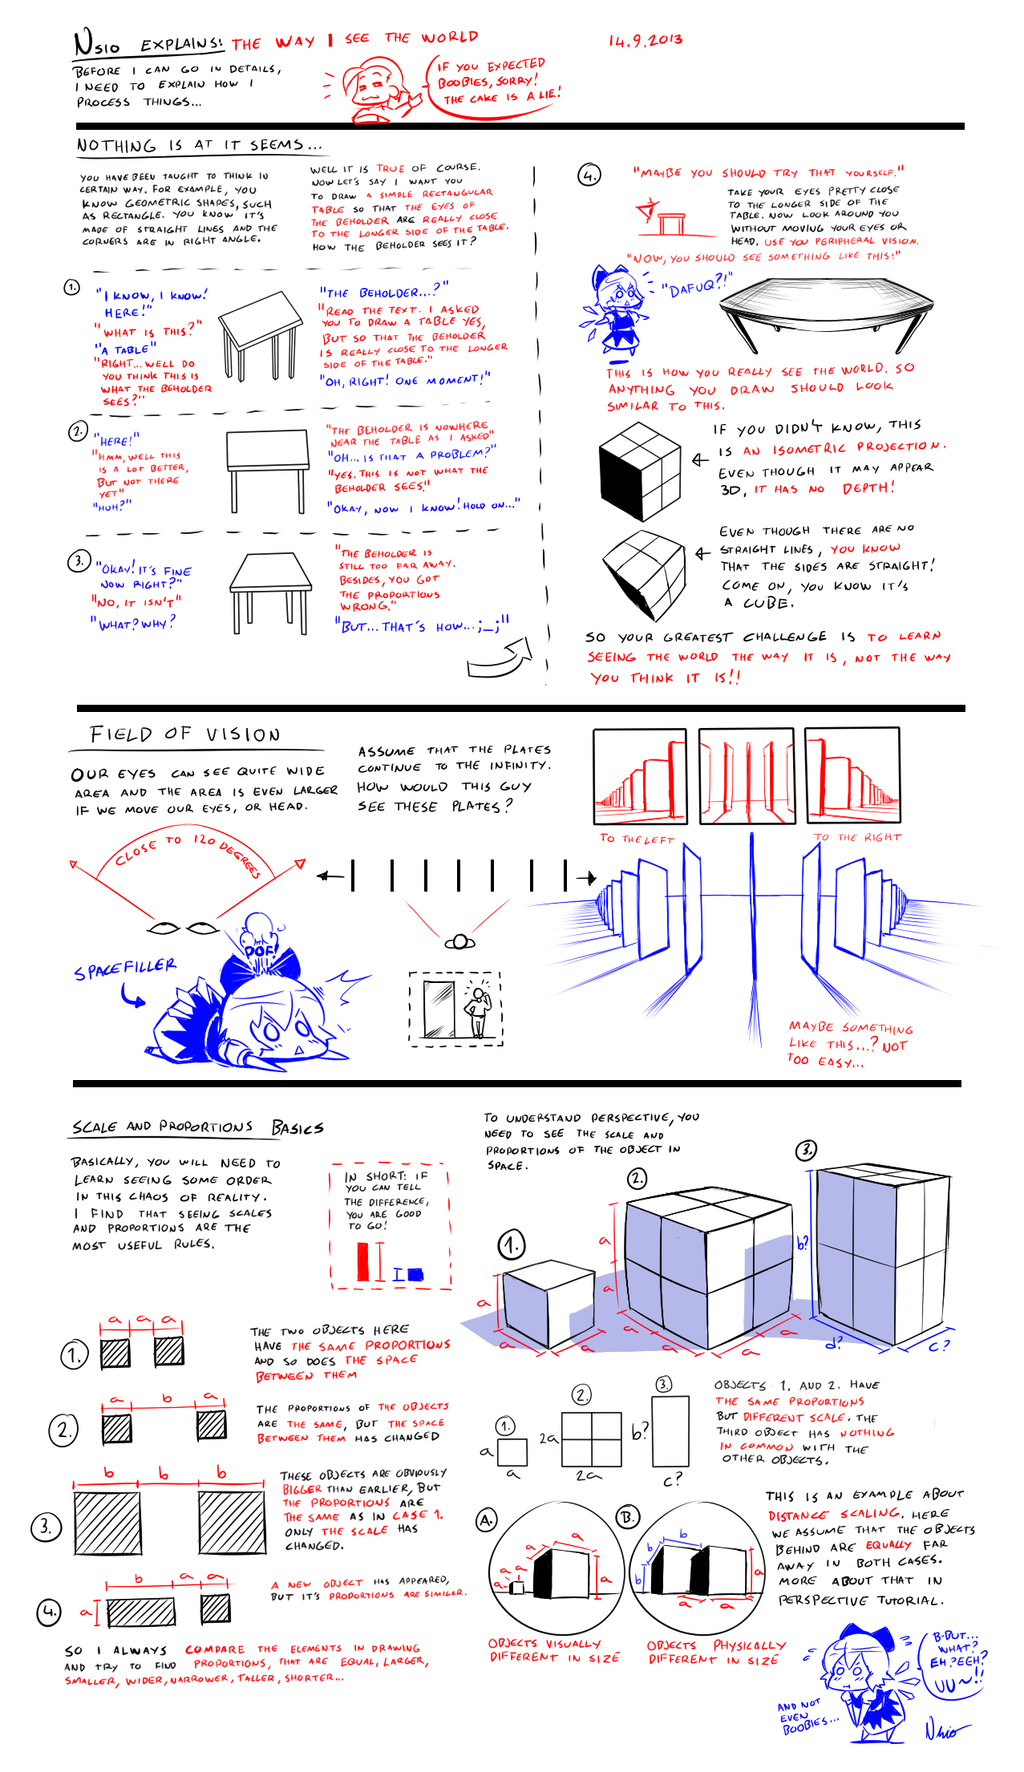
It's already ninth tutorial in my "Nsio explains" series. This time I'll talk a little about constructing and analysing your drawings.
Why should you construct and analyse your drawings?
First of all, if you are an artist with no prior experience about drawing, it's unlikely that you can draw anything right in first go, yet alone in one go. It takes a lot of practice and experience to be able to draw things without sketching first.
Let's imagine, that you are drawing a human figure. You start from one eye, then draw the other. You keep going and draw the cheek and chin. At this point you might already have done a mistake. If you spend some time to analyse your work now, you can probably still save it. However, you just keep going, drawing more individual details. And if you are really fond of details, you might have spent a lot of time on a detail which may not even be right. If your great detail doesn't contribute or causes problems, it needs to be sacrificed. However, the time and effort you spent on that fine detail makes you unwilling to sacrifice it. The next details you draw are forced to follow the wrong detail, accumulating issues one after another. When you finally look what you have done, it's already too late to fix the drawing. It would take too much effort and the results wouldn't probably be satisfying either.
This is why constructing and analysing your drawings is so important. If you construct your drawings in logical manner, you can save a lot of time and effort in fixing your drawings. Analysing your work in regular intevals as you keep working on your drawing ensures that you won't be putting too much effort on something wrong.
Checklist
Self-analysis is the foundation of improving yourself. You will need to evaluate your actions and be able to see what you are doing wrong. Once you know our issues, you can start working on getting better at them.
Here I compiled few common issues, but seriously, the amount of possible issues are numerous. And even the matters I have covered are explained in very general level. Also the source of the issue isn't always as obvious as it may seem. For example, the character head may look too small in comparison to the body. However, you can also consider that the body appears too large when compared to the head. Either the head or the body needs to be fixed. It can also be, that the scale and proportions of the torso just makes the head look smaller. That said, there may be only one or several factors affecting the perceived issue. You will need to decide which feature you will sacrifice for the greater good.
I'll talk about few issues I tend to struggle most.
If you keep working on your drawing for quite some time, you will become blinded to it. If you mirror your drawing, it will look like a completely new drawing, making it a lot easier to see the issues. Digital artist have it easy, but traditional artist can use a real mirror and rotate the canvas as well.
When you trace your sketch, remember that your goal isn't copying it. The sketch is there only to give you some rough idea of the final results. That said, you don't have to follow the sketch too strictly, especially if it's not perfect.
Example of constructing and analysing
I though an example would be most useful way to explain how to work on your drawing.
When I draw, I work on phases. Each phase has it's own focus points and goals to achieve. The benefit of working on these phases is that I can focus only on few things at time. The phases are
1. Idea
2. Rough Sketch
3. Refined Sketch
4. Lineart
5. Post-processing
The first phase is useful for trying out many alternatives without using too much time or effort on the drawing. If I don't like the pose, I can easily discard it. I can also try to find a pose that's more fitting or justified for the character I'm going to draw. I went with the third. The fourth is there just to "pre-evaluate possible errors with the drawing".
Second phase is the most important of all of the phases. All major issues should be fixed on this phase. Well done work here will pay off on later phases. At first I draw the full body without paying too much of attention to the issues. After I'm done in 5 mins or so, I start analysing the errors. I use lasso selection to relocate and rotate body parts. I also redraw many parts to fix major issues. I have included my quick rendition and it's fixings. Drawing the character naked is important, because that's the only way you can truly test where the body parts go. Also, naked sketch will serve as a base for the clothing. If the drawing requires major changes, they can still be done. However, a good rule of thumb is that "when you have chosen a pose, stick to it".
I really recommend spending a lot of time on rough sketching. I used to draw at least two or three rough sketches of the same body, because drawing the body from scratch was often easier than fixing the faulty one.
On third phase, it's time to make a preview of the final drawing. All important details and features should be present here. The line quality doesn't matter though. I often draw most important and hard details (such as fingers) quite detailed already in order to make it easier to draw them on next phase. I usually draw some sort of shading as well, and often I won't take the drawing further than this. It has already served as valuable practice work.
On fourth phase, it's time to draw the final lineart. On this phase, the focus should be solely on the linework. While issues should be fixed when they emerge, the point of the two earlier phases is to get rid of them so that the focus can be put solely on making pretty lines. If I'm going to color the piece, this is enough work for now.
Fifth phase is either coloring or inking. Here i just went with solid black and one bluish shade. When the work is done, I usually appreciate it for some time and then after few days I do post-analysis. This piece came out pretty neat, though the legs could have benefited from some extra attention, especially the armor parts and feet.
Related content


Comments: 219


Brilliant ideas! Keep these tutorials coming, please!
👍: 0 ⏩: 0

This is really helpful to me, as this shows some good points that I have forgotten.
👍: 0 ⏩: 0

Yeah this is very helpful indeed I'ma start putting this to use
👍: 0 ⏩: 0

*looks at your gallery*
"..."
*Body slams the watch button*
👍: 0 ⏩: 1

Hopefully it can still be clicked by the others
👍: 0 ⏩: 1
These are very helpful, thank you for taking the time to make them uwu
👍: 0 ⏩: 0

Thank you, this is exactly what I needed!
May I ask who the character is? owo
👍: 0 ⏩: 1
Oh, I came up with the character and design on fly as I drew the tutorial. Didn't come up with name though
👍: 0 ⏩: 1
Really?! That's so awesome, I really like her design! :]
Hopefully we'll see more of her soon(?)!
👍: 0 ⏩: 0

is there another way besides using a mirror to check traditional drawings for mistakes (because i don't really have a mirror ><)? do you also have any suggestions for learning anatomy? like do i have to draw a person several times or read art books or something? i recently realized that i have no idea how to draw the human body with proper anatomy even after drawing them for a few years.
thank you for the brilliant and incredibly helpful tutorials!!
👍: 0 ⏩: 1
If your drawing is on a paper, you can also hold it towards light to see the drawing trough the paper as mirrored. You can also place it on a window (which is useful for tracing as well).
I suggest studying joints anatomy (skeleton) and proportions before going into anatomy. When you handle the proportions and general shapes, it's much easier to add anatomical details. To study anatomy, you need too look for references and try drawing anatomy yourself. It's also good to remember that your own body serves as an excellent reference any time.
You're welcome, good to hear they are useful
 (Smile)")
👍: 0 ⏩: 1
thank you for the great advice sir ! so inspired now ^___^
👍: 0 ⏩: 0

Every time I think you can't make a more useful tutorial, you somehow do. ")
You should make a book, Nsio's drawing for dummy's. 
👍: 0 ⏩: 1
Haha, and I'm always worrying whether they are helpful at all when I upload a new one
Making a book would require so much more effort. Besides this way the material is free for all
👍: 0 ⏩: 1
Lol. Very true. ")
The way you do tutorials is indeed very helpful. Even if I know already the topic, there's always something new that I realize that I was doing wrong. (I also like the way you do your bases. ")
Are you ever going to do one for shading and coloring? or are the tutorials only for basic form of drawing?
👍: 0 ⏩: 0

I love your tutorials so much. don't ever stop! Unless you need to breathe, breathing is important!
👍: 0 ⏩: 1
Thanks! I'll keep drawing tutorials as long as I have ideas and motivation to do them
👍: 0 ⏩: 0

One of the most helpful tutorials I have ever seen! Thank you, and wonderful job!
👍: 0 ⏩: 1


I don't think I could possibly compile a hand tutorial that would be more useful than those already uploaded in dA. I don't really draw tutorials about how to draw certain things, but rather explain how to approach drawing itself.
You just need to study references and keep drawing hands, even though they are hard. Hiding them will only prevent you from learning how to draw them.
👍: 0 ⏩: 0


Again, another wonderful tutorial that I will reference constantly. You have a great understanding of what you're doing in your artwork and communicate it well.
👍: 0 ⏩: 1
Thanks! I've been drawing so long that my methods are pretty much established by now. these days it's mostly about applying my understanding
👍: 0 ⏩: 1
I feel sort of the same way, however when I try to switch back and forth between different styles and mediums, something gets lost in translation and I don't retain much improvement in any particular one. I feel as though I have to remind myself all the time of what I'm supposed to do and your tutorials are a great reminder.
👍: 0 ⏩: 0

Thanks for the tutorial!! it was really helpful!
👍: 0 ⏩: 0


With mirroring I have a problem. I still can't see mistakes. An artist once told me that it may be because I use both hands. Often I see and fix mistakes when I switch hand.
👍: 0 ⏩: 1
I have never heard such case before. To be honest, it sounds very absurd to me, but that's because I can't really comprehend such situation :S. I have no idea how the handedness could affect seeing... What I do know is that when drawing with left hand, one needs to draw "mirrored" to be able to use same methods and muscles as in right hand. So in a sense, in your case mirroring the drawing will probably also mirror your mind, effectively negating the mirroring. Just speculating, very interesting issue.
If switching the hand works, then good. You can also try turning the drawing upside down. If they don't work, then I don't know how to deal with the issue
👍: 0 ⏩: 0

one of the best tutorials ive seen
👍: 0 ⏩: 0


Hey! Thank you for the tutorial!
It clarifies a lot of points that everyone should know =]
It helps improve the drawings and makes them more consistent.
👍: 0 ⏩: 0


Seriously dude, I wanted to slack today ! Your tutorials is giving me motivation...gosh.
It's awesome. Seriously. I'm gonna draw all day focusing on rough sketches before finding a good one. I got the (3) problem on my last drawing ")
👍: 0 ⏩: 1
Hehe, well that's good!
I hope you don't mind that I got the idea for the foreshortening tutorial example and the hand issue from your drawing. ^^'
👍: 0 ⏩: 1
No it's fine, I take it in a pretty funny way
👍: 0 ⏩: 0


 (Wink)")

Still a beginner at drawing but 'learn to sketch' is still one of the best pieces of advice I've ever gotten. Learn to see and clarify the big picture before going into details. This does a pretty good job of explaining.
👍: 0 ⏩: 0


As always, a very illustrative piece. Thanks!
👍: 0 ⏩: 0

I see you did this digitally, or made this tutorial geared closer to digital art- for traditional art [namely pencil and paper], what would you reccomend? Namely steps 3 and 4? I have the toughest time finding a solution for those unsightly pencil stains, and was hoping you had something to say about pen and paper sketching~
👍: 0 ⏩: 1
When you draw the sketch on paper, you need to draw it lightly so that the mark isn't too dark and the pencil won't scratch the paper too deep. You will also need a good and clean eraser to avoid dirtying your work.
Since another person asked the very same question, I'll quote myself:
When drawing on paper, the idea and rough sketch pay important role due to limited fixing capabilities. If you make a mistake that would require moving body parts (or the paper is too worn and muddy already), I suggest taking another paper and tracing the sketch by placing it on a window. Then you can move the paper on top of the sketch to the desired direction and trace the body part so that it's in desired place.
The phase 4 is rather straightforward if you use ink. Of course, it won't be easy to fix anything if you mess up with the ink, but you can safely erase the sketch when you are done. Inking takes a lot of courage and faith, so it's good to practice inking quite often.
👍: 0 ⏩: 1
I see- any tips for heavy-handed folks? xD
👍: 0 ⏩: 1
Mm, well you could start practicing drawing stuff very lightly. I usually rest the pencil on my ring finger so that I just can't press the pen on the paper (all the force is directed to the ring finger). This is especially good trick with pigment liners, but works on regular pencils as well.
👍: 0 ⏩: 1
<= Prev | | Next =>