HOME | DD
 Nsio — Nsio explains: Constructing and Analysing

Published: 2014-02-14 02:27:29 +0000 UTC; Views: 315225; Favourites: 8192; Downloads: 6964
Redirect to original
Description
It's already ninth tutorial in my "Nsio explains" series. This time I'll talk a little about constructing and analysing your drawings.
Why should you construct and analyse your drawings?
First of all, if you are an artist with no prior experience about drawing, it's unlikely that you can draw anything right in first go, yet alone in one go. It takes a lot of practice and experience to be able to draw things without sketching first.
Let's imagine, that you are drawing a human figure. You start from one eye, then draw the other. You keep going and draw the cheek and chin. At this point you might already have done a mistake. If you spend some time to analyse your work now, you can probably still save it. However, you just keep going, drawing more individual details. And if you are really fond of details, you might have spent a lot of time on a detail which may not even be right. If your great detail doesn't contribute or causes problems, it needs to be sacrificed. However, the time and effort you spent on that fine detail makes you unwilling to sacrifice it. The next details you draw are forced to follow the wrong detail, accumulating issues one after another. When you finally look what you have done, it's already too late to fix the drawing. It would take too much effort and the results wouldn't probably be satisfying either.
This is why constructing and analysing your drawings is so important. If you construct your drawings in logical manner, you can save a lot of time and effort in fixing your drawings. Analysing your work in regular intevals as you keep working on your drawing ensures that you won't be putting too much effort on something wrong.
Checklist
Self-analysis is the foundation of improving yourself. You will need to evaluate your actions and be able to see what you are doing wrong. Once you know our issues, you can start working on getting better at them.
Here I compiled few common issues, but seriously, the amount of possible issues are numerous. And even the matters I have covered are explained in very general level. Also the source of the issue isn't always as obvious as it may seem. For example, the character head may look too small in comparison to the body. However, you can also consider that the body appears too large when compared to the head. Either the head or the body needs to be fixed. It can also be, that the scale and proportions of the torso just makes the head look smaller. That said, there may be only one or several factors affecting the perceived issue. You will need to decide which feature you will sacrifice for the greater good.
I'll talk about few issues I tend to struggle most.
If you keep working on your drawing for quite some time, you will become blinded to it. If you mirror your drawing, it will look like a completely new drawing, making it a lot easier to see the issues. Digital artist have it easy, but traditional artist can use a real mirror and rotate the canvas as well.
When you trace your sketch, remember that your goal isn't copying it. The sketch is there only to give you some rough idea of the final results. That said, you don't have to follow the sketch too strictly, especially if it's not perfect.
Example of constructing and analysing
I though an example would be most useful way to explain how to work on your drawing.
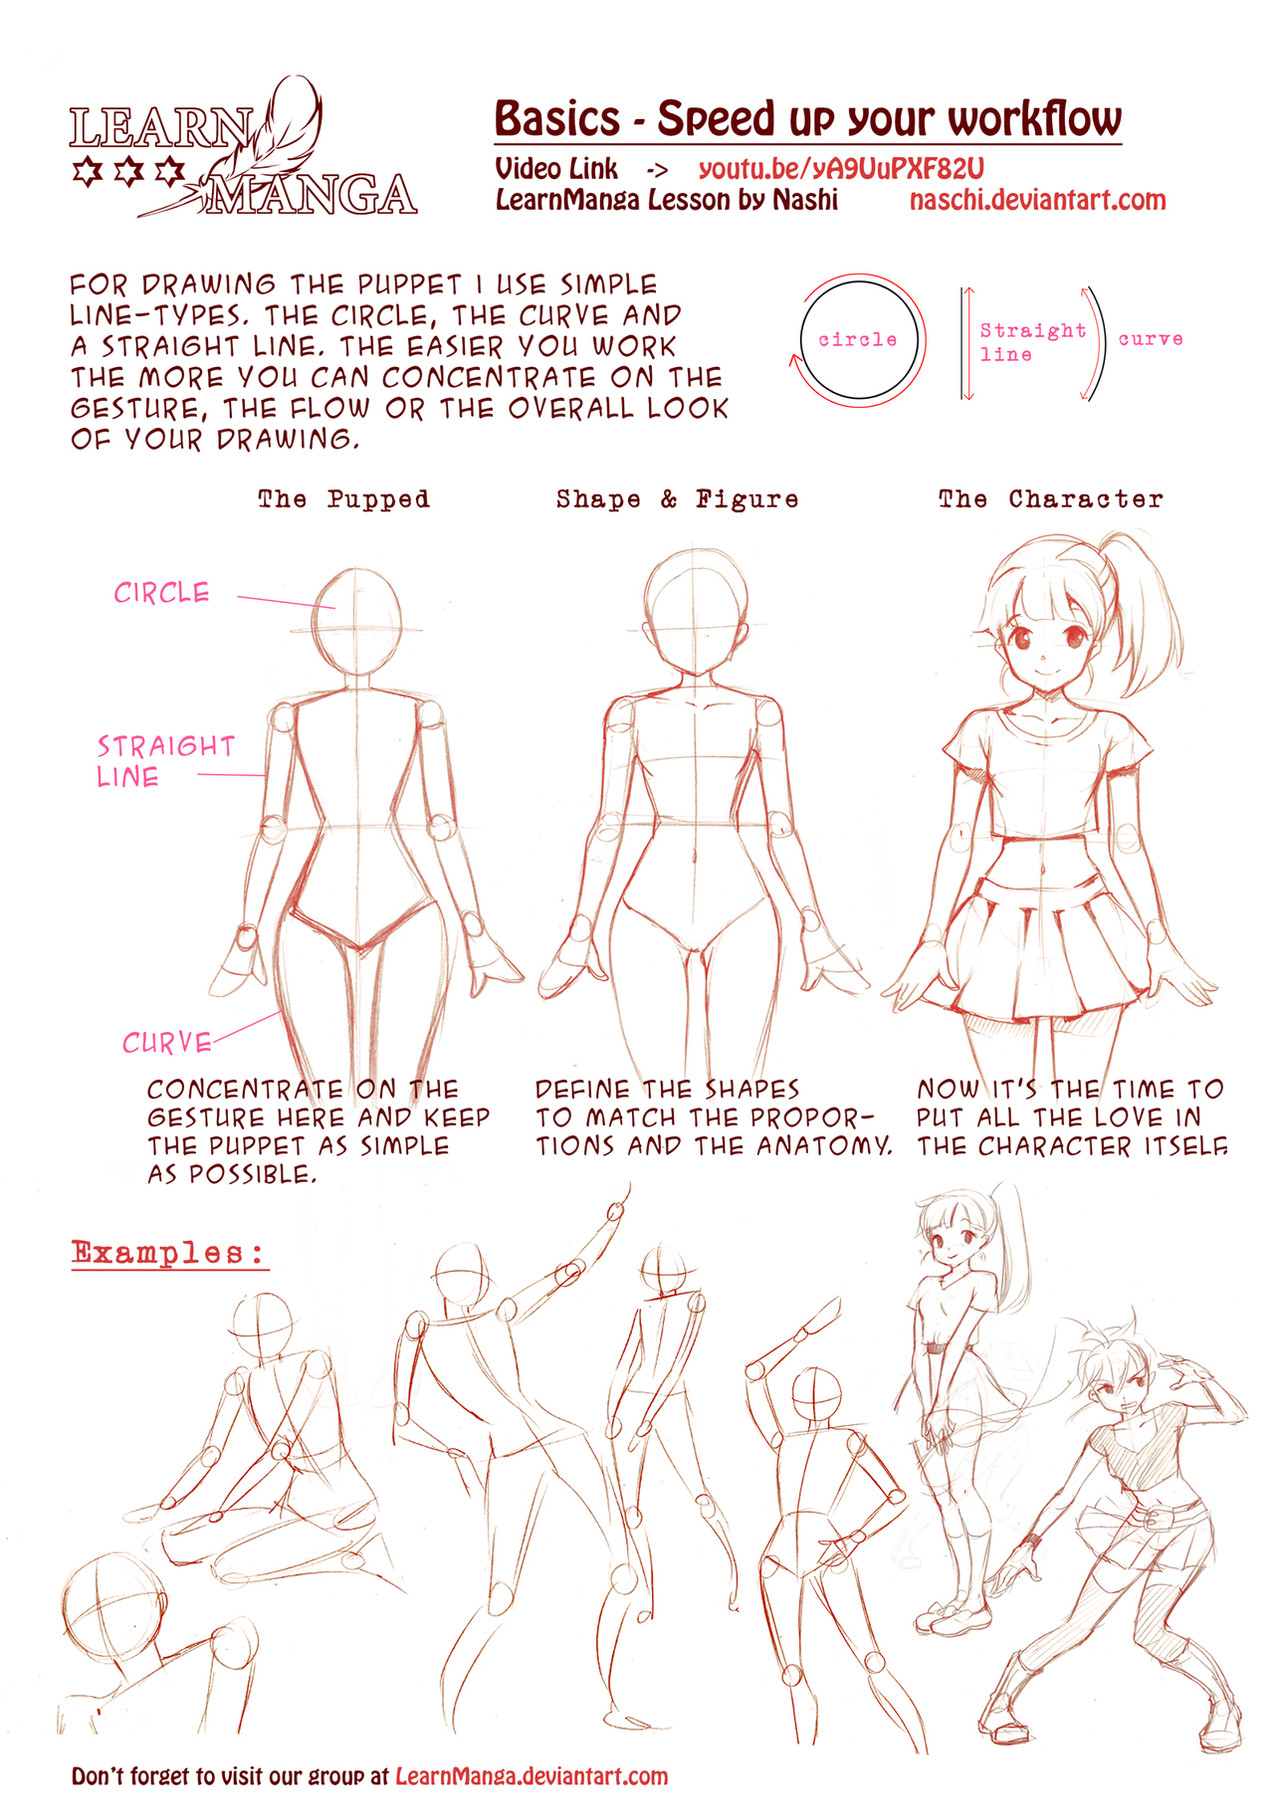
When I draw, I work on phases. Each phase has it's own focus points and goals to achieve. The benefit of working on these phases is that I can focus only on few things at time. The phases are
1. Idea
2. Rough Sketch
3. Refined Sketch
4. Lineart
5. Post-processing
The first phase is useful for trying out many alternatives without using too much time or effort on the drawing. If I don't like the pose, I can easily discard it. I can also try to find a pose that's more fitting or justified for the character I'm going to draw. I went with the third. The fourth is there just to "pre-evaluate possible errors with the drawing".
Second phase is the most important of all of the phases. All major issues should be fixed on this phase. Well done work here will pay off on later phases. At first I draw the full body without paying too much of attention to the issues. After I'm done in 5 mins or so, I start analysing the errors. I use lasso selection to relocate and rotate body parts. I also redraw many parts to fix major issues. I have included my quick rendition and it's fixings. Drawing the character naked is important, because that's the only way you can truly test where the body parts go. Also, naked sketch will serve as a base for the clothing. If the drawing requires major changes, they can still be done. However, a good rule of thumb is that "when you have chosen a pose, stick to it".
I really recommend spending a lot of time on rough sketching. I used to draw at least two or three rough sketches of the same body, because drawing the body from scratch was often easier than fixing the faulty one.
On third phase, it's time to make a preview of the final drawing. All important details and features should be present here. The line quality doesn't matter though. I often draw most important and hard details (such as fingers) quite detailed already in order to make it easier to draw them on next phase. I usually draw some sort of shading as well, and often I won't take the drawing further than this. It has already served as valuable practice work.
On fourth phase, it's time to draw the final lineart. On this phase, the focus should be solely on the linework. While issues should be fixed when they emerge, the point of the two earlier phases is to get rid of them so that the focus can be put solely on making pretty lines. If I'm going to color the piece, this is enough work for now.
Fifth phase is either coloring or inking. Here i just went with solid black and one bluish shade. When the work is done, I usually appreciate it for some time and then after few days I do post-analysis. This piece came out pretty neat, though the legs could have benefited from some extra attention, especially the armor parts and feet.
Related content


Comments: 219

I just tried it, and oh wow, I can't believe how well that actually works- I'm actually shocked lol. Thank you man, you've been nothing but help since I started watching you
👍: 0 ⏩: 0

This doesn't work for pencil and paper drawings does it? I mean, because it gets really difficult to see, redraw, or make modifications after one or two attempts.
I totally do this for digital drawings though.
👍: 0 ⏩: 1

It does, to some extent. Of course you won't be having layers to aid you. You need to draw the first sketch very lightly so that it's easy to erase (also make sure your eraser is clean). In ideal scenario, you don't need to erase anything before inking, but of course it's not that simple. If you erase the sketch, you will need to remember and see the sketch in your mind. If you don't succeed in few tries, then redraw the erased parts of the sketch.
When drawing on paper, the idea and rough sketch pay important role due to limited fixing capabilities. If you make a mistake that would require moving body parts (or the paper is too worn and muddy already), I suggest taking another paper and tracing the sketch by placing it on a window. Then you can move the paper on top of the sketch to the desired direction and trace the body part so that it's in desired place.
The phase 4 is rather straightforward if you use ink. Of course, it won't be easy to fix anything if you mess up with the ink, but you can safely erase the sketch when you are done. Inking takes a lot of courage and faith, so it's good to practice inking quite often.
👍: 0 ⏩: 1
Still really really hard for me, because of my favourite tools in digital art is NOT the eraser, but the Undo function and the Scale function and the Rotate function. I don't have a natural affinity for drawing, mostly I just keep redrawing and undoing the same thing until I get the general feel that it looks aesthetically pleasing. Avery trial and error method. Thanks for your advice anyway though! Yea inking is so stressful haha. Apart from controlling smoothness there's also line thickness to take note of, making it doubly hard.
👍: 0 ⏩: 1
For you, I suggest practice with no undo function or eraser. Just do your best and once you are done, make a new layer and trace the earlier sketch. Do this few times and then compare the sketches. You should be paying attention in which direction you are usually drawing the line when you draw it wrong. You can then try to consciously draw the line differently to compensate your habits.
Another practice you can try is to draw two dots with some distance between and then try connecting those two dots with a straight or arcing line. Your goal here is to end your stroke exactly on the second point and draw all the subsequent lines on top of each other. You will then see how accurate you are at hitting the desired spot and how much spread will occur. You can also add a third point for the arcing line practice so that each line need to go trough this point and end up at the last point.
While you draw these straight lines, I suggest trying to draw in different angles (horizontally, vertically and any angle between) to see which direction is the most accurate. I'm right handed and I find that I'm most accurate when I draw the line from right to left in about 60 degree angle (more in vertical direction rather than horizontal).
And finally I suggest trying to use the eraser more often. I usually use undo when I need to draw long continuous lines, but I tend to eraser shorte lines (my tablet pen has an integrated eraser, so I can just flip the pen and erase things quickly).
👍: 0 ⏩: 0


thanks this should come in handy
")
👍: 0 ⏩: 0

xD This brings back memories... always screwing up my initial pose after phase 4 by changing it... never listening and applying details in phase 1... being a rebel in general... lol
Only in retrospect does this method seem super awesome. I think part of me liked the idea, but hated applying it. Now, at this stage in my artistic journey, I can say I was stupid for not being more structured in my approach. The idea of construction is useful beyond just the drawing you are currently doing, because it helps you realize the true form of things as it is seen in life, through trial and error. it's kinda like anatomy practice without the anatomy, because eventually you'll get it right after enough critical observation.
This is a great tutorial exactly for that reason; hopefully by showing other artists this process and explaining its usefulness, they can avoid having to do things the harder way.
👍: 0 ⏩: 1
Indeed. No matter how many times I mentioned it's importance
 (Wink)")
For me it was impatience that prevented me from drawing my works well. The more I drew, the more I began to spend on constructing the drawing. And it's a good note that I didn't include anatomy in this at all, because once you get the proportions in place, you can start upgrading it with anatomical details.
Drawing is hard, because the artists are making it hard for themselves. While breaking the process into phases still require a lot of understanding and experience, it's so much easier to evaluate the possible results before putting too much effort in the drawing. I hope that people will learn this.
👍: 0 ⏩: 0
Toxic-Pixels In reply to ??? [2014-02-14 05:18:03 +0000 UTC]
LOVE your tutorials man! keep em coming! 
👍: 0 ⏩: 0

Made all our Valentine's Days.
This is literally everything I needed to know about digital art. Doesn't mean I'm not going to wait for more tutorials from you.
 (Smile)")
👍: 0 ⏩: 0


Thanks for posting yet another amazing tutorial!
Getting the first sketch down is something I always have trouble with so this was really helpful.
👍: 0 ⏩: 0


You are soooooo so awesome for this
👍: 0 ⏩: 0

That Shin-chan esque drawing on the top right makes me lol.
I really admire your tutorials. The details in which you explain the topic are just phenomenal and easy to understand. I learn so much from these.
Keep it up Nsio!
👍: 0 ⏩: 1
Hah true! When I was drawing it, I also thought Shin-chan xD
Thank you very much. I'm doing my best to provide useful tutorials
👍: 0 ⏩: 1

This character you use in tutorials looks a lot like Misaka Mikoto from Index and Railgun series, is that intentional?
👍: 0 ⏩: 1
Purely a coincidence. That's just easiest and quickest for me to draw
👍: 0 ⏩: 0
<= Prev |