HOME | DD
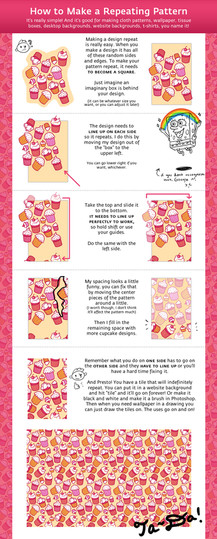
 onisuu — tutorial -- repeating pattern (update)

Published: 2013-04-10 06:00:47 +0000 UTC; Views: 116867; Favourites: 4394; Downloads: 705
Redirect to original
Description
example of how it looks on a site: sta.sh/01pru40biiqs | sta.sh/0u946d86wsh
(I lowered the opacity of the final tile to 40%)
something fun to do/try ;D
drawn in SAI/moved things in photoshop elements
in photoshop you can move things with the offset filter
Filter>Other>OffsetPLEASE REBLOG FROM MY tumblr !!


*please reblog from the source post! ^0^/

it's better! *7*))) <3
Related content
Comments: 208

aww thank you! I"m happy you like it!
👍: 0 ⏩: 0

is there a way to do this in sai or sai2? my laptop cant run PS it just crashes :/
👍: 0 ⏩: 0

aah i've never been able to wrap my head around how people do this, it's super helpful :'D
cute art btw aha
👍: 0 ⏩: 1

aw I'm glad it's helpful! thank youU!!
👍: 0 ⏩: 0

would there be any way to do the offset in clip studio paint?
👍: 0 ⏩: 2

www.youtube.com/watch?v=AeMog-… IDK if you're still looking but this YT video helped me for Clip Studio :')
👍: 0 ⏩: 0

Sorry, i've never used clip studio before. I hope someone else can answer for you^^
👍: 0 ⏩: 0

Thanks for the tutorial, it really saved my sanity. I needed some chainmail and I would've gone mad drawing all the chainmail without a pattern:
Created this chainmail pattern with the help of your tutorial:
👍: 0 ⏩: 1

Woahhh awesome job on that chainmail!! I'm glad this guide helped! ^^ i couldn't imagine drawing it all out by hand xD
👍: 0 ⏩: 1

Thanks.
Yes, that would have been very annoying.
👍: 0 ⏩: 0

Hi :3
So after you've did the last step, can you save the file as .png and then colurr them in SAI~?
👍: 0 ⏩: 1

Hello! Yes it does! First you want to make sure your image has its borders set to the full canvas size.
(Layer > Layer to image size)
then for offsetting:
(Layer > Transform > Offset> Offset by x/2, y/x and choose the radio button for wraparound and then click Offset)
👍: 0 ⏩: 1

Excuse me please,do you still have the manual movements tutorial? I,,,don't really have photoshop heh
👍: 0 ⏩: 1

Ohh I don't have the file anymore cause my computer had crashed earlier this year and some things weren't recovered T_T
1. basically, you would take note of your total canvas size. (Example: width 200 × height 400 pixels)
2. next, open a second canvas the same size, except it is blank
3. then you crop the picture at exactly half the measurements (100 x 200), anchoring to the four different corners of the canvas each time. And each time you crop, copy and paste that corner to the diagonally opposite corner on the second, blank canvas (ex. Top right corner is pasted in the bottom left corner of the blank canvas.
4. With the original image split into the four corners of the second canvas, you should have a blank space in the middle, which you can fill in with another image
sorry this is all text ;_; I can try making a visual guide next time I'm on the computer! May I ask what program you use for drawing? ^^
👍: 0 ⏩: 1

No no !! the more text the more helpful,thank you.
Ah ! I happen to be using Sai,MediBang,and fire alpaca. But you really don't have to !! I wouldnt want to tire you
👍: 0 ⏩: 0

AHHHH I RLLY NEEDED THIS SOOO MUCH
TY FOR MAKING THIS TUTORIAL QwQ
BTW This my last result doe
👍: 0 ⏩: 1

Yay!! I'm happy it was helpful! wow! I love the mix of characters and lil deco arts! ^^
👍: 0 ⏩: 0

Hehe I'm gkad it's helpful!! Also, if you don't have photoshop, you can use GIMP for free
👍: 0 ⏩: 0

I use a marker pen ^^ and also, SAI has a stabilizer setting on its top menu that you can increase to smoothen out your strokes! I set mine in the middle at 6 : )
👍: 0 ⏩: 0

ahh that's so pretty! <333 great work! ^o^ ))
👍: 0 ⏩: 1

Thank you for making this tutorial ;A;
It's a huge help!
👍: 0 ⏩: 0

Wow, this is so extremely helpful! Thank you so much for putting time and effort into making something like this for everyone! :0
👍: 0 ⏩: 0

This is amazing!
you saved my life with this awesome tutorial! ♥
👍: 0 ⏩: 1

I'm happy it helped you! C:
👍: 0 ⏩: 0

I always wanted to know how to do that! Thanks for the tutorial!
👍: 0 ⏩: 1

Hi Onisuu, what codes do you use to make the tile repeat in the custom box? I've been using this code for backgrounds, but I'm not sure what to add to it to make the image repeat. or maybe I should be using an entirely different code? Thanks for your help.
< div class="floaty-boat">< /div>< /div>
👍: 0 ⏩: 1

hi! I actually just use the img src tags as you've shown, and make a large picture (with the repeating) as the picture source 
rather than just uploading the one tile and trying to make it repeat in the coding (cause I don't know how to do that, or if it's possible in the widgets XD)
👍: 0 ⏩: 2

Thanks for your help! I finished my tile and added it to my profile page!
👍: 0 ⏩: 1

Ohhh yay!! It looks fantastic! ^0^
👍: 0 ⏩: 1

Oh, thanks! That makes sense. I with try that.
👍: 0 ⏩: 0

Great tutorial, thank you really really really much <3
👍: 0 ⏩: 1

aw I'm happy it helped you! C:
👍: 0 ⏩: 0

You will have to do it manually in SAI!
You'll need to crop the picture in half so you get the right side and left side exactly, do this by adjusting canvas size and anchoring the image on the middle right and left (2 separate crops)
and pasting the left and right half on and opposite side on a new canvas
well, in general I don't recommend this especially if you have tons of layers cause it will be such a pain in the butt.
yOu can most likely find a free trial of photoshop or photoshop elements which will make your life easier...or maybe look and see if there is a site that helps with making tiled images
👍: 0 ⏩: 1
| Next =>


