HOME | DD
 pradesta — (Step with Explanation) How i do Skin

#explanation #stepbystep #tutorial #howtopaintskin #digitalpainting
Published: 2015-04-28 22:22:20 +0000 UTC; Views: 1904; Favourites: 28; Downloads: 0
Redirect to original
Description
I know i'm not that good yet with my art ,But in case anybody wants to know the steps of how i color skin , here it is
 (Smile)")
(Also english is not my native language , so please bare with me
") )
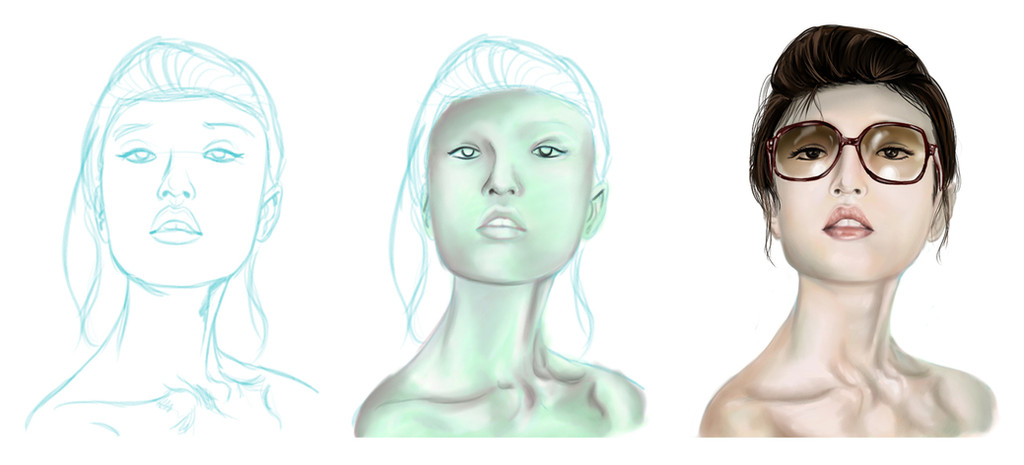
)1. Dirty Lineart (or you can say sketch
)Make some sketch , i try to imagine how my drawing is going to be (the pose , and stuff) , i'm not worrying about the proportion yet , bcs i could change it later . (P.s After i do the head , i do the direction of the collar bone , just some line telling where's the collar bone is pointing , this collar bone thing helped me a lot to imagine the pose and also cleveage)
2. Sort-of-a-clean Lineart
I clean the sketch by creating a new layer and draw on top of it (using brush with no 'transfer' setting) . I make sure the line is kind of smooth . After i finished , i delete the sketch , and then i can fix the proportions here by using 'Lasso' Tool and selecting which part is wrong , ALSO! use 'warp' on transform setting or 'Liquify' on filter , it helps a lot fixing your proportion without creating a lot of mess .
3. Base Color
By using 'Lasso' tool , i select my lineart which i've finished (sometimes i use pen -> make selection , if the line is complicated aka the hair) And then fill it with base color , a neutral color that is not too warm & not too cool (some sort of red-brown-ish) . After that , i use 'Clipping Mask' on my lineart layer and put it into the base color layer (this help cleans my drawing even more) , lower the opacity of lineart layer to 20-30% and set the blending mode to 'Multiply'
4. Shadow And Hair
When i pick the color for shadow , it's always the darker and warmer color (on photoshop's color picker the warm and saturated color is on the right side , while cool color and desaturated is on the left side) , and then i imagine the light source is gonna be from middle top . For the hair i choose a saturated green color (top right corner on the color picker) . I used standard round brush from photoshop with 'transfer' setting and i don't use airbrush that much (A trick!! Use opacity lock on the base layer so that when you paint , your color is not getting out of the edge :'D)
5. Adding Contrast
Sneaky trick
use 'Auto Contrast' adjusment on image , but make sure you didn't put any lighter color than the base color yet . And walaa , it's magic , if it's to intense you can fade it by choosing Edit - Fade Auto Contrast . Use darker color for darker shadow , like under the bewbs (?) (i don't really know how to explain shadows and light , sorry 6. Blending , Adding Pink-tone , Adding Lighter Color
When i blend i always-always used smudge tool (for the brush : standard round brush , with only scattering mode set) set the smudge's strength to 6-8% and start blending , but make sure when you blend don't blend the hard edge too , it'll make your drawing really weird , trust me . For the pink-ish tone , i chose light pink , and by using airbrush , set the brush to multiply , and start painting where your skin had pink-ish tone , like the cheek , bewbs and other shadow-y part . For the lighter color , you could paint it with that lighter-but-cool-tone color , or you could use dodge tool , but set it to 5-7% and the range to 'highlights', start painting the skin that got the light source mainly .
7. Finish and Adjustment
I create an adjusment layer (i usually chose vibrance , brightness and contrast , color balance. but in this case i only used the color balance) and i set it to blue-ish tone . And finish
Oh and that opacity mask thing , i used photoshop for more than 2 years , and i didn't know that there was this feature orz
I'm not gonna explain how i do the hair since this is only showing how i paint skin , sorry
I hope this could help , i really do .
And i'm sorry if it's hard to understand , it's the first time i've ever done something like this and i told you i'm not very good with english
Follow me on Instagram (New)