HOME | DD
 Pyek — Artistic Journal Skins: for Beginners: Pt II

Published: 2012-04-23 05:05:17 +0000 UTC; Views: 12483; Favourites: 675; Downloads: 125
Redirect to original
Description
Edit 13/12: Revised and updated-looking tut says almost the same exact things as it did before! Now with woodland creatures!Thanks so much to everyone who has commented on and favorited these tuts. It really means the world when I know it's all been useful to someone.
-------------------------------
My goal is to explain in laymen terms what I learned trying to wriggle my way through CSS when I first started. I am not by any means an expert on the subject of dA journal skins.
That said, if you want a tutorial on fancy CSS, this isn't the tutorial for you. These tutorials will focus more on using a simple background image to make an artistic-looking journal, and just shifting basic essential CSS around to suit--nothing very advanced. It is, as it says, for beginners who are, in fact, beginning. c:
I hope someone will find this useful. Please comment if anything is unclear or you have additional questions or comments.
Complimentary Tutorials...
Applying your custom CSS to your dA journal
-------------------------------
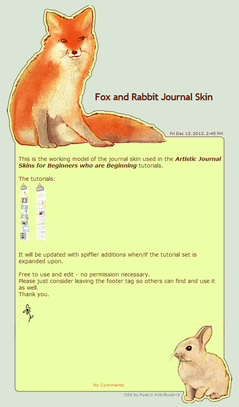
Do you like the journal skin example used in this Tutorial? Or just want to see it in action? See it here , or install it to your journal here .
-------------------------------
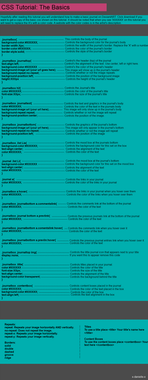
For easy Copy & Pasting, here is the CSS as seen in the tut above <3
Remember, some of your specs won't match up if you are using different images. Adjustments will be necessary.
.journalbox {
background:transparent;
border:none;
}
.journaltop {
background-color:transparent;
background-image:url( ____TOP____ );
background-repeat:no-repeat;
margin:0px auto 0px auto;
width:580px;
height:376px;
text-align:left;
font-size:0px;
}
.journaltop h2 {
padding:215px 0 0 220px;
width:480px;
color:#681507;
font-size:25px;
}
.journalbox h2 a {
color:#681507;
}
.journaltop span{
float:right;
margin:72px 33px 0px 0px;
color:#681507;
font-size:9px;
font-weight:normal;
}
.journaltop img {
display:none;
}
.journaltext {
background-color:transparent;
background-image:url( ____MIDDLE____ );
background-repeat:repeat-y;
margin:-10px auto -40px auto;
padding:10px 37px 0px 30px;
width:525px;
text-align:left;
color:#681507;
font-size:14px;
}
.journaltext a {
color:#f25b1e;
font-weight:normal;
}
.journaltext a:hover {
color:#f2b91e;
}
.journalbottom {
background-color:transparent;
background-image:url( ____BOTTOM____ );
background-repeat:no-repeat;
margin:0 auto -200px auto;
padding:150px 0px 0px 12px;
width:580px;
height:280px;
text-align:center;
font-size:10px;
}
.journalbottom a {
color:#f25b1e;
padding:40px 0 0 0;
}
.journalbottom a:hover {
color:#f2b91e;
text-decoration:none;
}
Related content
Comments: 244

Where did you type the code? Like DA or some other website?
👍: 0 ⏩: 1

Maybe this will help! c:
[link]
👍: 0 ⏩: 0

How can you like make buttons at the bottom instead of a footer? Like a button that leads you do refs, commision prices, etc. side by side?
👍: 0 ⏩: 1

In the footer area, you would just use images links instead of text links. So, make your buttons, upload them to an image hosting site, then in the footer, you would type something like this (minus the spaces):
< a href="link-URL"> < img src="button-URL"> < /a>
Putting the code to plug in your button image there instead of just doing a text-link makes the image the link instead.
👍: 0 ⏩: 1

Thanks for this and PartI: you've been of great help!
👍: 0 ⏩: 0

Are you doing part 3? This is an amazing tutorial!
though, how do you make it where you got links above the middle section with an icon (in this case it's a paw with a flame and it's at the top left. [link]
👍: 0 ⏩: 1

That's when you'd use the Header area above where you entered in your CSS. Putting something in the header means it will appear in every journal post without having to re-enter it every time. The icons are just separate images uploaded to a site like photobucket or your sta.sh, just like the background images are uploaded.
In the header, you would put: < a href="link-URL"> Link text people will see goes here
You can get fancy with headers and footers with more CSS to design exactly where they sit and how they look etc, but that's the basic info.
👍: 0 ⏩: 0

Ok so im making a journal skin for a friend and the top and bottom pictures aren't working, i have cheaked all the codes and now i really dont know what to do ^ ^' help!
👍: 0 ⏩: 0

What's the code to remove the journal history entry? Whenever we post a journal, this appears
" Journal Entry: Sat Apr 27, 2013, 1:02 PM " right below the title. Can we remove that? And what's the code for it?
Thanks
👍: 0 ⏩: 0

Great tutorial!
Sadly the journal I made is bugging.. There's a huge gap on the right beside the journal [link]
Anyway of fixing this? I followed the instructions carefully :/
👍: 0 ⏩: 1

That looks like a padding issue, it will likely just take some adjusting guess-and-check work in the .journaltext area until you get it just right where you want it.
👍: 0 ⏩: 0

hi, here's what i've done using your code: [link]
i've also learned a few things along the way...thank you so much!!!
👍: 0 ⏩: 0

Thank you so much for making this tutorial, I was able to make a journal skin I'm proud of <3
👍: 0 ⏩: 0

this is soooo helpful, it's really hard to look for tutorials for journals that are very detailed, thank you soo much!!
👍: 0 ⏩: 0

This is SO helpful! Much more understanding than most other tutorials on jornal skin making! 
I do have one question though, would the URLs still work if I uploaded the three images here, on DA? Or does it have to be Photobucket or Flickr? :3
👍: 0 ⏩: 1

You can certainly upload them here, I often use sta.sh for my journal pieces. c: Anywhere that gives you a direct URL for the images is fine.
👍: 0 ⏩: 0

Ahh thank you will be using this to make my own skin
👍: 0 ⏩: 0

hey, for some reason my skin isnt working at all. help please?
👍: 0 ⏩: 0

this is such a fail ;n; [link]
help me ;n;
👍: 0 ⏩: 0

Holy crap! I have been looking for a tutorial for weeks! directed me here and I'm glad she did. These tutorials and the last part will come in handy :3
👍: 0 ⏩: 0

OK SO IT TOOK ME LONG ENOUGH and I finally got a skin made!
[link]
Unfortunately, I can't figure out how to scoot the journal title over about 50 px or so. halp?
👍: 0 ⏩: 1

Try putting in this to your title's code:
padding-left:50px;
👍: 0 ⏩: 0

great tutorial... but WHERE do you write all these codes?
👍: 0 ⏩: 1

Thanks!
Go like you're creating a new journal entry. Top-left you'll see where it says "New Journal Entry" and just below that, "Current Skin: ----". Beside that is a link that says "Edit Skin". Click that link. You'll get a pop-up. Ignore the "Skin Header" and "Skin Footer" boxes for now, those have other uses. Your entire CSS goes in the big center box labelled "Skin CSS". Preview it, tweak it, whatever until you're happy. Then give it a title and hit "Save". Your skin is now saved in your left-hand collection of skins, and you just select it to apply.
👍: 0 ⏩: 1

ok..working on part 2 as we speak...I need my part 3 fix soon!
👍: 0 ⏩: 0

[link]
Thanks for the help on this! It was great for making my journal!
👍: 0 ⏩: 1

That's gorgeous! Thanks for sharing
👍: 0 ⏩: 1

Amazing tutorial C:
I have one problem, however, the text box hangs off the image and I don't know how to fix it ;n;
👍: 0 ⏩: 1

It may just be a padding problem. Is it an additional textbox tag or are you talking about your main text body area as a whole?
👍: 0 ⏩: 1

Oh, it's the whole text box as a whole.
👍: 0 ⏩: 0

What exactly is GSS? I tried looking it up, but I didn't get a good answer.
👍: 0 ⏩: 1

Do you mean CSS*? CSS stands for Cascading Style Sheets; they tell the html what to do and how to look. It's basically a language or a set of rules that you're writing that tells your project - in this case, a journal skin - that 'this is the background you use in this area', 'this is the color of links in this area', 'using this tag makes the text move over here', etc.
👍: 0 ⏩: 1

OK. That's nice to know. So it's a type of computer programming then? Do you know if it's similar to VisualBasic.NET?
👍: 0 ⏩: 0

I don't really get WHERE I should write all those codes. And I would just like to have the header, not the footer.
👍: 0 ⏩: 1

The entire code for your journal skin goes in the large center box. If you are only using a top image, then you simply leave the backgrounds for the middle and bottom pieces designated as background-color:transparent; as opposed to plugging in an image URL. The header and footer boxes are for things like html code so you can set up sidebars and permanent fixtures like that, not for CSS.
👍: 0 ⏩: 1

ohhhhhh I get it now!!! I'll try to do my journal skin now! thanks, really.
👍: 0 ⏩: 0

Which images aren't working for you, the background images? Make sure you're using the direct link for the URL.
👍: 0 ⏩: 1

I use Sta.Sh for it.. and it won't work..
👍: 0 ⏩: 1

if you're using stash, you need to click the download link to the right of your picture so that it opens up in its own page. The URL on that new page is the direct link that you need to use in your CSS.
That should work if you're using the right link, that's how I do mine as well. Let me know if it's still not working for some reason. c:
👍: 0 ⏩: 1

it won't work... may I sent you the CSS and you correct it?
👍: 0 ⏩: 1

certainly, I'll be happy to take a look for you.
👍: 0 ⏩: 1
| Next =>


