HOME | DD
 Pyek — Artistic Journal Skins: for Beginners: Pt II

Published: 2012-04-23 05:05:17 +0000 UTC; Views: 12482; Favourites: 675; Downloads: 125
Redirect to original
Description
Edit 13/12: Revised and updated-looking tut says almost the same exact things as it did before! Now with woodland creatures!Thanks so much to everyone who has commented on and favorited these tuts. It really means the world when I know it's all been useful to someone.
-------------------------------
My goal is to explain in laymen terms what I learned trying to wriggle my way through CSS when I first started. I am not by any means an expert on the subject of dA journal skins.
That said, if you want a tutorial on fancy CSS, this isn't the tutorial for you. These tutorials will focus more on using a simple background image to make an artistic-looking journal, and just shifting basic essential CSS around to suit--nothing very advanced. It is, as it says, for beginners who are, in fact, beginning. c:
I hope someone will find this useful. Please comment if anything is unclear or you have additional questions or comments.
Complimentary Tutorials...
Applying your custom CSS to your dA journal
-------------------------------
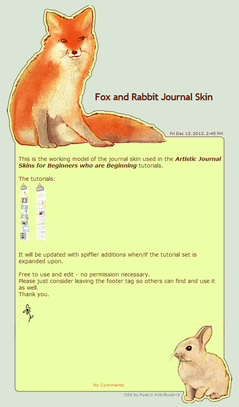
Do you like the journal skin example used in this Tutorial? Or just want to see it in action? See it here , or install it to your journal here .
-------------------------------
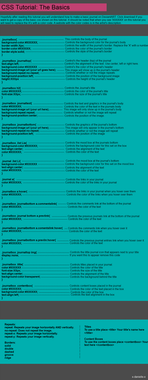
For easy Copy & Pasting, here is the CSS as seen in the tut above <3
Remember, some of your specs won't match up if you are using different images. Adjustments will be necessary.
.journalbox {
background:transparent;
border:none;
}
.journaltop {
background-color:transparent;
background-image:url( ____TOP____ );
background-repeat:no-repeat;
margin:0px auto 0px auto;
width:580px;
height:376px;
text-align:left;
font-size:0px;
}
.journaltop h2 {
padding:215px 0 0 220px;
width:480px;
color:#681507;
font-size:25px;
}
.journalbox h2 a {
color:#681507;
}
.journaltop span{
float:right;
margin:72px 33px 0px 0px;
color:#681507;
font-size:9px;
font-weight:normal;
}
.journaltop img {
display:none;
}
.journaltext {
background-color:transparent;
background-image:url( ____MIDDLE____ );
background-repeat:repeat-y;
margin:-10px auto -40px auto;
padding:10px 37px 0px 30px;
width:525px;
text-align:left;
color:#681507;
font-size:14px;
}
.journaltext a {
color:#f25b1e;
font-weight:normal;
}
.journaltext a:hover {
color:#f2b91e;
}
.journalbottom {
background-color:transparent;
background-image:url( ____BOTTOM____ );
background-repeat:no-repeat;
margin:0 auto -200px auto;
padding:150px 0px 0px 12px;
width:580px;
height:280px;
text-align:center;
font-size:10px;
}
.journalbottom a {
color:#f25b1e;
padding:40px 0 0 0;
}
.journalbottom a:hover {
color:#f2b91e;
text-decoration:none;
}
Related content
Comments: 244

Part I and Part II are outstanding. This is honestly the best tutorial I have come across on DeviantART for making a journal. Everything else is rubbish, no offense to them. 
When will Part III be coming?
👍: 0 ⏩: 1

Wow thank you!! ohmygosh you're so nice~! :'D
Part 3 is underway. It's been some time coming because I keep running into other things I need to do first.. :'D But hopefully soon!
👍: 0 ⏩: 1

Hehehe, it's true! 
I'm glad to hear it! I'll check back every couple days to see if it's up. ^^'
👍: 0 ⏩: 1

Baha..! You give me much too much credit, I'm no master!
But my ego is very flattered~! :'D
👍: 0 ⏩: 0

First can I just say, that I have been searching for a simple tutorial like this for a VERY long time. Thanks so much for making this~!!
On another note, I have a problem. When I hit the preview image for my CSS, the middle part of it looks cut off, not to mention the titles and text are in the wrong place (I'm sure I just have to tweak the code and move it to the right spot for THAT problem ;>). May I note you the CSS so you can take a look?
👍: 0 ⏩: 1

Thank you!!
Did you change the pixels used in this example to match your images instead? The text and titles also need adjustment on their padding until they sit in the correct places on your bg. Those numbers have to change to accommodate every different skin. If you've tried these tweaks and it still doesn't seem to be working, or it's just too frustrating or unclear, you can certainly go ahead and note me the CSS. I'd be happy to try and help!
👍: 0 ⏩: 1

Thanks, I changed the pixels of the middle box so now they fit!
It has now made a weird box underneath the middle box and above the bottom one, and the middle box isn't connected to the top one... Dx
If it's not too much trouble, I'll note you the CSS~
👍: 0 ⏩: 1

Got the note, just had a look at it. I see what the trouble is and it isn't hard to fix. c: I'll be noting you back.
👍: 0 ⏩: 1

I have been LOOKING AND LOOKING for a good tutorial!!!!!!!!!!!!!!!!!!!!!!!!!!!!!!!!!!!!!!!!!!!!!!!!!!!!!!!!1
👍: 0 ⏩: 1

8D Swell! I hope this is useful to you then!
👍: 0 ⏩: 1

One question: can I do this in Paint Tool SAI?
👍: 0 ⏩: 1

Yep! You can use any arts program you like, the tools might just be a little different. Same basic principles apply.
Heck, you could do it is MSPaint if you wanted to! ;3 Though it might not look.. eh. Yeah best stick with SAI. ouo
👍: 0 ⏩: 1

yeah XD I have a tablet so yeah I was wondering.. I can't really figure out Photoshop Elements 9...
👍: 0 ⏩: 0

This is the only helpful tutorial I have encountered. THANK YOU.... been raging for nearly 3 days now...
👍: 0 ⏩: 1

Thank you! I'm glad it helps. c:
👍: 0 ⏩: 1

You're welcome! It's so well explained that I'm sure it will
👍: 0 ⏩: 0

This is exactly what I was looking for! Thank you so much for making this tutorial. I can't wait for part three.
👍: 0 ⏩: 0

First journal skin tutorial I found, where every single line of the css code is explained. this helps a lot, especially ppl who know a bit of css but aren't pros at programming.
very well done
👍: 0 ⏩: 0

It helped a lot, can't wait for the third part.
Oh, and I have a question. How do you 'center' the journal's title? I mean, do I always need to edit padding when the title is longer?
👍: 0 ⏩: 1

Hi! I'm glad it helped. c:
Centering the title is simple, you just need to add text-align: center; to the h2 code.
So, using the same example code from the deviation, you should have...
.journaltop h2 {
background-color:transparent;
border:none;
color:#000000;
font-size:20px;
padding-top:465;
text-align: center;
}
The bold text is the addition that will center your title.
Just keep in mind that only the title text will be centered as this does not affect the date and time below it. To center that as well, you need to as the same tag (text-align: center;) to the .journaltop code as well.
👍: 0 ⏩: 1

For some reason it won't allow me to determine font-size. It complains that it's malformed O.o
👍: 0 ⏩: 1

Where are you changing the font size/what code are you using? Or if it's easier, go ahead and note me your CSS. I'll be happy to try and help you figure out what's not working properly.
👍: 0 ⏩: 1

I did it exactly the way you did :/
👍: 0 ⏩: 0

I still don't quite understand the whole "padding" thing. Care to elaborate a bit? ^^"
👍: 0 ⏩: 1

I can't tell if this is sarcasm or not, have I over-explained unnecessarily or are you being serious..? x'D
When you imagine padding, picture your text in an invisible box. The box's purpose is to keep the text contained where you want it. Increasing the padding pushes the text farther away from the inner walls of it's invisible box. The more padding, the further away the text is forced to be from anything surrounding it--whether it be an image or the edge of your skin.
So, if I want my text to really hug the edge of my journal skin, I will decrease it. If I want thicker margins where the text hits that invisible wall before reaching the edge of the skin, I'll increase the padding. For example, pretend my skin is a 200px wide, 400px tall box and I want a medium margin around the text that appears inside. I might make a text box that is 200 x 400 as well and then add padding that looks like this: padding: 20px 10px 20px 10px;. Because the padding instruction travels in a clockwise circle, the top of my text is pushed down 20px, the right side is pushed in 10px, the bottom up 20px, and the left side in 10px. Now it won't hug the edges of the skin.
I hope that makes some sort of sense. If it doesn't quite, let me know and I'll whip up a picture-example or something (those are so much easier for me! x'D) I thought someone else had uploaded an image that explain it already but I can't seem to find it now. *searches*
Or, was it something else that was unclear?
👍: 0 ⏩: 1

It was completely serious! Don't worry! XD
And thank you!! It all makes sense now. :3
👍: 0 ⏩: 1

Umm.. well, I got all the coding done, but only the middle is functioning - the rest has gone to default.
Here are some screenshots of what I'm seeing:
[link]
[link]
[link]
Any help you could give me (when you have time, of course) is very welcome! Thank you for your time!
👍: 0 ⏩: 1

It looks like you're pasting the CSS into the actual journal entry area?
Going by the first SS you posted, you see where it says "Current Skin: Rainbow Music"? Straight across from that is a "Edit Skin" link. Click that and you'll get a pop-up. You want to paste your CSS in the biggest box right in the middle of that pop-up. Before you save it, give it a different title so it will save a new skin instead of over-writing the Rainbow Music one.
Is this what you've already tried?
👍: 0 ⏩: 2

It works now!! Thanks so much!! All I need to do is edit the padding a bit :3 And also, I had a little typo, had an extra "t" in there. I made the CSS while looking at your tutorial, and I had seen a "t" after the ";" for the width of something. Just thought I should let you know. c:
👍: 0 ⏩: 1

Ah thank you! I kept pushing 't' for new text boxes before I confirmed the ones I was in... x'D I thought I'd found and deleted them all. I guess not! I'll fix it, thanks for letting me know. c:
👍: 0 ⏩: 1

Sure thing! Don't want anyone else to make the same mistake I did. c:
👍: 0 ⏩: 0

I have been using the edit skin thing, this is just what came up when I hit "save as", but I have not tried just putting it in the middle box. There were "header" and "footer" boxes, so I had put the different codes according to the boxes. I'll go try that now!
👍: 0 ⏩: 1

Ah I see. ^^ All CSS needs to go in the middle box, but I definitely see where it's misleading since there are 3 pieces of your bg and 3 boxes in the pop-up.
The header and footer areas are to be used if, for example, you want a permanent link to appear at the bottom of all your journal entries, but don't want to have to type it in every time. By typing it in that footer box, your skin will 'remember' it and always apply it. Header, naturally, is for things that always appear at the top of your post, and footers appear at the bottom, with your text entry in between them.
I don't know if you've seen my journal that I use or not, but if you want to see an example, you can look here: [link]
The sidebar I made on that skin with the signs is in the header box so it appears automatically there at the top. In my footer box, I have the set of "Lillegard Island" links so that they are a constant with the skin as well.
👍: 0 ⏩: 0

That means that on top, middle and bottom do not write anything? All codes are written at the time "arming" the skin on dA journal?
👍: 0 ⏩: 1

I'm not sure I understand your question.
Write anything where--on the image itself or in the code? Arming the skin?
👍: 0 ⏩: 1

sorry for that question, my doubt is if the code is written in the image? or where you put the code?
👍: 0 ⏩: 1

Ah!
You're right I didn't address this. Perhaps I should work it in to Part 3 of this tutorial, which is still to come.
To apply the code, you go into your blog as if you're writing a new journal entry. If you have a premium account, there will be a section along the left-hand side of your screen with any skins that you can use; either installed from other people or which you have made yourself. When you're making your own, you click on the "Edit Skin" link directly beside your new, unpublished journal entry. You'll get a pop-up where you can type/paste your code and save it. From then on, whenever you go to make a new journal entry, you just click the one you want to use.
I hope that made some kind of sense. 
... This will be easier to explain with pictures and screenshots. x'D
👍: 0 ⏩: 0
<= Prev |


