HOME | DD
 Quelchii — Traditional (mixed media) tutorial
#avengers #coloredpencils #drawing #loki #marvel #portrait #traditional #hiddleston #tomhiddleston #coloredpencil #copicmarkers #markers #mixedmedia #stepbystep #traditionalart #tutorial #mixedmediatraditional
Published: 2015-02-10 18:52:01 +0000 UTC; Views: 17674; Favourites: 394; Downloads: 100
Redirect to original
Description
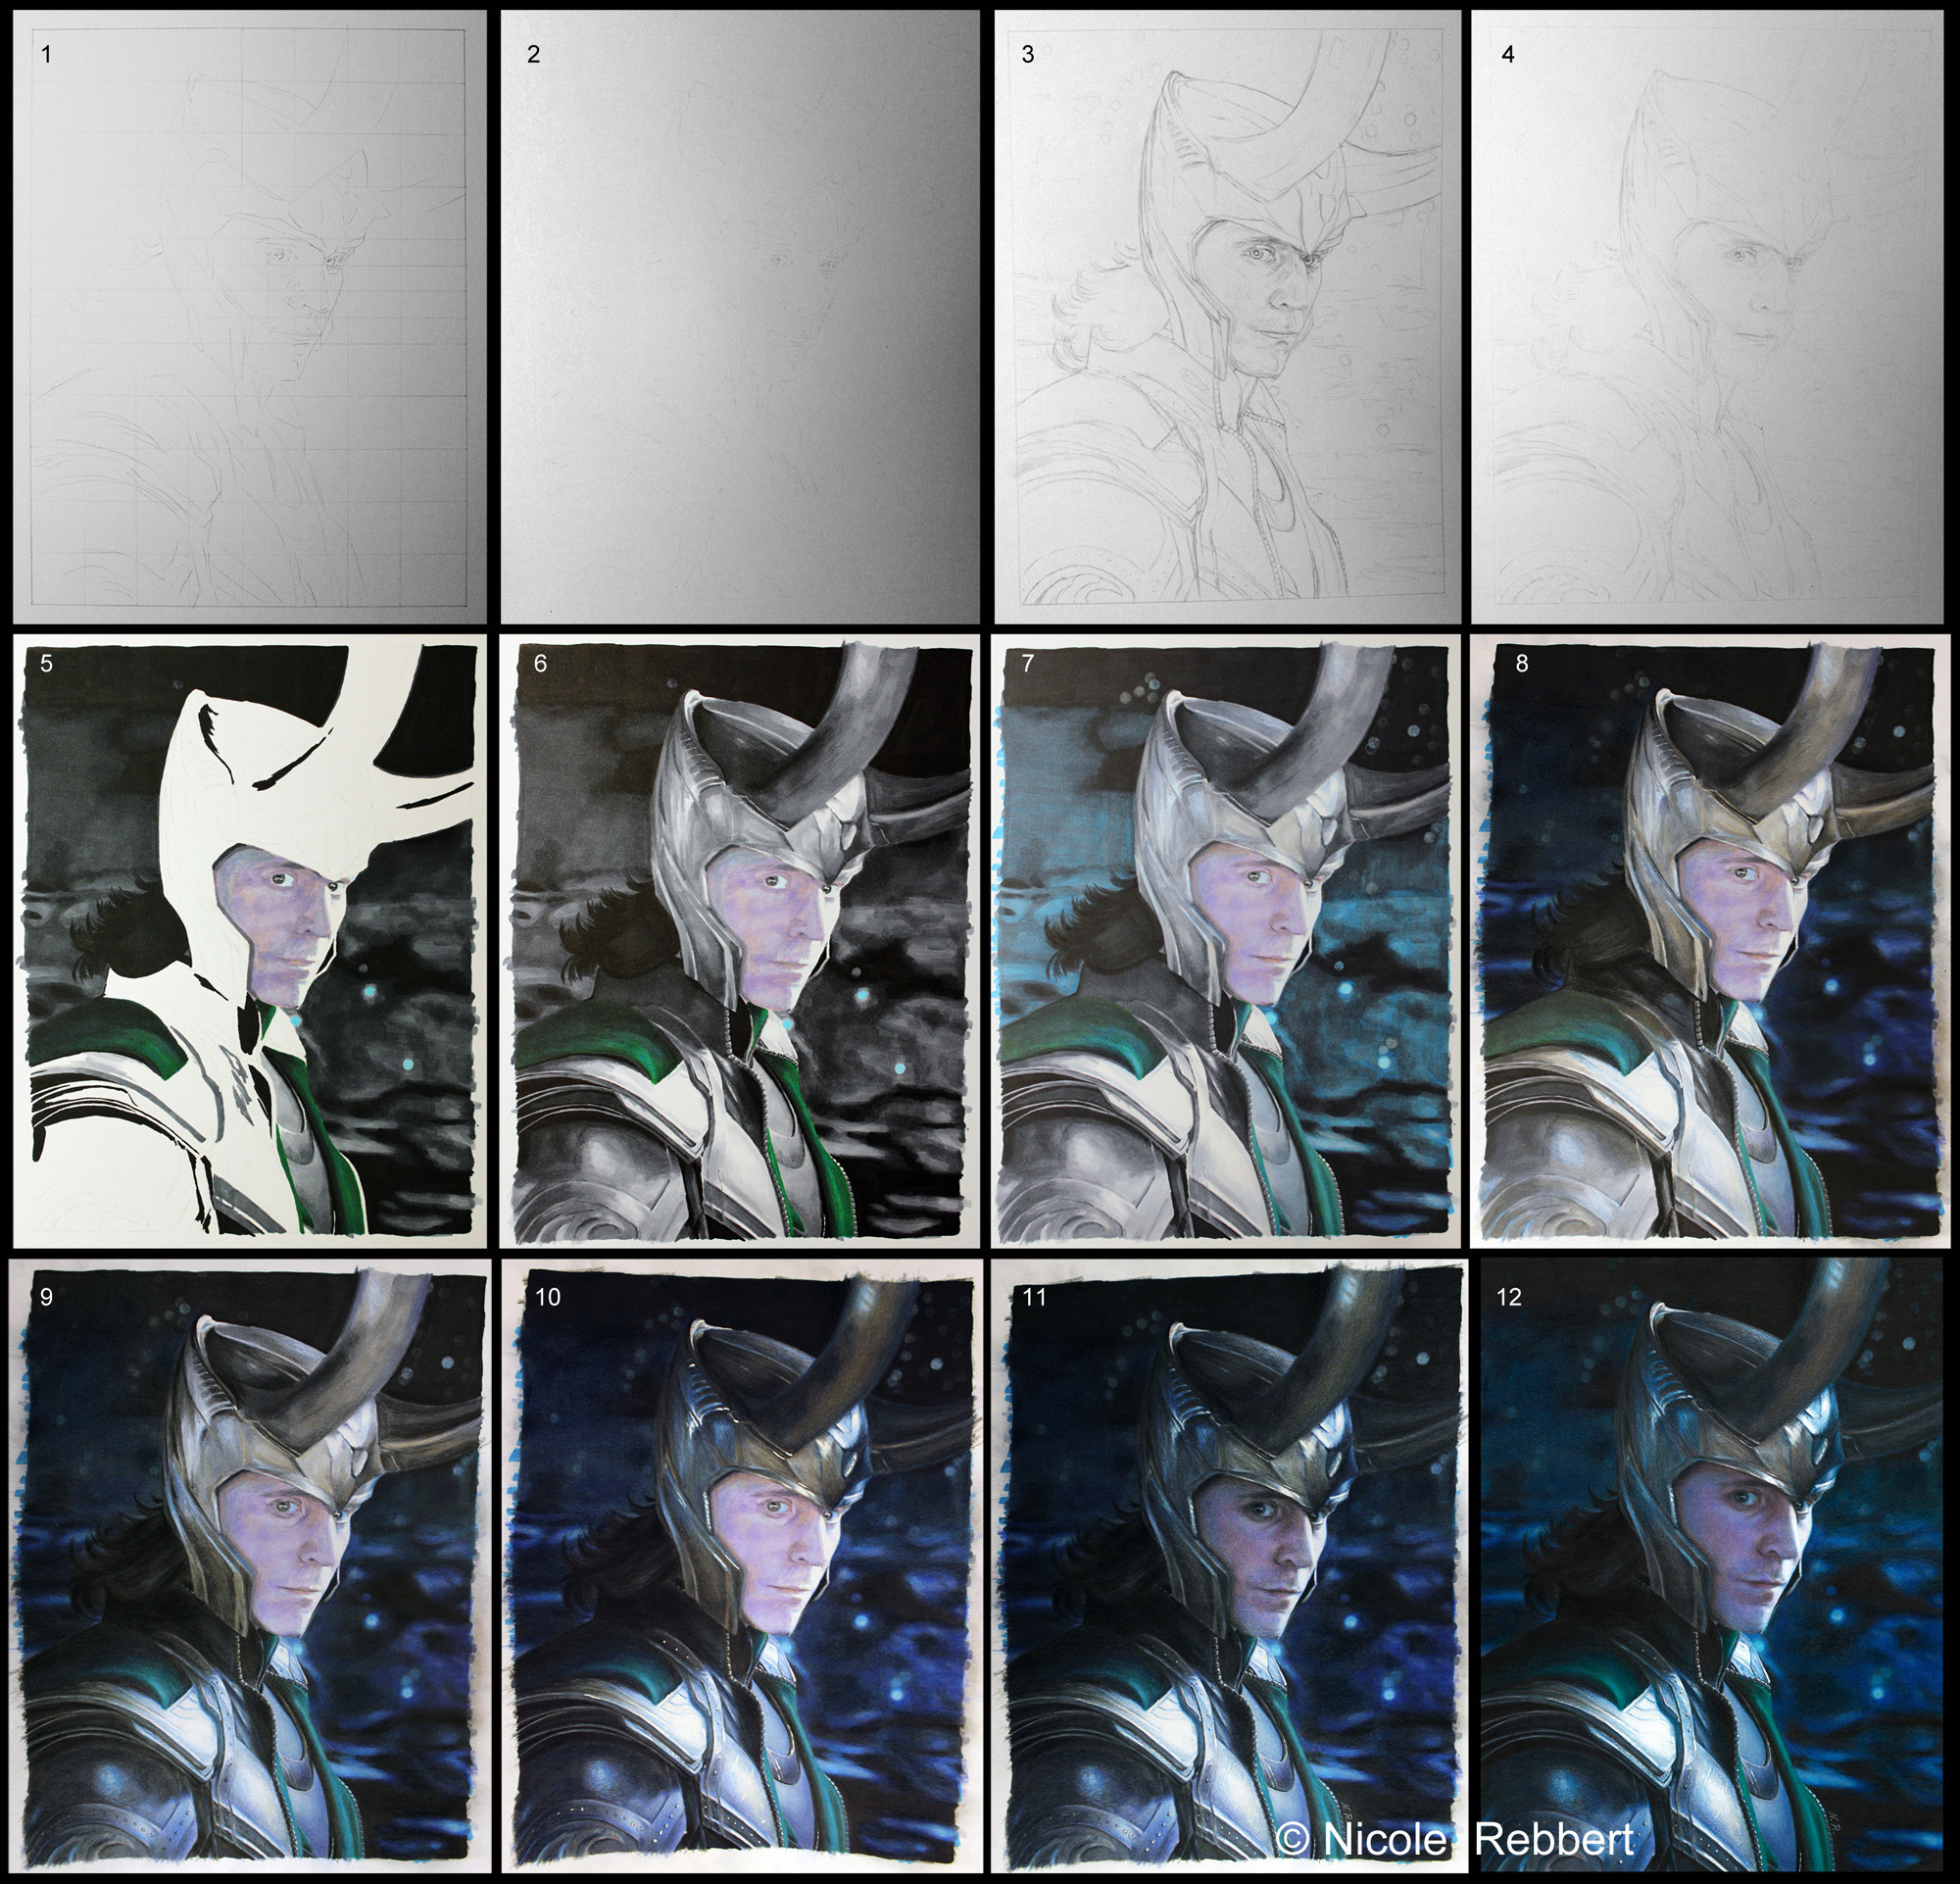
This is a little tutorial (see explanations at the bottom of this description) for my latest traditional mixed media drawing "Loki" (Tom Hiddleston as Loki from the movie The Avengers).I photographed the steps 1-11 with my Canon EOS 600D (EOS Rebel T3i) without flash. I'm sorry for the bad quality, but the light conditions were not very good. Step 12 is the scan.
Please don't upload my pictures somewhere else without my permission. Don't infringe copyright!
Here are some more detailed step by step tutorials/descriptions for colored pencil and mixed media + the finished drawing:
Here is my summarized working process for this drawing:
Sorry in advance for all the mistakes (It would have been much more easier to write this in German!).
First off here my equipment:
- a printed reference picture (edited in photoshop, because screencaps are often too dark!) and laptop to zoom in (details!)
- paper A4 (210x297mm, 190 g/m²)
- Faber-Castell pencil H3 and HB or Faber-Castell grip 1345 HB 0.5
- Faber-Castell Perfection 7056 (eraser pencil), eraser, coloured pencil sharpener, set square or ruler
- Copic Ciao markers
- Faber-Castell Polychromos artists' colour pencils
- uni-ball Signo pigment ink um-153 white
step 1: Grid method for major outlines: Draw a grid on the paper (H3 and don't press too much, because you have to remove it and don't want to get "grooves/furrows"!!!) and on the reference picture. Draw the important outlines with a graphite pencil HB.
step 2: Erase the grid lines completely and the outlines so that you can barely see them.
step 3: Draw all outlines and details properly (you can also "test" a few shadows in order to make sure that the face looks good).
step 4: Erase everything a little bit (especially in bright areas!).
step 5 - 7: Base colouring with markers. I also blended a few colours (works only with thick paper >180g/m², because otherwise it would bleed through and marker paper is not so good for colored pencil!), because I don't have so many Copics. Side note for step 7: There is already a little bit of colored pencil in the face to check the likeness again (eyes, nose, mouth) and too smoothen the skin texture.
step 8: Addition of colored pencil layers to the background (black, different shades of blue, cold grey and white for the stars -> you can apply white colored pencil on a black or very dark marker layer!) + a few colourful highlights for his armour (blue and ochre) and grey.
step 9: Near completion of his armor (black, different shades of blue and cold grey -> start with the colourful details, add dark shadows and/or dark details and blend everything with a lighter colour e.g. light grey or light blue in this case) + some more grey colored pencil layers for his helmet
step 10: Final colouring of the helmet (a bit ochre, differeng shades of grey and blue). Adding of white highlights with a white gel pen.
step 11: Define (/remove parts of) the white gel pen lines/dots with a white or dark colored pencil (depends on area). Colouring of the face. Side note: Is something wrong with face? => turn the reference and the drawing upside down, then it's easier to spot mistakes (sounds strange, but it helps a lot)!
step 12: scan (edit the picture in Photoshop CS5: cut out the border, edit brightness/contrast and colour balance to resemble the original drawing)
More side notes:
- Usually I start with the face, because when it's completely messed up I have to start again (this happened one time so far). But the picture is so dark, that I finished it at the end, because I often draw it too bright in the beginning so that I have to darken it in the end...
- Almost every time I print the reference picture two times, because I don't like to look at a grid the whole time.
- In this example the grid is "everywhere" in the beginning, but most of the time I draw the grid where I need it. You can use a whole grid for a very dark picture like this, but if you use a reference with many white or bright areas it's almost impossible to let the lines or some remains disappear.
- You can also use the grid method without step 2 and just draw everything properly with the grid (I just use it for important outlines and then I try to draw everything else without grid).
- This picture is very dark, so I used a marker base layer almost everywhere. Most of the time I just use it only for a few parts.
Time: maybe something about 25 hours?
Related content


Comments: 94

I just LOVE that you include the steps, not only visually but also textually! that is amazing and gives a really unique insight in all the work behind such a beautiful picture. amazingly good work here ( and loads of other places in your gallery!)
👍: 0 ⏩: 0

")

I keep wondering what magic you put in every masterpiece... Thank you so much for these tutorials even though I can't do it so wonderfully. I so admire your works!!
👍: 0 ⏩: 1


Mine always get stuck around step 10 (mine don't look as accurate though) and the colors are so flat.
Great advice. It's also so mesmerizing to see your process and watch a sheet of paper become something so lively. Those colors just pop and there is so much depth.
👍: 0 ⏩: 1


Eine sehr gute Schritt-für-Schritt-Anleitung! Obwohl das Rastern und die 180°-Drehung zu den Verfahren zählen, die die alten Meister anwandten, um eine Vorlage ggf. zu vergrößern und allemal getreu zu übertragen, neigen diese sogenannten Tricks anscheinend dazu, immer wieder der damnatio memoriae anheimzufallen, müssen sie ja des öfteren aus der Mottenkiste hervorgeholt werden, auf daß werdende Künstler ihre Kunst vervollkommnen können
Darf ich fragen, mit welcher Papiermarke Du die besten Erfahrungen gesammelt hast?
Traditionell arbeite (vielmehr arbeitete, da ein Augenleiden mir inzwischen in die Quere kommen ist) ich mit Bleistift, Grafit, Kohle, Künstlerfarbstifte und weiche Pastelle. Marker, Gel-Pens und andere neue Materialien besitze ich keine. Sie liegen finanziell jenseits von Gut und Böse, erst recht eine Digitalkamera, ein Flachbettscanner oder ein Umtausch von PC und Wacom Intuos A3-Grafiktablett (beide anno 1998 zugelegt und mittlerweile hoffnungslos veraltet), da ich inzwischen durchaus unfreiwillig zu den Havenots gehöre. Schlimmer kann's eh nur noch werden, wenn mein Augenlicht sich verabschiedet.. Ha-ha-ha. Manche Leute finden das tatsächlich erheiternd. Ach, was soll's.
 (Wink)")
👍: 0 ⏩: 1

Danke schön! Das Witzige ist auch, dass ich (bis auf die "Rastermethode") alle Tricks von alleine rausgefunden habe. Evtl. werde ich wohl noch ein Tutorial mit diesen und einigen weiteren nützlichen Tricks zusammenstellen.
Die besten Erfahrungen in Bezug auf Farstift und mixed media Zeichnungen habe ich mit extrem alten Ursus Zeichenpapier gemacht. Es ist wirlich relativ alt, da ich den A3 Block damals noch zu Schulzeiten gekauft habe. Vor ein paar Monaten habe ich versucht das Papier nachzubestellen, doch leider hat sich die Qualität im Laufe der Jahre extrem verschlechtert. Ich bin also auf dem Suche nach einem brauchbaren Ersatz, da mir so langsam die Blätter ausgehen (ich verwende das gute Papier nur noch für aufwändige Projekte).
Der Preis eines weißen Gelstifts hält sich glücklicherweise in Grenzen (Ersatzminen sind relativ günstig), doch die Preise für die Copics liegen wirklich jenseits von Gut und Böse.

👍: 0 ⏩: 1
Das mit der sich verschlechternden Qualität ist wirklich ein Übel. Nicht allein beim Künstlerbedarf, sondern wahrlich quer durch die Bank. Das Wort "Qualität" bei dem immer öfter minderwertigen Zeug, das zu überhöhten Preisen angeboten wird, mag ich schon gar nicht mehr in den Mund nehmen! ))):-.
Hinsichtlich hochwertigen Papiers u.a. könnte "Dickblick" in den USA noch zu den ersten Adressen zählen. Ich habe dort früher (vor der Vernichtung meiner Existenzgrundlage als Selbständige) nahezu alles online dort bestellt. Die stets prompt mit FedEx gelieferte Ware war jedesmal ebenso erstklassig wie das hervorragende Service. M.E. haben sie auch kostengünstige Proben. Ist bei ihnen alles beim alten geblieben, dürfte eine E-mail-Anfrage umgehend beantwortet werden. Boesner, obwohl mit einer Niederlassung unweit meiner damaligen Wohnstatt vertreten, war in mancherlei Hinsicht keine Option.
Vielleicht könnte die Rennleitung von DeviantArt bezüglich Papier vs. Dickblick mit einem guten Tipp oder slnstwie behilflich sein. Denn eins steht fest: Zeichner brauchen Papier, PC hin oder her!
P.S.: Zeichnest Du auch en plein air, vor der Natur? (D.h., wenn Petrus besser gelaunt ist als momentan…)
👍: 0 ⏩: 1
Ja, es wird wohl immer weniger auf Qualität geachtet. Ich habe auch noch ein paar sehr alte Faber-Castell Bleistifte (die sind eher grün und nicht dunkelgrün). Die sind wesentlich besser als die, die man jetzt so kaufen kann. Dennoch versuche ich die neuen zu benutzen, auch wenn sie mir manchmal etwas bröckelig erscheinen.
Ok. Danke für den Tipp. Hier in meiner Nähe gibt es noch nicht einmal Boesner. Da werde ich aber wohl zuerst nachschauen. Mal sehen ob ich demnächst nach Hamburg, Berlin oder Hannover komme...
P.S.: Ich hatte vor vielen Jahren mal ein Skizzenbuch für so etwas. Momentan versuche ich einfach nur meine Technik zu verbessern, also benutze ich nur Referenzfotos. Im Moment würde mein Skizzenbuch wahrscheinlich mitsamt Stiften draußen wegfliegen!
👍: 0 ⏩: 1
Hamburg wäre für mich am nächsten, 120 km hin, dito zurück. Per Pedale, versteht sich. Zurzeit der garstigen Witterung wegen undenkbar, zumal die Strecke nur bis Lübeck mir vertraut ist und ich mich um und in HH gar nicht auskenne. Nächstes Jahr eventuell, wenn die Tage länger sind, der Wettergott einigermaßen gut gelaunt ist und ein neuer Job mir das eine oder andere Extra gestattet.
Zum Postscriptum: Dein Skizzenbuch würde Dir draußen momentan sicherlich mitsamt Stiften und Zeichnerin wegfliegen!!!
👍: 0 ⏩: 0


I haven't been commenting cos I don't want to flood your inbox, and I totally would. But to share like this! Seeing the process is an unbelievable experience. Thank you!
👍: 0 ⏩: 1
No problem! My inbox is flooded all the time anyways! XD Thank you!

👍: 0 ⏩: 0

Oh wow, I would never have thought of the marker layer under the pencils. I haven't used pencils as much as I really should but when I did I was so fed up of the grainy white bits coming through even with tons of blending the with the colours and even colourless blending pencils. Thanks for the huge insight, I'll need to order some of the markers to try out now as I'm really hoping to do more coloured pencil works both this year in college and in my spare time. Do you have any go to colours you could recommend?
👍: 0 ⏩: 1
Thank you! I'm always happy when my tips are some kind of helpful!
This method really saves a lot of time. Thatt problem with these white bits is very annoying and it takes a lot of time to get rid of these white spots. It's possible (with good paper), but still very annoying.
I don't understand the last sentence. 
👍: 0 ⏩: 1
No, thank you for sharing. I totally love seeing wip things on here, everyone is so helpful and willing to give tips on how to improve. Yeah I tried a few different papers but even with the really good stuff I found there were still more of the white spots than I would have liked.
Lol, no problem, I maybe worded that a bit weird. I was wondering if you had like favourite colours that you found were better than others or went especially well when combined with the pencils? I've seen alot of artists using the faber-castell polochromos lately, I've got a large set of Prismacolor pencils my parents got me as a birthday present a few years back so hopefully they'll work just as well when combined with some markers.
👍: 0 ⏩: 1
No problem!
Yes, I know how difficult it can be to find the perfect drawing paper... still haven't found it. I have some very old drwaing paper, but I can't buy it anymore.
Ok. That was my third guess!^^ I have some favorite colours: black, white, all warm + cold greys and for portraits additionally light flesh, cinnamon, venetian red, walnut, nougat. Copics: 100, 0, W1-10, E50, E51, E53, E33. These are the pencils I use the most.
👍: 0 ⏩: 1
Awww, that totally sucks you can't get the same brand anymore. I hate when that happens ")
Cool, thanks so much. My first student loan payment is officially in the bank this morning so I think I'm gonna treat myself to some new art supplies, might not use them as much for college work as I do for my own stuff at home, but at least I can legitimately say I used my funds for art supplies XD
👍: 0 ⏩: 1
The worst is that I can still buy the exact same paper from this brand. But the quality changed so much. It's much more granier than before. 
You're welcome! I noticed that I forgot the most important Copics for me. C0-10 (they are great for almost everything and better than W0-10).
I know this "problem". Have fun! XD
👍: 0 ⏩: 0

You are spectacular!!!! No words.  (Smile)")
👍: 0 ⏩: 1

Thank you very much!
👍: 0 ⏩: 0


wow this is amazing and this is really helpful! great work, keep it up.
👍: 0 ⏩: 1

Your process is amazingly detailed! Thank you for sharing.
👍: 0 ⏩: 1
Thank you! No problem!

👍: 0 ⏩: 0

Just curious, in number 5 doesn't the markers smudge the pencil outlines? I have had that problem once and since then I am paranoid about using markers over pencil, and even bought a grey multiliner to substitute the light pencil shadings. So I was just wondering how you managed to do a marker base over pencil lines without any smudges? Gorgeous drawings by the way, and ingenious use of mixed media; polychromos I find works better with a base under it instead of on the paper directly
👍: 0 ⏩: 1
No, I erased the pencil lines in number 4 (it was very hard to take a picture of this and to edit, because it's almost a blank sheet
Thank you!
👍: 0 ⏩: 1
Ah yes that will be hard to document because it has to be a rather fast job else you forget where to shade and all")
👍: 0 ⏩: 1
Oh, that doesn't sound very good. I managed to darken my lighter Copics with black Copic (I accidentally smudged a black area with a lighter Copic...), but luckily after a few lines they drew like before. These markers really cost an arm an a leg... and sometimes the Copic Ciao markers don't last very long. I hate that!
No problem! Good luck!
👍: 0 ⏩: 0


my reaction when I first saw this:
1.- Let´s see
2.- hmmm
3.- wut?
4.- wait....
5.- what?
6.- No, way
7.- Come.......
8.- ON!!!
9.- This can't
10.- Be real
11.- No! wait......
12.- It is!!!
You are so talented. I mean....... I want to kiss your hands, ok no that was too much hahaha
Sorry for my bad english.
Have a nice day, darling
👍: 0 ⏩: 1
Omg... this comment made me laugh so hard! LOL!
Thank you very much!
👍: 0 ⏩: 0

The upside down tip is fantastic! I should've thought it before.
Only one question, are you using watercolor paper? I remember you mentioned it blends copics very well, I suppose it is because of the g/m but I need to ask.
Marvellous tutorial, and wonderful model
👍: 0 ⏩: 1
Thanks! I discovered this simple trick by accident! It can be very, very useful!
I only use watercolour paper for some of my marker drawings (my two latest marker drawings) and (in the future) for watercolour. It's not suitable for mixed media drawings, because colored pencil doesn't work so well and you can't draw so much details. For this mixed media drawings I still use my very, very old "Ursus sketch pad". A few weeks ago I bought the same paper from the same brand, but sadly the quality changed over the years (I tried it with "Loki in Prison 3")... So when you see "Paper DIN A4 190g/m²" in one of my descriptions it's my old drawing paper.
Thank you very much!
👍: 0 ⏩: 1
Oh, so sad the quality is different, you must treasure your old paper then
I'm excited to see watercolor works from you, I like watercolor very much. Thanks for the tips, they are very useful
Hae a nice weekend


👍: 0 ⏩: 1
Yes, I save it for my favourite reference pictures (~20 sheets are left...).
No problem!
Have a nice weekend too!
👍: 0 ⏩: 0

Thank you for taking the time to share this tutorial! It's not only useful, but also very interesting to look at!
👍: 0 ⏩: 1

| Next =>